Surveys - introduction
From LimeSurvey Manual
(Redirected from Creating surveys - Introduction)
General
A survey includes, via different interconnected databases: languages, questions, question groups, question attributes, sub-questions, answers, default answers, assessments, and quota settings. To facilitate the surveys management, the survey group functionality (New in 3.0 ) was recently added.
Surveys
There are two ways to reach the create a new survey page:
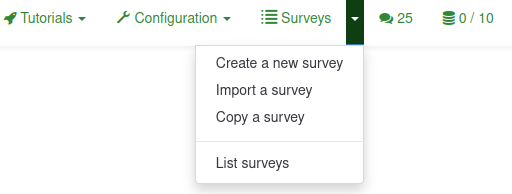
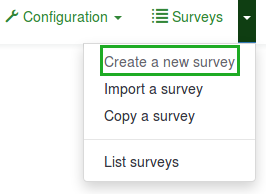
1. The first way is to click the arrow next to Surveys located on the main toolbar of your LimeSurvey installation home page. A drop-down list will be displayed. From the drop-down list choose Create a new survey.
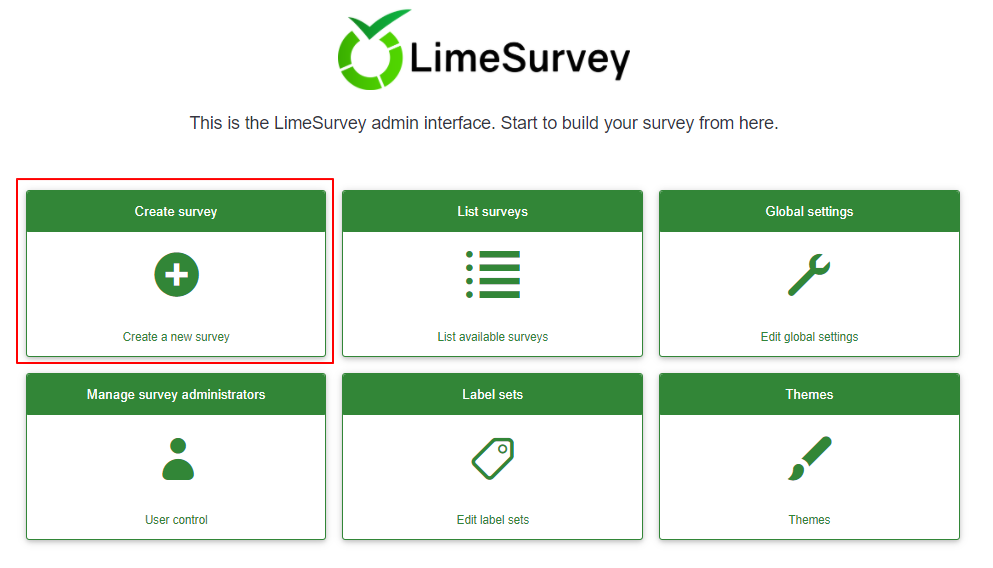
2. The second way is to click the Create survey box on your LimeSurvey installation home page.
The Create a new survey page will be displayed.

Create a New Survey
On the Create a new survey page:
(1) Enter the Survey title.
Note: The Survey title field is required. The remaining fields are optional. For a detailed explanation of each field, please refer to the Text Elements section below.
(2) Click Save (In the top-right just below your Username).
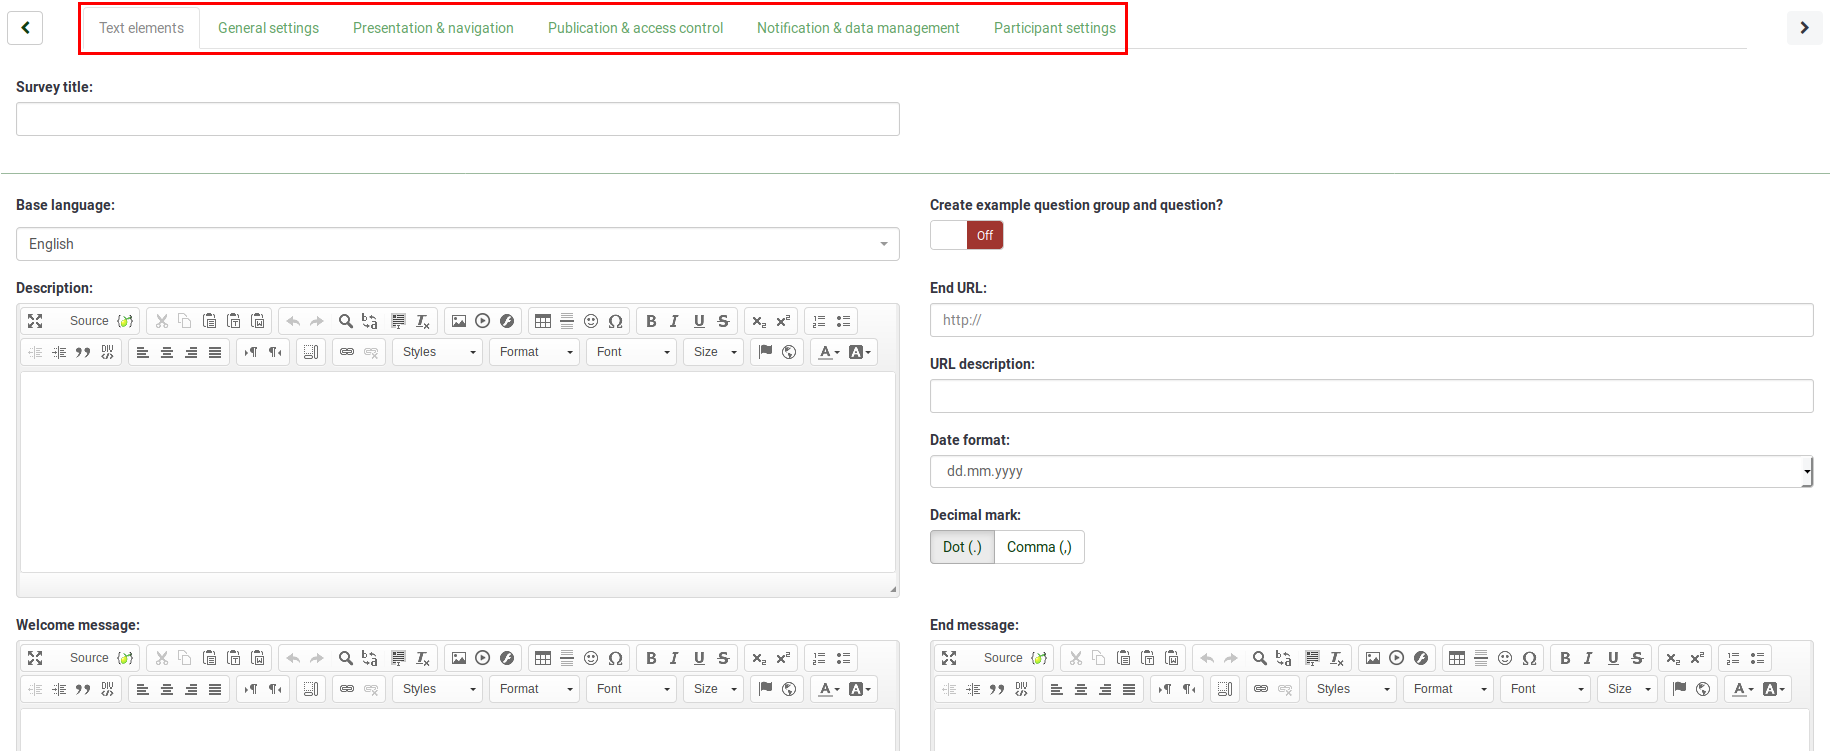
To optimize your survey, check the options available under each tab located on the Create a new survey toolbar:
- Text elements
- General settings
- Presentation & navigation
- Publication & access control
- Notification & data management
- Participant settings
Text elements
The following options are located under the Text Elements tab:
- Survey Title: The title of the survey can be changed from this field.
- Create example question and question group?: (New in 3.0 ) If enabled, an example question and question group will be added to your survey by default when you create a survey. This example question and question group will be displayed when the Save button is clicked to create the survey.
- Base Language: This represents the main language of the survey. If you wish to add other survey languages, first create a survey, then access the general settings of the newly created survey and add additional languages.
- Description: You can type in a survey description. If enabled from the global settings, you can use the HTML editor to better customize the description field.
- End URL: You have the possibility to redirect users to another page when they finish filling out the questionnaire. If you wish to redirect them, type in the URL and activate the automatically load URL option that is located under the Presentation & navigation tab.
- URL Description: A short end URL description can be added in instances where the user is redirected to a non-related survey webpage. It may help if the survey administrator adds notes relating to the usage of the respective URL.
- Date Format: This option is important when you want to record timestamps together with the survey participants' answers. If you click on it, a drop-down list will show up with a several date formats. Choose the date format used in the geographical location of your respondents. Do not forget that different date formats are used across the world. For example, it is recommended that you use a different time format if your questionnaire focuses on the US market (mm-dd-yyyy) and not on the British market (dd-mm-yy).
- Decimal Mark: Two options are available: dot (.) and comma (,). Choose the one that fits the place (the geographical location) where you conduct your study (e.g. US vs Germany).
- Welcome Message: Type in a message that will welcome the survey participants when they access your survey link.
- End Message: Type in a message that will be displayed to the survey participants once they finish the questionnaire. If the end URL field is automatically loaded, the end message is no longer displayed.
General settings
The following options can be found under the General Settings tab:
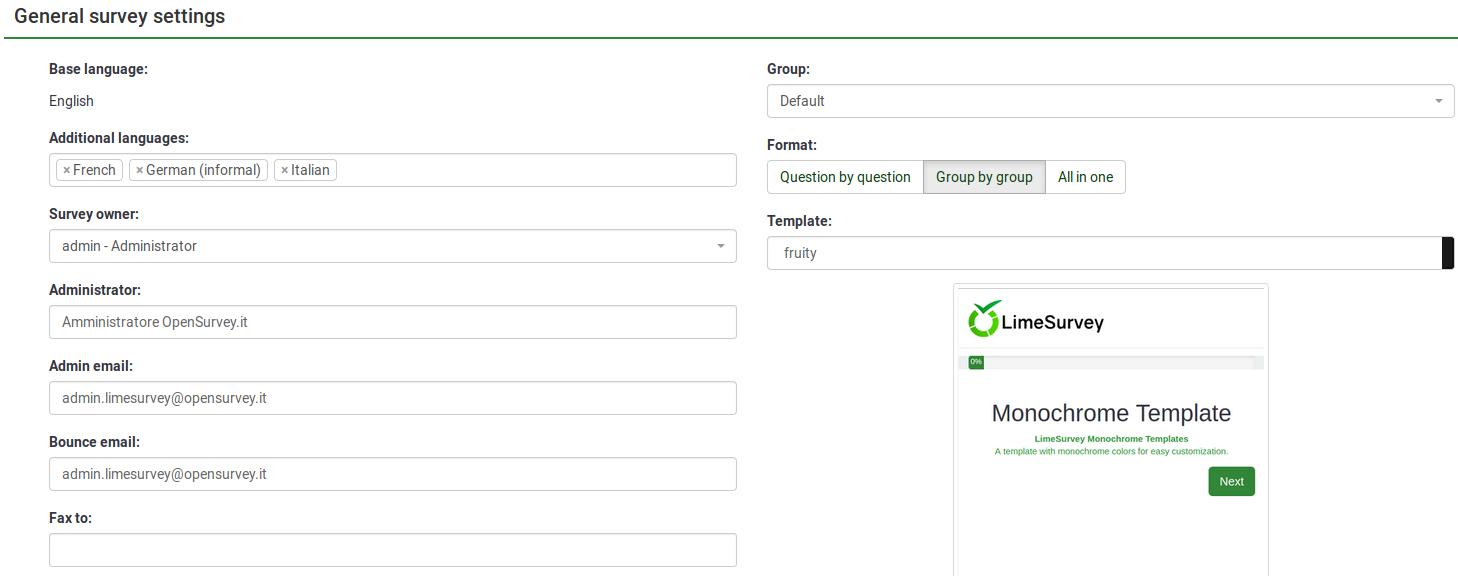
- Survey Owner: Type in the real name of the survey owner.
- Administrator: The name of the administrator.
- Admin Email: Type in the email address of the survey administrator.
- Bounce email: This is the email address where the delivery error notification emails (bounced emails) will be sent to.
- Fax To: This field is used to print a fax number on the "printable survey" - i.e.: when you want to send someone a hard copy because he or she cannot use the online survey.
- Group (New in 3.0 ): Select the survey group that the newly created survey should be added to.
- Format: This function allows you to choose the way in which the questions will be displayed to the survey respondents. Three options are available:
- Question by Question : The questions will be displayed one by one (one question per page). If this option is chosen, a separate "welcome" page and "end" page will be displayed when taking the survey.
- Group by Group : Each survey page will display a question group. Also, a separate "welcome" page and "end" page will be displayed when taking the survey, as with the "Question by Question" surveys.
- All In One : If chosen, all the pages will be displayed on a single page. If you select this option, no separate pages will be displayed for the "welcome" and "end" pages - they will all appear on the same page, together with the questions.
- Template: The default template is rather simple, but functional. More information on creating your own templates is available here.
The following options can be found under the Presentation & Navigation tab:
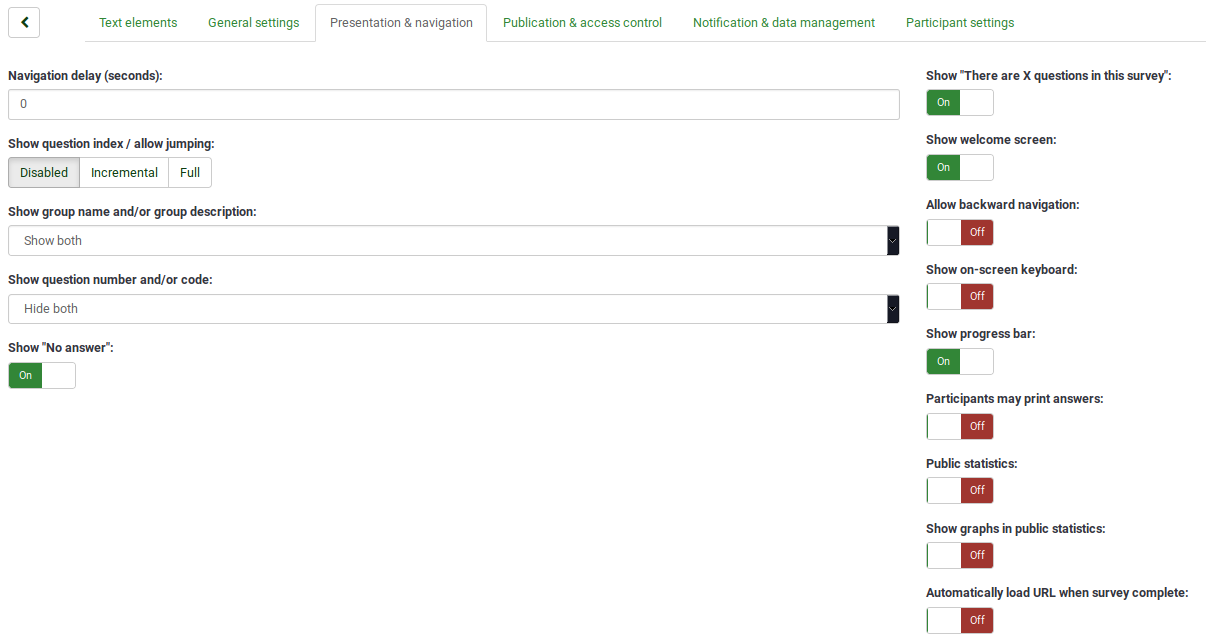
- Navigation Delay (Seconds): This feature displays the number of seconds before the previous, next, and submit buttons are enabled. If none is specified, the option will use the default value, which is "0" (seconds).
- Show Question Index / Allow Jumping: A question index can be displayed in the survey if this function is enabled, allowing the user to jump from one question group to another. You can choose the following:
- Disabled : If this option is selected, no index is shown in the survey.
- Incremental : If this option is selected, the question groups will be shown incrementally in an index menu located on the survey page. You are allowed to "jump back" only to the question groups that were previously visited/accessed.
- Full : Jumping from question group to question group is allowed via the index menu.
- Show "There Are X Questions In This Survey": This shows the total number of questions in your survey.
- Show Group Name and/or Group Description: This function allows you to choose whether your survey will show participants the question group name only, the group description only or both. You may also choose to hide both.
- Show Question Number and/or Code: This function allows you to choose whether your survey will show participants the question number only, the question code only or both. You may also choose to hide both. Please note, the question number is shown the moment someone starts the survey, while the question code is shown next to each survey question.
- Show "No Answer": When a "radio button" or "select type" question that contains editable answers (e.g.: List & Array questions) has the Show "No Answer" option enabled and it is also not mandatory, an additional entry "No Answer" is displayed for each question/sub-question. In this way, the respondents may choose not to answer the respective question/sub-question. The following two options are available for survey administrators:
- On : If this option is selected, the respondents can choose the "No Answer" option for a non-mandatory question.
- Off : If selected, the "No Answer" option will not be displayed as a possible answer for any non-mandatory question.
- Show Welcome Screen: If turned off, the welcome text message will not be displayed at the beginning of the questionnaire.
- Allow Backward Navigation: If enabled, this will allow the users to navigate backwards and change his or her previous answers.
- Show On-Screen Keyboard: If turned on, an on-screen keyboard will will be displayed when answering questions that require typing in information.
- Show Progress Bar: When enabled, this function displays a progress bar that shows participants how much of the survey they have completed and how much is left to be completed.
- Participants May Print Answers: If turned on, the survey participants may choose at the end of the survey to print their answers.
- Public Statistics: A link to a set of statistics will be shown at the end of the survey if this option is enabled.
- Show Graphs In Public Statistics: If enabled, graphs will also be shown in the Public Statistics at the end of the survey. Please note that the "Public Statistics" option has to be enabled to allow the survey participants to see the graphs.
- Automatically Load URL When Survey Complete: The end URL becomes a redirect link once the survey is completed if this option is turned on.
Publication & access control
The following options can be found under the Publication & Access Control tab:
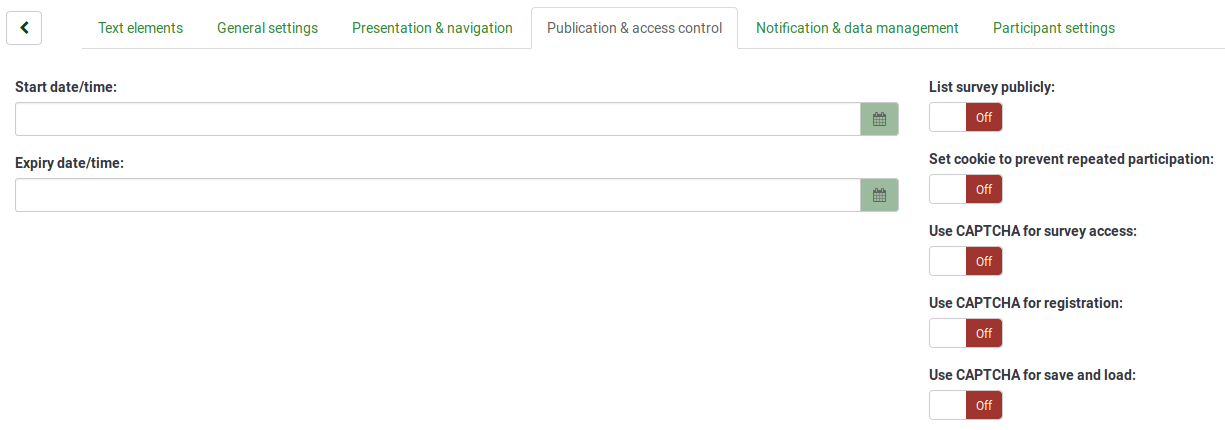
- Start Date/Time: This is the date/time the survey starts.
- Expiry Date/Time: This function allows you to choose a date for your survey to expire. This is the last date on which the public survey script will let people participate. (Example: If you set the expiry date for the 31st of December, then people will no longer be able to fill out the survey on the 1st of January). To remove an expiry date, just clear the date from the input field.
- List Survey Publicly: The default value is "No". When it is set to "Yes", your survey will be listed in the "Available Surveys" portal where it can be seen by all LimeSurvey users.
- Set Cookie to Prevent Repeated Participation: If this is turned on, a survey participant will be blocked from completing a survey a second time.
- Use CAPTCHA for Survey Access: In order to access the survey, a CAPTCHA code has be typed in by the survey participant.
- Use CAPTCHA for Registration: In order to register for the survey, a CAPTCHA code has be typed in by the survey participant.
- Use CAPTCHA for Save and Load: Enable this function if you want a survey participant to type in a CAPTCHA code when he or she loads the survey again after only a part of it was completed (to prevents automated responses).
Notification & data management
The following options can be found under the Notification & Data Management tab:
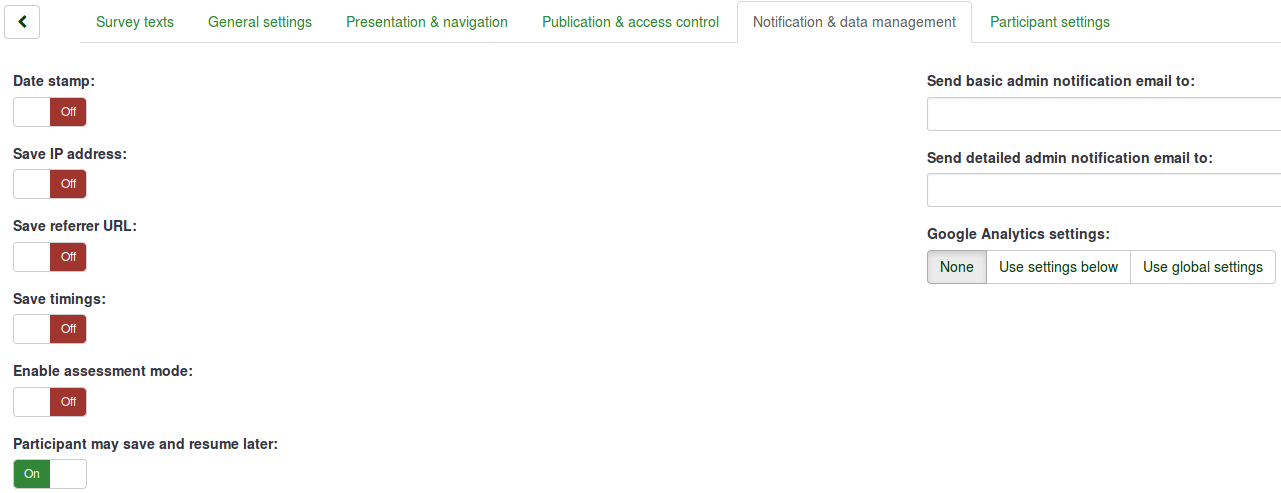
- Date Stamp: Enable this functionality if you would like to see the time when the answers were submitted.
- Save IP Address: If "yes" is selected, the IP address of the survey respondent will be stored together with his or her answers.
- Save Referrer URL: If "yes" is selected, the referrer URL will be stored together with the answers.
- Save Timings: If this functionality is enabled, the time spent on each page of the survey by each participant is recorded.
- Enable Assessment Mode: You can enable/disable assessments for this survey with this setting.
- Participant May Save and Resume Later: This setting allows a participant to save his/her responses and resume the survey at a later time. Please note that this is most useful with open surveys or surveys in which the participants are anonymous. If you are using tokens and the survey is not anonymous, in most cases it is better to activate token-based response persistence from the Participant settings panel.
- Send Basic Admin Notification Email To and Send Detailed Admin Notification Email To: These two functions allow you to send notifications or survey responses to any email address once the survey is submitted. You can edit the templates for these emails from the Email templates menu. You can choose the option to send emails to multiple recipients simultaneously by separating the email address entries with a semicolon (;) (e.g "yourname@test.com; myname@test.com; hisname@test.com" or (if using placeholders) "yourname@test.com;{INSERTANS:82733X12X73};{TOKEN:EMAIL}").
There are different ways for entering an email address:
- Enter a specific email address (ie: yourname@test.com).
- Enter a SGQA code and the response will be sent to an email address entered as an answer to that particular question (use the format {INSERTANS:9999X88X12} in the same way you would reuse information from previous answers).
- The following is only possible if your survey is not anonymous. Enter a token code and the response will be sent to an email address retrieved from a token field. Use the format {TOKEN:EMAIL} or {TOKEN:ATTRIBUTE_1} in the same way you would re-use Information from the Survey participants table.
- Google Analytics Settings: If you would like to get details about the survey web traffic, use Google Analytics. Three options are available:
- None : Google Analytics will not be used.
- Use Settings Below : If this option is chosen, the survey owner can type in his or her Google Analytics Tracking ID to be stored only with the respective survey. You also have the ability to choose one of the three Google Analytics styles.
- Do Not Use Google Analytics - so {GOOGLE_ANALYTICS_JAVASCRIPT} is an empty string.
- Default Google Analytics - {GOOGLE_ANALYTICS_JAVASCRIPT} uses the standard Google Analytics code, inserting the proper Google Analytics Key.
- SurveyName-[SID]/GroupName - {GOOGLE_ANALYTICS_JAVASCRIPT} contains customized Google Analytics code to log the URL as {SURVEYNAME}-[{SID}]/{GROUPNAME}. This can be helpful if you want to analyze navigation paths through your survey, time spent per page, and drop-off rates per page.
- Use Global Settings : If this option is chosen, the survey will use the same Google Analytics Tracking ID as the one saved in the global settings and then you choose the desired Google Analytics style.
Participant settings
The following options can be found under the Participant Settings tab:
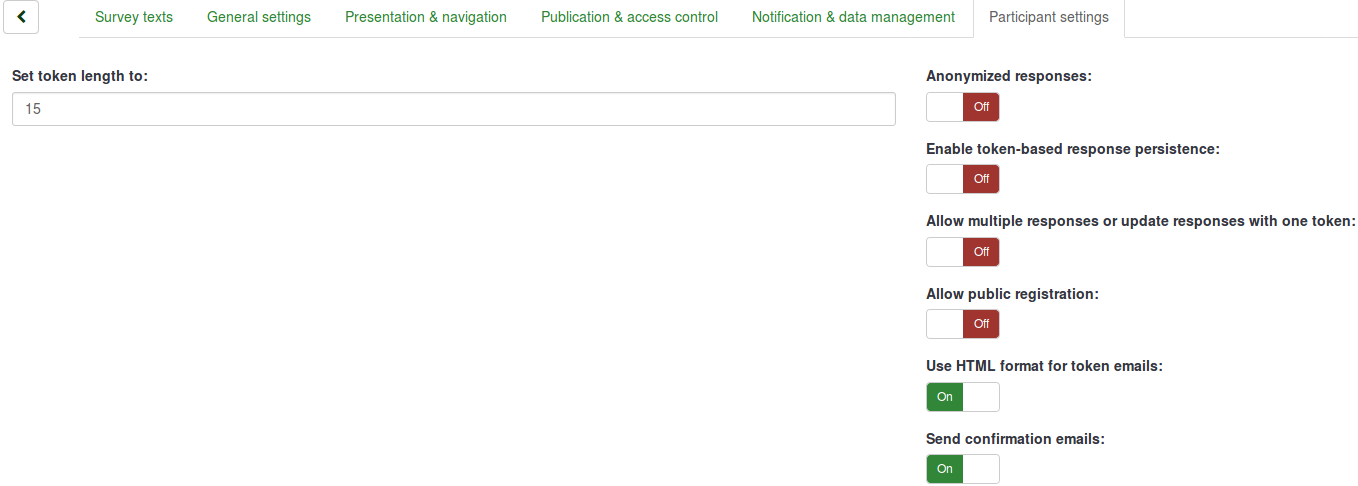
- Set Token Length To: Usually, the default value of 15 digits does not need to be changed (the maximum supported value is 35). However, if you wish to change this setting, please enter a number (X) which is greater than 5. If the number entered is less than 5, it will be converted to the default value of 15. When generating tokens, all tokens will use a length of X digits.
- Anonymized Responses: This functionality allows you to determine whether responses to your survey are matched with information from the Survey Participants table (utilized in the respective survey) or are kept "anonymous". The default is "No". If you choose "Yes", then your survey is set to anonymize responses - there will be no way to connect answers and participants. Even the survey administrator will not be able to link response data and participant/token data. However, you will always be able to specifically view each response entered by your participants in the survey. Thus individual and anonymous analyses can still be done.
- Enable Token-Based Response Persistence: If your survey uses tokens and your responses are not anonymized, you may want to enable this feature. If you enable this feature, your participants will be able to leave the survey and resume later at any time without using the Resume Later function - for example, when they get distracted or their browser crashes. Upon clicking the invitation link again, they will be returned to the point in the survey where they left off with previous entries saved.
- Allow Multiple Responses or Update Responses With One Token: If this option is activated, participants will be able to return to their survey by clicking the invitation link, even if they have already submitted the survey. If the survey is anonymous or "Enable Token-Based Response Persistence" is set to "No", this will add a new response. If the survey is not anonymous and "Enable Token-Based Response Persistence" is enabled, the user will update the existing responses.
- Allow Public Registration: If you use tokens to control access to your survey, the only people who can use the survey are those who have an entry and a unique token code allocated in the Survey participants table. If you would like to use tokens, but also allow public registration, set this to "Yes". The "Yes" setting will allow visitors to register his or her name and email address. The script will create a new entry in your Survey Participants table for this person, then send them an invitation email. The script will ensure that only one person per email address can complete your survey.
- Use HTML Format For Token Emails: When enabled, all emails sent by the token management interface (invite, reminder, confirmation) will be formatted as HTML. You will then be able to use rich formatting for these emails. The default value is "Yes".
- Send Confirmation Emails: If enabled, the participant will receive a confirmation email that the survey was submitted.
Import a survey
You can import a survey from the Create, import, or copy survey screen.
(1) From the Surveys dropdown options (on the top toolbar of your Limesurvey homepage) select Import a survey.
(2) On the Import tab, click Browse and choose the file you wish to import.
(3) Click the Import survey button.

Choose from the following formats:
- .LSS files (XML-format created by LimeSurvey 1.90 or later);
- .LSA files (Survey archive which may include also token, responses and timings - available since LimeSurvey 2.0);
- .TXT files (Text-format created by Excel - available since LimeSurvey 2.0);
- .CSV files (Created by early LimeSurvey versions from 1.50 to 1.90).
The import function "intelligently" re-numbers the survey, groups, questions, answers, and condition IDs so that they all match each other. No existing survey is going to be overwritten during the import process.
By default, the resource links and expression fields are also imported. Basically, the more advanced type of questions are going to be also imported along questions that include complex branching, assessments, validation, and tailoring.
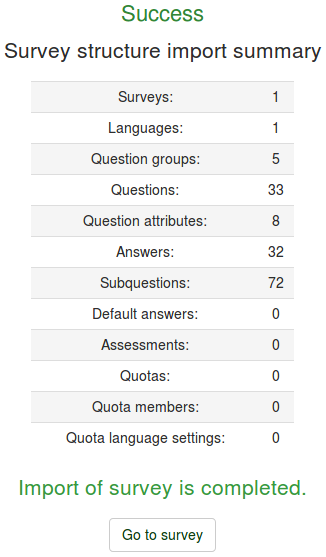
Once the import process is completed, a survey structure import summary will be displayed, showing whether it was successful or not:
Copy a survey
(1) Access your LimeSurvey homepage and from the Surveys dropdown options (on the top toolbar) select Copy a survey.
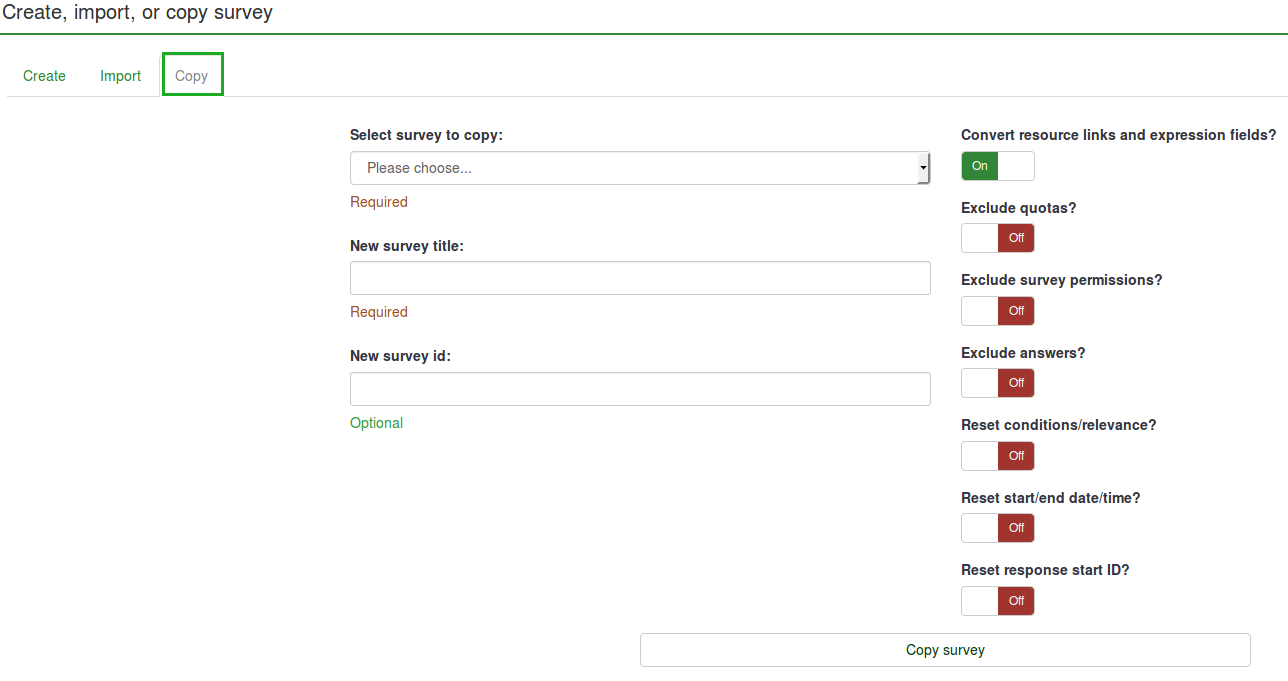
(2) From the Copy tab, choose the survey that want to copy from the Select survey to copy options.
(3) Complete the required fields and set preferred options.
(4) Once you are done selecting the preferred options, click the Copy survey button located on the bottom of the page. A survey copy summary will be displayed:
Copy Survey Fields:
- New survey title: Type in the title you wish the copied survey to have.
- New survey id: You can type in a new survey ID or leave the field empty. If the field is left empty, a survey ID will be automatically assigned.
- Convert resource links and expression fields: If you disable this option, the more advanced question types that use the expression manager will not be copied.
- Exclude quotas: The quotas are going to be excluded if this option is disabled.
- Exclude survey permissions: If enabled, no survey permissions will be copied into the new survey.
- Exclude answers: Exclude the answer options.
- Reset conditions/relevance: You can choose to reset the conditions that were set in the original survey.
- Reset start/end date/time?: You can choose to reset the survey start/end date/time.
- Reset response start ID?: Each response has a corresponding ID. If enabled, the ID of the responses will be reset. However, bear in mind that it is better not to have an ID with two matching responses because it might influence the output of your survey.
Below is a screenshot of the Survey Copy Summary.
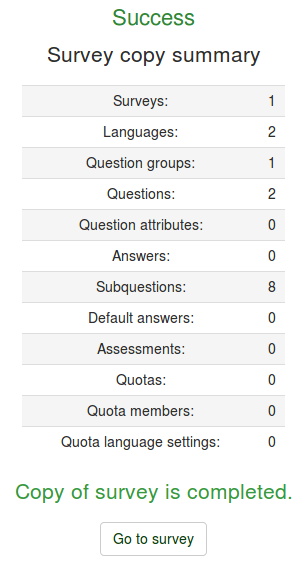
To access the copied survey, click Go to survey to be redirected to the settings of the newly added survey.
List surveys
There are now two ways to see a list of available surveys.
(1) From the Surveys options (on the top toolbar of your LimeSurvey homepage) select List surveys.
(2) Or click the List surveys box on your LimeSurvey homepage.

A list of surveys will be displayed.

- Survey ID: When created, the survey receives a unique id that is used to make the connection between different LimeSurvey tables.
- Status: Status of available surveys:
- Title: The title of the survey.
- Group: The survey group to which the survey belongs to.
- Created: The date when the survey was created.
- Owner: The name of the user that owns the survey.
- Anonymized responses: This shows whether the responses are anonymized when stored into the database or not.
- Partial: The number of surveys that were partially completed.
- Full: The number of surveys that were fully completed.
- Total: The number of partially and fully completed surveys.
- Closed group: This is either "Yes" (if a Survey participants table is used) or "No".
- Actions: The last column presents the actions that are available for each survey:

If you want to look for a specific survey, use the search bar and filter the results via the survey status field ("active", "active and running", "inactive", "active but expired", and "active but not yet started").
Delete a survey
(1) From the list of Surveys dropdown options (on the top toolbar of your LimeSurvey homepage) select List surveys.
(2) Select the survey(s) you wish to delete (by ticking the box to the left of the survey ID).
(3) Click on the Selected survey(s)... button located on the bottom-left side of the page.
(4) Select Delete.
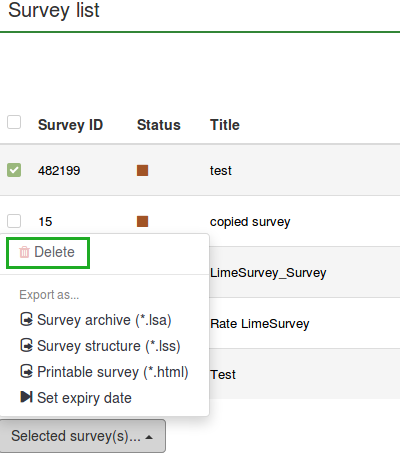
(5) When you click Delete, a confirmation window will appear asking you to confirm your action. Select Yes to confirm.
Export a survey
(1) From the Surveys dropdown options (on the top toolbar of your LimeSurvey homepage) select List Surveys.
(2) Select the survey(s) that you want to export by ticking the box to the left of the survey ID.
(3) Click the Selected survey(s)... box at the bottom of the list of surveys.
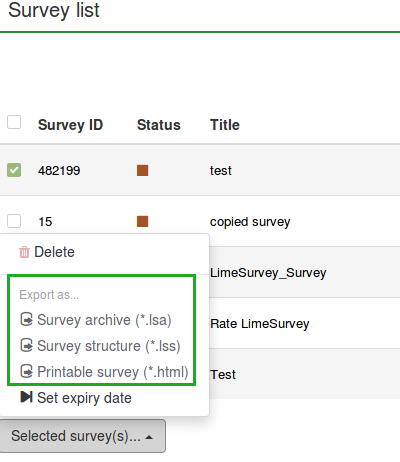
The following options are available:
- Survey archive (*.lsa);
- Survey structure (*.lss);
- Printable survey (*.html): This option allows you to export the survey in a printable format in order to be filled out "offline".
(4) Select the export file type that you want to export the survey as.
For more details, check how to export a survey structure.
Survey groups
(1) To access the survey group functionalities, click Surveys located on the main toolbar of the LimeSurvey home page.
(2) Then click the Survey groups tab:

A survey groups list will be displayed.
On this page you can:
- Create a survey group - located above the survey groups table;
- Edit a survey group - located on the last column (the green pencil icon);
- Delete a survey group - located on the last column (the red trash icon).
Create a survey group
To create a new survey group:
(1) Click Surveys located on the main toolbar of the LimeSurvey home page.
(2) Click the Survey groups tab.
(3) Click the Create a new survey group button located above the survey groups list.
(4) Complete the following fields and Save:
- Name: Type in the name of the survey group;
- Title: Type in the title of the survey group;
- Description: Type in a short description of the survey group;
- Order: Helps you organize the order of the survey groups within a parent group;
- Parent: Choose the survey group that will be the parent survey group. The parent group option is used to ease the edit of template-related options of a high number of survey groups via a few clicks.
To add surveys to the group:
(1) Go to the General settings tab of a survey.
(2) Click the arrow in the Group field to display a list of survey groups.
(3) Select the survey group and Save.
Edit survey group
The following options of a survey group can be edited:
- Surveys in this group;
- Settings for this survey group;
- Template options for this survey group (New in 3.0 ).
(1) From the top toolbar of your LimeSurvey homepage, click Surveys.
(2) Click the Survey group tab.
(3) Select the survey group that you want to edit, by clicking the edit icon under the Actions column.
The survey group will be displayed in edit mode.
Surveys in this group
If you click on the first tab, all the surveys from the respective group will be displayed.

This works as a filtering function, filtering out all the surveys not listed in the chosen survey group. You can now select the desired survey and start editing it. To see which survey-editing functionalities are available, check the list surveys section.
Settings for this survey group
The following fields can be edited from the Settings for this Surveygroup tab:
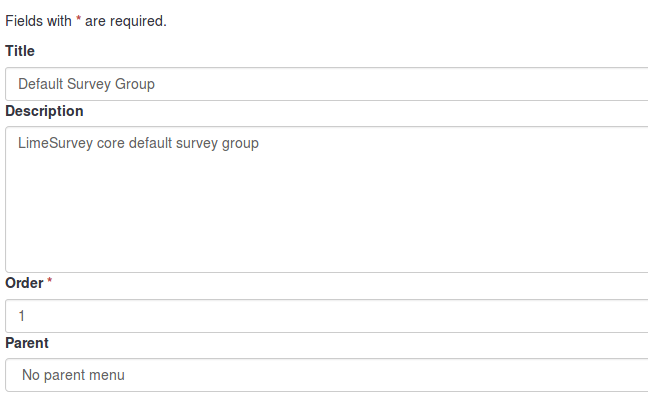
- Title: Type in the title of the survey group;
- Description: Type in a short description of the survey group;
- Order: Helps you organize the order of the survey groups within a parent group;
- Parent: Choose the survey group that will be the parent survey group. The parent group option is used to ease the edit of template-related options to a higher number of survey groups via a few clicks.
Template options for this survey group
The template options functionalities are present in LimeSurvey 3.0+. It offers a set of various options that allows you to quickly and easily change the templates-related settings of the surveys that belong to the same survey group:
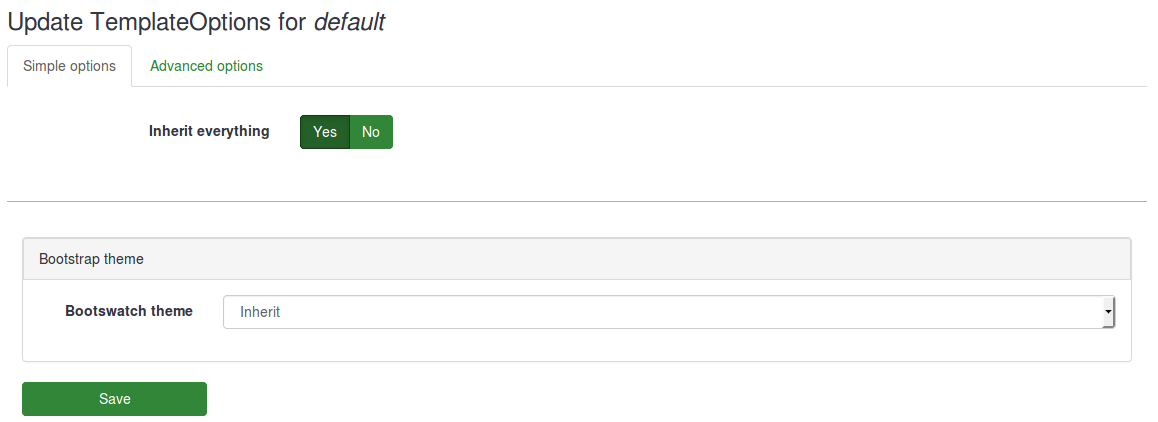
The Inherit everything functionality lets you decide whether you want the survey group to inherit everything or not from the parent survey group theme.
If you do not want this to happen, select "No". The following options will show up which will allow you to choose what should be inherited from the parent survey group theme:
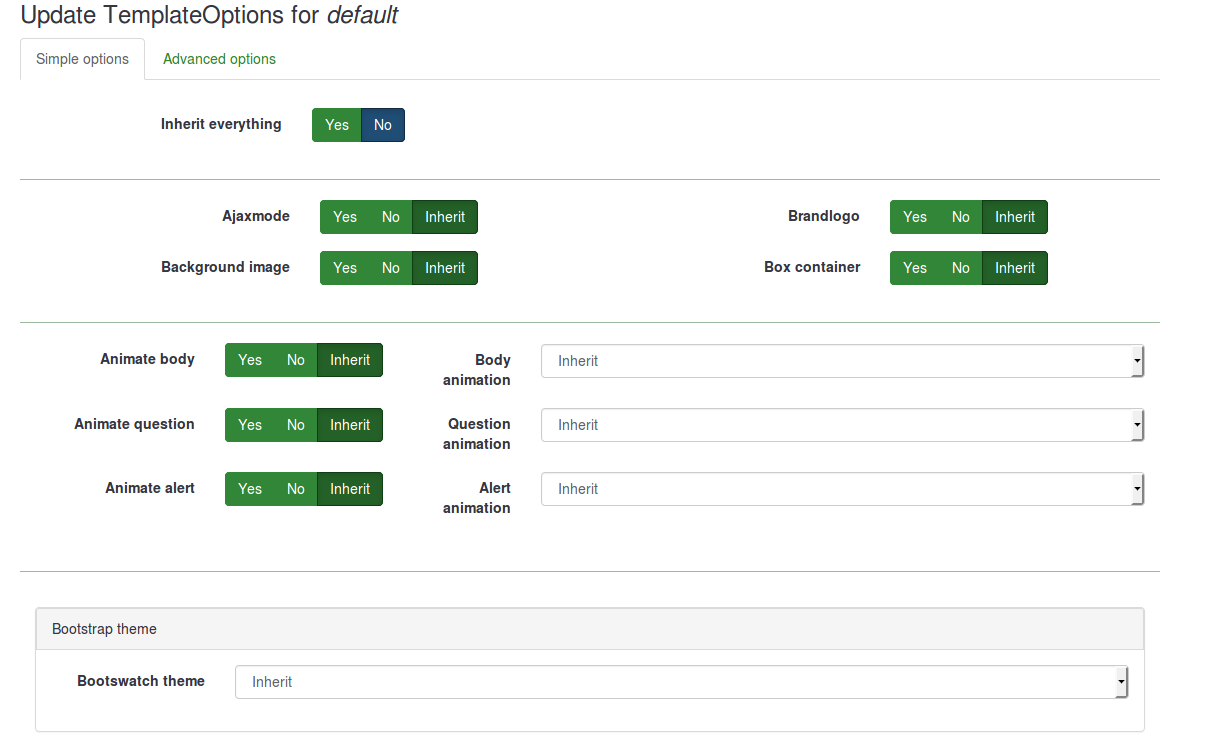
Below, you will see that you can choose a bootswatch theme for your survey group. Bootswatch themes can be used to quickly edit your templates. Basically, bootswatch is a collection of themed swatches which can be freely downloaded and dropped into your Bootstrap site. Some of these themes are already included into your LimeSurvey installation and they can be selected from the Bootswatch theme drop-down list.
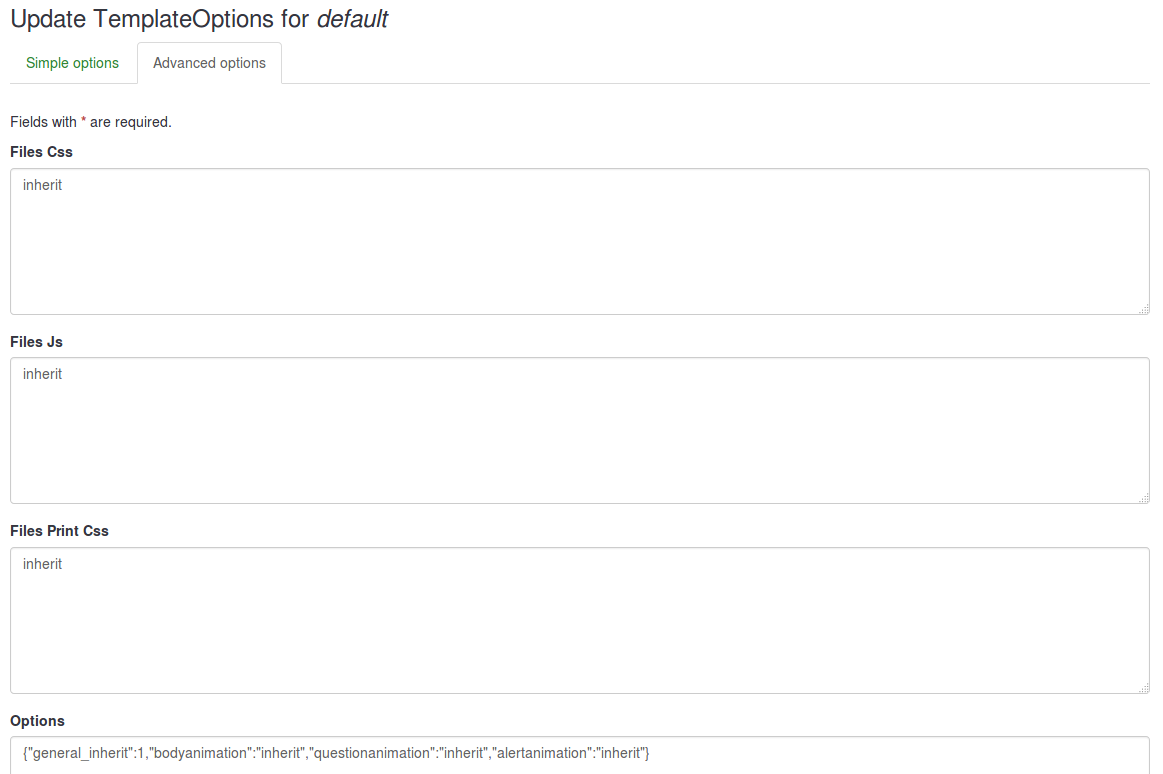
If you want to tweak more a survey group template options, click on the advanced option tab (recommended for advanced users):
Delete a survey group
(1) Display a list of your surveys. (From the Surveys tab on the top toolbar of your LimeSurvey homepage, click List surveys or click the List surveys box).
(2) Click the Survey group tab.
(3) Select the survey group you want to delete and click the Delete icon located in the Actions column.
(4) Confirm the deletion by clicking Yes.

