Gebruikersbeheer
From LimeSurvey Manual
Gebruikersbeheer
Met gebruikersbeheer kunt u extra beheerders toevoegen. In dit hoofdstuk noemen we ze gewoon 'gebruikers'. Verwar ze niet met deelnemers aan de enquête (ook wel respondenten genoemd).
Gebruiker toevoegen
Om een gebruiker toe te voegen, klik op Configuratie -> Gebruikersbeheer.
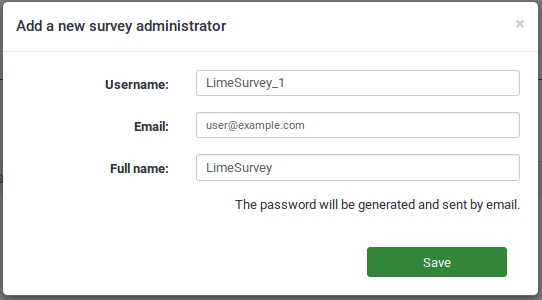
Klik daarna op Gebruiker toevoegen, dat staat rechtsboven de Gebruikersbeheertabel. Op een vervolgscherm wordt je dan gevraagd om:
- Enter the desired username into the Username text field.
- Enter the email address into the Email text field. Please note that:
- LimeSurvey sends out a confirmation email to the address entered into the Email field. This email address will be used as the standard contact email address for surveys created by the respective user.
- If you don't want the user to receive the confirmation email with a link to the LimeSurvey application, username, and password, you can use your own email address to send the confirmation email to you. After that, you can change the email address to the address of the user.
- Enter user's full name into the Full name text field. Please note that the full name entered here will be used as the standard contact person name for surveys created by the respective user.
- Click Save to create the new user.

You have now created your first user. To find out more about setting user permissions, please read on.

Zoals je hieronder kunt zien, zijn er 4 opties onder de kolom Actie waarmee je:

- edit the general aspects of a user - by clicking the pen symbol.
- delete the user from the survey administrators database - by clicking the wastebin button.
- set global permissions for a user - by clicking the lock symbol.
- set template permissions for a user - by clicking the pen-and-lock symbol.
Gebruiker wijzigen
Gebruik het pen-symbool om een gebruiker te wijzigen.
Daarna kun je het e-mailadres, de naam en het wachtwoord wijzigen. Om de wijziging(en) op te slaan klik op Bewaar.
Gebruiker verwijderen
To delete a user account, simply click on his or her corresponding wastebin button (located on the same line as the user account you want to delete) and click OK.
Globale rechten van een gebruiker instellen
Klik op het slot-symbool om de rechten van een gebruiker in te stellen.

The CRUD (create, read, update, and delete) system is employed (like in the survey permission settings). To fine-tune user permissions, we strongly recommend to extend the matrix using the double-right arrowhead, which is located in its upper right corner. If you check the first box, all the CRUD permissions in that row are automatically checked.

Nu kun je de volgende rechten instellen:
- Deelnemersdatabase: zie deelnemersdatabase.
- Labelsets: Het recht om labelsets te beheren (aanmaken, bekijken, wijzigen, verwijderen, exporteren en te importeren).
- Settings & Plugins: With this permission a user can check data integrity, save the SQL database to an .sql file, manage global settings, view the PHP info in the global settings, and manage all plugins.
- Surveys: Gives access to all surveys. To allow a user to only create and manage their own survey, give the user the 'create' permission. A creator of a survey is the owner of the survey and will always be able to manage it. Remember that each survey can grant different permissions .
- Templates: It allows the user to use all the available design templates and edit all non-standard templates. A person with this right should have sufficient knowledge in terms of HTML, Javascript, and CSS. If a user is not familiar with these things and is supposed to use a specific design template, it would be better to only give him 'read' permission. Each template can have specific permissions.
- Gebruikersgroepen: Het recht van een gebruiker om gebruikersgroepen aan te maken, te bekijken, te wijzigen en te verwijderen.
- Gebruikers: geeft de gebruiker het recht om eigen gebruikers aan te maken, te wijzigen, te verwijderen en maximaal zijn eigen rechten te geven. Andere rechten kunnen alleen door een Hoofdbeheerder ingesteld worden.
- Superadministrator: This permissions can only be added or removed by the user called admin and grants full permission to the whole LimeSurvey application.
- Use internal database authentication: This permission allows users to access LimeSurvey's panel via the authentication page (e.g. http://domain/admin/authentication/sa/login). If it is unchecked and the respective user tries to connect to LimeSuvey's panel, he will get the following error: 'Internal database authentication method is not allowed for this user'.
Sjabloonrechten van een gebruiker instellen
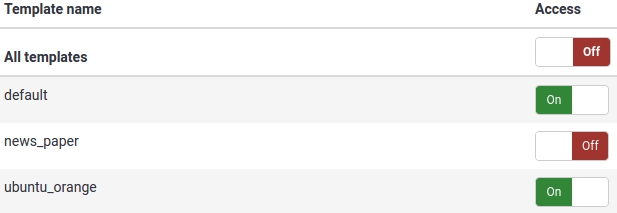
With template permissions, you can decide which design templates a user can select when creating or editing a survey. It might be a good idea to restrict the design templates a user can select in order to prevent unwanted use of design templates, which you might consider to not be suitable for a survey/questionnaire.
For example, if you have a specific design template for a group of users or customers, you might want to restrict their access to other templates to only make them use the template created for their purpose.
Klik op het pen-slotsymbool om de rechten van een gebruiker op een sjabloon te wijzigen

Select the design templates to which the respective user or user groups should have access. After you finished your selection or deselection, do not forget to hit the Save button: ![]() .
.
Bekijk voor een uitleg van deze functie de voorbeelden.
Wegwerpwachtwoorden gebruiken
Een gebruiker kan als beheerder inloggen (/limesurvey/admin) met gebruik van een gebruikersnaam en daarbij een wegwerpwachtwoord gebruiken. Hiervoor is de kolom 'one_time_pw' in de gebruikerstabel beschikbaar.
To enable this login method, the line $use_one_time_passwords = false; has to be set 'true' in config.php (it is 'false' by default) .
De URL moet de volgende waarden bevatten:
- user: de gebruikersnaam die gebruikt wordt om in te loggen op LimeSurvey. Deze moet bestaan!
- onepass: het wachtwoord dat opgeslagen ligt in de gebruikerstabel
Een geldige URL voor een login met een wegwerpwachtwoord ziet er zo uit:
Things to watch out for:
- To enable this login method, the line
$use_one_time_passwords = false;has to be settruein config.php (it is 'false' by default). - The passed username has to exist in LimeSurvey's users table.
- The one-time password (which can be set via an external application) has to be stored as MD5 hash in column one_time_pw of table users.
- (This should be ignored except "Both passwords have to match") The passed plain text password will be hashed using the sha256 function and will then be compared to the stored hash in column one_time_pw of table users. Both passwords have to match.
- After the first login with the one-time password, it gets deleted from the database. The user won't be able to log in anymore with that respective password a second time.
- My local LS system can't test the permissions with different accounts (my email password does not have a way to be connected).
Rechten voor een enquête instellen
Deze rechten gelden alleen voor een enquête. Gebruik globale rechten om de rechten over het hele systeem in te stellen.
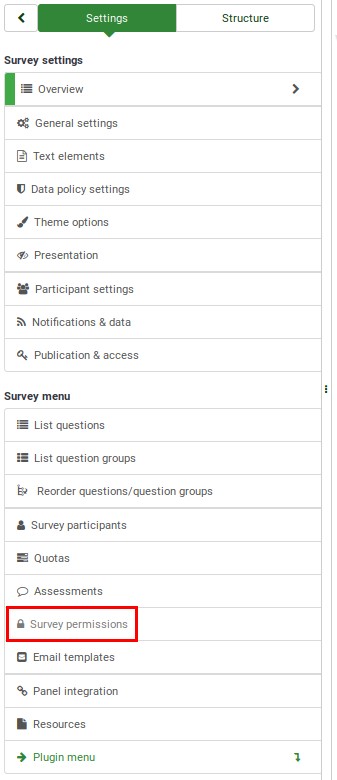
Om de rechten op een enquête te wijzigen dien je eerst het zij-menu Instellingen van je enquête te kiezen. Klik op Enquête-rechten en kies de gebruikers (of gebruikersgroep) waarvan je de rechten wilt instellen of wijzigen.


Rechten voor een gebruiker instellen
Kies daarna de gebruiker waarvoor je de rechten wilt instellen en klik op Toevoegen gebruiker.

Nadat je op Instellen enquête-rechten hebt geklikt, verschijnt een tabel met rechten voor de enquête van de gebruiker.

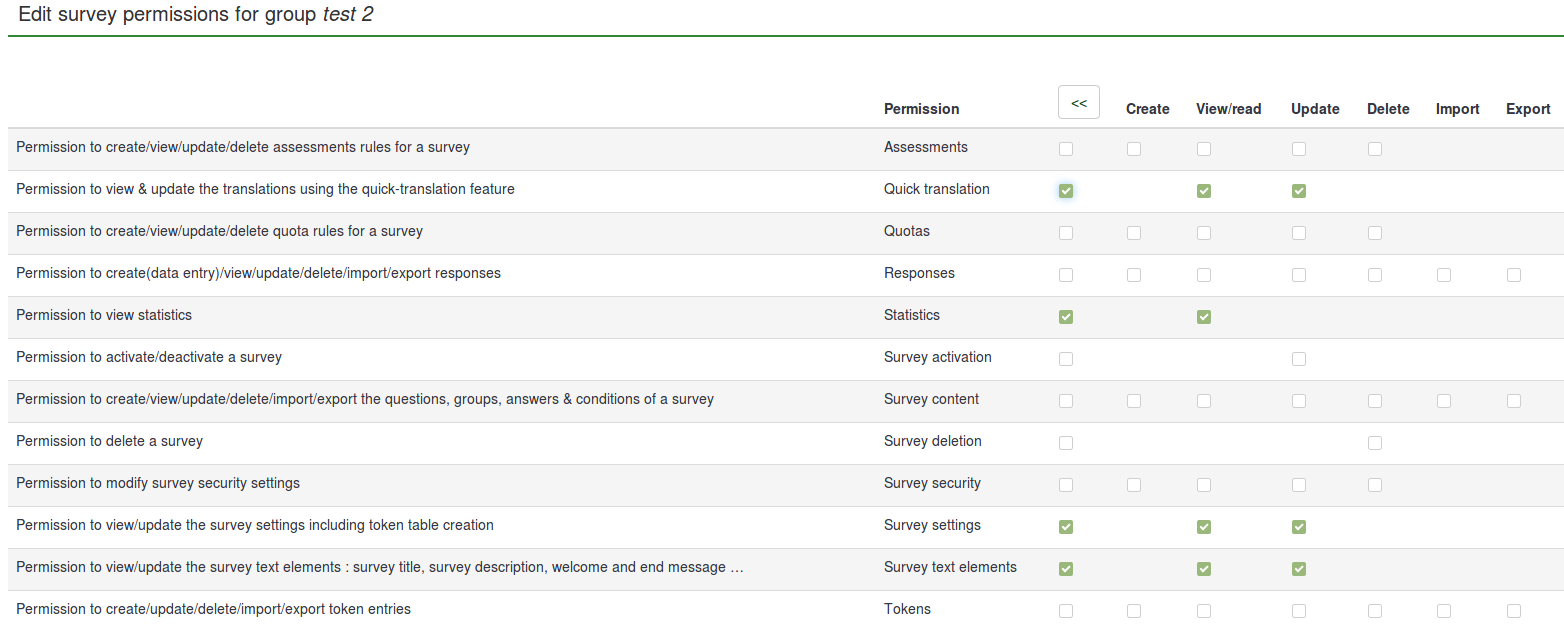
In deze tabel kun je de rechten instellen van de gebruiker op de enquête. Om rechten in te stellen klik je op de betreffende checkbox. De checkbox in de eerste kolom zet of wist alle rechten in die rij.
Click on the double-right arrowhead to access the extended version of the matrix to choose specifically the actions that can be performed by a user. After you finished editing the survey permissions, click on the Save button, which is located in the upper right corner of the screen.
Some examples are provided below in order to help you get a better understanding of Limesurvey's survey permissions system.
Rechten aan een gebruikersgroep verlenen
Klik op een gebruikersgroep toevoegen en kies de groep die je rechten op de enquête wilt verlenen.

In the next step, select the permissions that you will allocate to the members of that user group. Do not forget to click on the double right arrowhead to get an extended view of the permissions matrix.

Als je klaar bent met het wijzigen van de rechten, klik dan op de knop Bewaar in de rechterbovenhoek.
Bekijk voor een uitleg van deze functie de voorbeelden.
Voorbeelden
In dit gedeelte gaan we in op rechten voor specifieke taken en hoe je die kunt verlenen aan gebruikers.
Een persoon met hoofdbeheerdersrechten toevoegen
- Login als admin.
- Maak een nieuw gebruikersaccount aan.
- Stel de rechten voor deze gebruiker in op Hoofdbeheerder.
- De hoofdbeheerder heeft alle rechten op sjablonen,
- De hoofdbeheerder heeft alle rechten op alle enquêtes.
Een nieuwe gebruiker wil zelf enquêtes aanmaken
- Login als admin, of als een gebruiker met Hoofdbeheerder-rechten.
- Maak een nieuw gebruikersaccount aan.
- Stel de rechten voor deze gebruiker op Maak een enquête aan.
- Stel optioneel de rechten in op de sjablonen die de gebruiker of groep mag gebruiken.
De eigenaar van een enquête heeft een ander persoon nodig om zijn enquête te wijzigen
- Login als admin, of als een gebruiker met Hoofdbeheerder-rechten.
- Maak een nieuw gebruikersaccount aan.
- Stel geen globale rechten voor deze gebruiker.
- Stel geen sjabloonrechten in.
- Stel de enquêterechten in op wat de gebruiker (niet) mag doen. Klik op de dubbele pijl om de tabel uit te klappen.
Een persoon moet resultaten in kunnen zien en ze exporteren
- Login als admin, of als een gebruiker met Hoofdbeheerder-rechten
- Maak een nieuw gebruikersaccount aan.
- Stel geen als rechten in.
- Stel geen als sjabloonrechten in.
- Stel de enquêterechten in op: Responsen: bekijk/lees en exporteer, Statistieken: bekijk /lees.

I need help from two interns that can help me with the translation of my survey
- Log in as admin (or as a user that has the Superadministrator permission).
- Create n user accounts (where n is the number of translators).
- Create a user group called Translators and add the n accounts to this group.
- Go to the Survey permissions and click on Add a user group.
- If they only do translations, then offer them the Quick translation permission.