Import responses
From LimeSurvey Manual
Introduction
The import responses feature refers to the ability of LimeSurvey to import and display old responses into its own Response table. Some scenarios when you could use it:
- you wish to combine all your data gathered in two or more LimeSurvey instances into one LimeSurvey instances. This is usually done to get a better perspective on all the responses you wish to further analyse.
- some questions are not set to the right type. Since LimeSurvey does not allow to change the question type as long as the survey is live, you will have to deactivate it. By deactivating it, a response table is getting created and stored into the database associated to your LimeSurvey installation. Once you are done with your changes, reactivate your survey and reimport your responses from the old response database.
- you wish to batch-edit multiple lines in a spreadsheet software and later import them again into your installation. This is usually the case in which you changed a question type and wish to "adjust" the old stored answers to the new format.
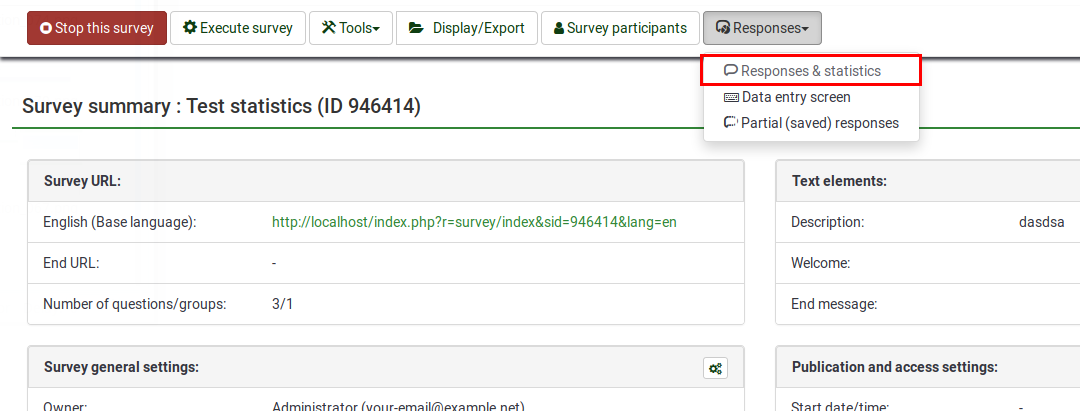
To access the import functionality, select Responses & statistics from the main toolbar (displayed on any survey-related panel) and then click on Responses:

The default page, Response summary will be loaded. Now, look for the Import option located on the top top toolbar:

Two import options are available:
Import
Import responses from a deactivated survey table
Once clicked on Import responses from a deactivated survey table, the following page will be loaded:

Two options are selectable on this page:
- Source table: select the table you wish to import. Please note that the tables can be located in either under the compatible tab or under the compatible with type coercion tab. Please continue reading below to understand what the last option is as well as the possible risks of type coercing a response table.
- Import timings (if exist): timings are not displayed in the response table but in the timings table. If enabled, the timings will also be imported.
In the second part of the page, a warning message is displayed stating how compatibility is determine between two response tables (between the current one and the old/second one).
You can import all old responses that are compatible with your current survey. Compatibility is determined by comparing column types and names, the ID field being always ignored.
Using type coercion may break your data; use with care or not at all if possible.
LimeSurvey detects and handles the following changes:
- Question is moved to another group (result is imported correctly).
- Question is removed from target (result is ignored).
- Question is added to target (result is set to database default value).
Import a VV survey file
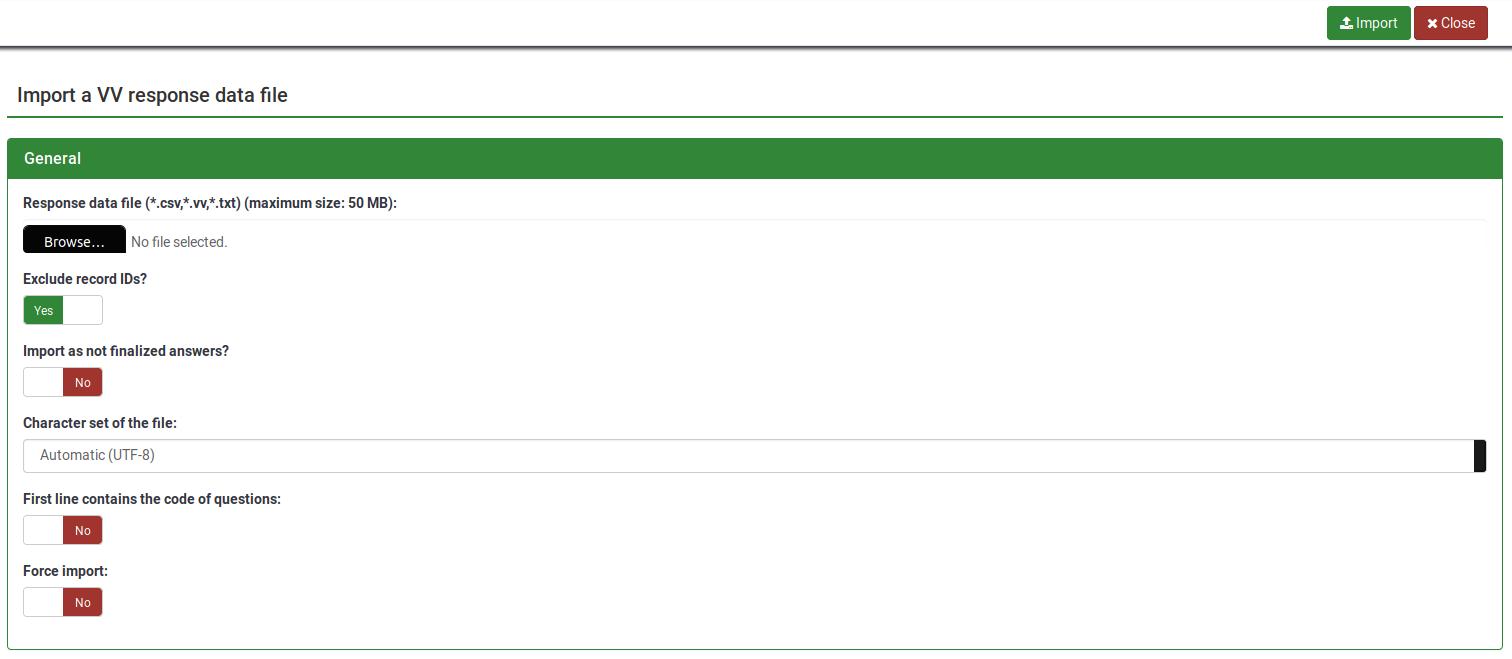
If you click the Import a VV survey file button, the following page will be loaded:

- Response data file: select the file to be uploaded from your machine. The accepted file formats are : *.csv, *.vv, *.txt.
- Exclude record IDs?: if 'id' column exist in the file you can exclude this line or not. If this setting is checked then a new record is added for each line of the .vv file. If unchecked you can choose:

- When an imported record matches an existing record ID (displayed if exclude record IDs is disabled, see the above screenshot):
- skip: report and skip the new record. After upload you will see if the record already existed - if it did it's not imported.
- renumber: renumber the new record. A new record is added to the response table with answer of the VV file.
- replace: replace the existing record. The old record is deleted and completely replaced by the record from the VV file.
- replace answer: replace response details from the vv file into the existing record. The old record is updated with the new response from the VV file.
- Import as not finalized response?: if checked, the submitdate is set to NULL - the response is set to not completed.
- Character set of the file: you can choose the character set of the file - the default and recommended value is UTF-8 but some spreadsheet program don't allow to choose a character set.
- First line contains question codes: iy default, VV file's first line contains the human readable question, the real column names being located on the second line. Basically, the first line contains the real column names.
- Force import: if the question codes are not found in the database name or in Qcode Variable Naming, then columns are assigned depending of order. This can be used to import the VV file from different LimeSurvey instance. Regardless of this, each survey must be exactly the same. We strongly recommend to use this option only if you know what you are doing. It can be very dangerous - the results can end up in the wrong column.
Reserved names
The reserved names are located between left and right brackets. When the .VV file is imported back into LimeSurvey, the strings are being replaced with:
{question_not_shown}: NULL value in database. LimeSurvey uses [empty string] for questions that were not answered and NULL value for questions that have not been shown (e.g., when using the ExpressionScript).{quote}: " (a double quote){cr}: Carriage return{newline}: A new line{lbrace}: Left bracket (for example, if you want to have {cr} in response, use{lbrace}cr})
Potential issues & solutions with the VV file
If you used Microsoft Excel to edit the exported vv file, the data structure of this file may be corrupted, so LimeSurvey is not able to import the edited file. You can try the following workaround to get the import working without an error:
- Open your exported vv file in Excel and do your edits.
- Save it as tab-separated text file (it creates a new file with the extension .txt).
- Do another "clean" vv export from LimeSurvey.
- Open this new exported vv file with a text editor like notepad (or anything similar).
- Press CTRL + A to mark all of the content and delete it.
- Open the Excel edited vv file (the tab separated .txt file) with a text editor and press CTRL + A to mark all the content.
- Press CTRL + C to copy the content and paste it into the new (now empty) vv file.
- Press CTRL + S to save the file as it is (in .csv format).
- Try now to import this file.