Manage users
From LimeSurvey Manual
User management
The user management tool allows you to add additional administration users to LimeSurvey. We will call them in this chapter just 'users'. Do not confuse them with survey participants (respondents).
Create users
To create a new user, open the user management dialog by clicking on Configuration (located on the main LimeSurvey toolbar) -> Manage survey administrators as shown below.
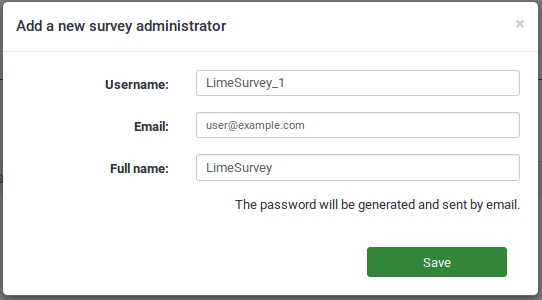
Then, click on Add user located on the upper right part of User control table. A window will pop up, asking you to:
- Enter the desired username into the Username text field.
- Enter the email address into the Email text field. Please note that:
- LimeSurvey sends out a confirmation email to the address entered into the Email field. This email address will be used as the standard contact email address for surveys created by the respective user.
- If you don't want the user to receive the confirmation email with a link to the LimeSurvey installation, username, and password, you can use your own email address to send the confirmation email to you. After that you can change the email address to the address of the user;
- Enter user's full name into the Full name text field. Please note that the full name entered here will be used as the standard contact person name for surveys created by the repsective user.
- Click Save to create the new user.

You have now your first user created. To find out more about setting user permissions, please continue reading further.
As you can see below, there are four options under the Action column that allow you to:
- edit the general aspects of a user - by clicking the pen symbol;
- delete the user from the survey administrators database - by clicking the trash button;
- set global permissions for a user - click the lock symbol;
- set template permissions for a user - click the pen-and-lock symbol.
Edit user
You can use the pen symbol to edit a user.
You can set a new email address, full name, and even change his or her password. If you have finished what you want to do, click on the Save button (right upper part of the window).
Delete user
To delete a user account, simply click his or her corresponding trash button (in the line with the user account that you want to delete) and click OK.
Set global permissions for a user
To set global permissions for a user, click on the lock symbol.

The CRUD (Create, read, update and delete) system is employed (like in the survey permission settings). If you check the first box, all the CRUD permissions for that row are automatically checked. To fine-tune a user's permissions, we strongly recommend to extend the matrix using the double-right arrowhead, which is located in its upper right corner:

You can now add or remove the following permissions:
- Participant panel: For more details, read the central participants database wiki.
- Label sets: Permission to create, view, update, delete, export, and import label sets. The label sets don't have specific permissions (unlike design templates).
- Settings & Plugins: With this permission a user can check data integrity, save the SQL database to an .sql file, manage global setting, view the PHP info in the global settings, and manage all plugins.
- Surveys: This gives access to all surveys. To allow a user only to create and manage their own survey survey, only give the user the 'create' permission. A creator of a survey is the owner of this survey and will always be able to manage it. Remember that each survey can grant to users different permissions.
- Templates: It allows the user to use all the available design templates and edit all non standard templates. A person with this right should have sufficient knowledge in terms of HTML, Javascript, and CSS. If a user is not familiar with these things and is supposed to use a specific design template, it would be better to give him only access to 'read' permission. Each template can have specific permissions.
- User groups: This permission allows a user to create/view/update/delete user groups.
- Users: A user can create, modify, and delete his own administration users with this permission. The newly created users cannot have higher permissions than the parent. You will also not be able to edit users owned by other administration users. If this has to be done, then a Superadministrator permission has to be granted.
- Superadministrator: This permissions can only be added or removed by the user called admin and grants full permission to the whole LimeSurvey installation. Please note: This permissions is very powerful and you should be very careful with granting it.
- Use internal database authentication: This permission allows users to access LimeSurvey's panel via the authentication page (e.g. http://domain/admin/authentication/sa/login). If it is unchecked and the respective user tries to connect to the LimeSuvey's panel, he will get the following error: 'Internal database authentication method is not allowed for this user'.
Set template permissions for a user
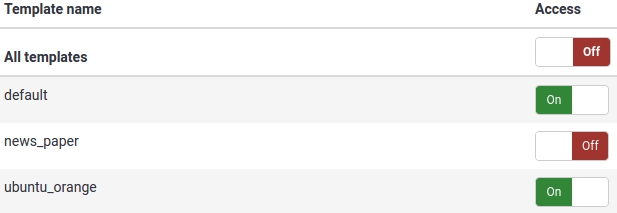
With template permissions, you can decide which design templates a user can select when creating or editing a survey. It might be a good idea to restrict the design templates a user can select in order to prevent unwanted use of design templates not suitable for a user and/or survey.
For example, if you have a specific design template for a group of users or customers, you might want to restrict their access to other templates to make them use only the template created for their purpose.
To set or edit the template permissions for a user, simply click the pen-and-lock symbol for design templates:

Select the design templates to which the respective user should have access to. After you finished your selection or deselection, do not forget to hit the Save button ![]() .
.
To get a proper understanding of this function, check the examples provided below.
Use one-time passwords
A user can call the LimeSurvey login at /limesurvey/admin and pass a username and a one-time password (which was previously written into the users table - column one_time_pw - by an external application).
To enable this login method, the line $use_one_time_passwords = false; has to be set true in config.php (it is 'false' by default).
The URL has to contain the following variables:
- user: The username normally used to login into LimeSurvey. This username has to exist in the 'users' table of the database.
- onepass: The plain text password which is then compared to the password in the 'users' table
A valid URL to login using a one-time password will look like this:
Things to watch out for:
- To enable this login method, the line
$use_one_time_passwords = false;has to be settruein config.php (it is 'false' by default). - The passed username has to exist in LimeSurvey's users table.
- The one-time password (which can be set via an external application) has to be stored as MD5 hash in column one_time_pw of table users.
- The passed plain text password will be hashed using the sha256 function and will then be compared to the stored hash in column one_time_pw of table users. Both passwords have to match.
- After the first login with the one-time password, it gets deleted from the database. The user won't be able to log in anymore with that respective password a second time.
Set permissions for a single survey
These permissions only apply for a single survey. If you want to set permissions for the whole system, you can use the global permissions. These permissions can be offered either to a single user or to a user group.
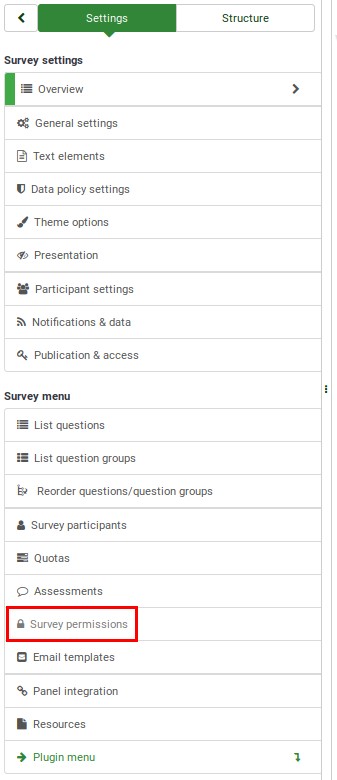
To change the survey permissions, you have to select the Settings menu of your survey, which includes the general settings of your installation. Then, click on Survey permissions and choose to whom would you like to offer permissions. The rights can be offered either separately to specific users or to a user group.


Grant survey permissions to a user
In the next step, select the user that will receive survey rights and click Add user.

After you click Set survey permissions, the user's survey permissions matrix will be shown.

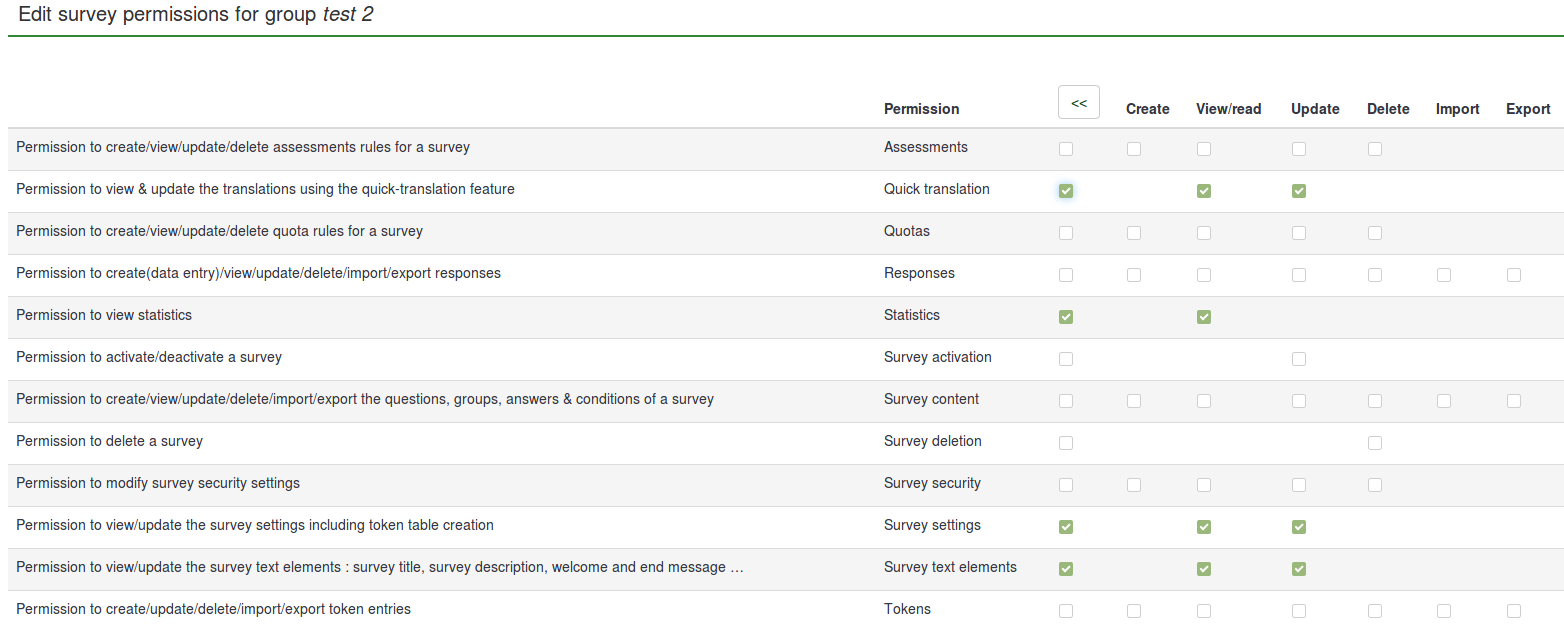
You can set in this matrix the user's survey permissions. Checking a box grants survey permissions to the respective user. If you click on a checkbox from the first column, all the rights of the corresponding line will be selected/removed.
Click on the double-right arrowhead to access the extended version of the matrix to choose specifically the actions that can be performed by a user.
After you finished editing the survey permissions, click on the Save button, which is located in the upper right part of the screen.
Some examples are provided below in order to help you get a better understanding of the Limesurvey's survey permissions system.
Grant survey permissions to a user group
Click on add a user group and select the user group to which you would like to add the permission rights.

You will select in the next step the permissions that you will allocate to the members of that user group. Do not forget to click on the double right arrowhead to get an extended view of the permissions matrix.

After you finished editing the survey permissions, click on the Save button, which is located in the upper right part of the screen.
Some examples are provided below in order to help you get a better understanding of the Limesurvey's survey permissions system.
Examples
Different scenarios are presented below. They provide some advice about which rights are necessary for some specific tasks and how they can be granted to the users.
I want to add a new person in charge for administrating LimeSurvey
- Log in as admin.
- Create a new user account.
- Grant that user the Superadministrator permission.
- Not necessary : Setting the template permissions (Superadministrator has all permissions for all templates).
- Not necessary : Setting the survey permissions (Superadministrator has all permissions for all surveys).
A new user wants to create his/her own surveys
- Log in as admin (or as a user that has the Superadministrator permission).
- Create a new user account.
- Set global permissions for that user to Create survey.
- "Optional" : Set template permissions - select which template(s) should be used by the user/user group.
The creator of a survey needs another person to edit his/her survey
- Log in as admin (or as a user that has the Superadministrator permission).
- Create a new user account.
- Set no global permissions for user.
- Set no template permissions for user.
- Set the survey permissions the way you want. If he/she should have all permissions for the survey, you can check the box from the first column. Otherwise, click on the double-right arrowhead to see the expanded matrix (upper right corner) and select only those rights you believe the respective user should have.
A person responsible for the survey wants to see the results of the survey and export them
- Log in as admin (or as a user that has the Superadministrator permission).
- Create a new user account.
- Set no global permissions for user.
- Set no template permissions for user.
- Set survey permissions to: Responses -> View/read and export, and Statistics: View/read.

I need help from two interns that can help me with the translation of my survey
- Log in as admin (or as a user that has the Superadministratpr permission).
- Create n user accounts (where n is the number of translators).
- Create a user group called Translators and add the n accounts to this group.
- Go to the Survey permissions and click on Add a user group.
- If they do only translations, then offer them the Quick translation permission.

