Workarounds: Question design, layout and templating
From LimeSurvey Manual
This section more or less deals with styling your survey, adjusting the layout and setting up special question types. You can find similar information at these pages:
- The template editor
- Workarounds: Manipulating a survey at runtime using Javascript
- Workarounds: Survey behaviour.
Please keep in mind that these workarounds are not official LimeSurvey extensions - they are solutions that users have created for themselves.
Therefore LimeSurvey can't offer guarantees or support for these solutions.
If you have questions, please contact the users that, thankfully, shared their solutions with the community.
Get rid of the quetstion mark (help.gif)
Tested with: 1.80+ (6536)
To get rid of the question mark symbol that LimeSurvey displays at the end of a question, you can either upload an empty help.gif into the template folder (as discussed in the forum) or you can use the Template editor: Open the template.css of your template and search for div.questionhelp img, then add a visibility:hidden;
It will look something like this:
div.questionhelp img

{

  margin:5px;

  visibility:hidden;

}
You can also replace the image by following these instructions.
Require users to check a box agreeing to privacy statement before registering for a survey
If you need to have users positively acknowledge a privacy statement before submitting a registration form, the following will help you do this.
It involves a minor modification to common.php in versions up to 1.85. Later versions may not require this.
Edit common.php and look for the line (at approximately line 3014)
$registerform .= "<tr><td></td><td>
<input class='submit' type='submit' value='".$clang->gT("Continue")."' />"
and change it to:
$registerform .= "<tr><td></td><td>
<input id='registercontinue' class='submit' type='submit' value='".$clang->gT("Continue")."' />"
Then save common.php. This gives you DOM access to the "continue" button on the register form, but will have no other practical effect or change to LimeSurvey's operations.
Next, you need to edit the template you are using (see the documentation on the Template editor if you don't know how to do this).
In the template editor, open the screen "Register page" and select the file "register.pstpl"
There are two modifications you need to make to this file. The first is to add the following code after the line that says {REGISTERFORM}.
<script type='text/javascript'>

</script>
This code disables the "Continue" button so that nobody can process the registration form until they've clicked the checkbox.
The second modification to make is to be done between the lines {REGISTERMESSAGE2} and {REGISTERFORM}. Add:
<center>
 <label> Accept
   <input type='radio'
          name="privacy"
          value="YES"
          onChange="if(this.checked) {
                      document.getElementById('registercontinue').disabled=false;
                    }" />
 </label>
 <label>I don't accept
   <input type='radio'
          name="privacy"
          value="NO"
          CHECKED
          onChange="if(this.checked) {
                      document.getElementById('registercontinue').disabled=true;
                    }" />
 </label>
</center>
Then the users will have to agree to whatever text you replace "Do you agree to privacy stuff?" before they continue on and register.
(Thanks to Pippo_Jedi for helping work this out)
Different progress indicator
Version 1.87 and later:
Add the following to the end of template.js. It will find the progress value and insert it into the element following the progress bar.
It should be pointed out that I had to introduce a delay in firing the function because the progress value is not calculated until after template.js is called. The delay is set at 1/10 of a second but you may be able to reduce that.
   // Display progress value

   function setProgValue() {

       var progress = $('#progressbar').attr('aria-valuenow');

       $('#progress-post').text(progress+'%').show();

   }

   $(document).ready(function(){

       $('#progress-post').hide();

       setTimeout('setProgValue()',100);

   });
If you want to hide the "0%" before the progress bar, add the following to the end of template.css:
#progress-pre {

   display: none;

}
Delete unwanted gaps in question title
Tested with:
When copying data (questions, answers, ...) from MS Word or other applications into the editor there might occur some gaps in the question title.
There are two solutions to this:
- Use popup mode and manually delete unwanting extra html tags (requires html knowledge).
- Disable paste word feature: Tweak your limesurvey-config.js file in limesurvey/admin/scripts/fckeditor.26 and set the following option to true:
FCKConfig.ForcePasteAsPlainText = true ;
After that clear you browser cache and try again.
How to change the <font-size> tags using CSS
This workaround was deleted because it is outdated. Such changes can be done by adjusting template.css of your template.
Question type variation: Scale with bars (one and two sided)
Tested with:
Some methodogical issues to think about: Very often a common scale as 1 to 5 or -2 to +2 fits all needs, as the shown subject is clearly defined as positive or negative. As soon as you would reduce the influence from the question and scale on the respondent, you will need something neutral to determine tendences, emphases and so on.
So I put up a new variation of the one and two sided array question:
ttp://www.limesurvey.org/images/fbfiles/images/example_bar_scale.jpg
In my example the left side reads "strategical planning" and the right side "operative business". None of these are purely negative or positive, so the bars only show in which direction the balancing point moves.
To realize a question as shown above just do as follows:
Set up as many bars as you will need (in my example there are four different bars in total) with a graphic program like PAINT .NET, GIMP or similar ones (yes, you may also use commercial software like Photoshop). To prevent the bars from looking twitchy, designate the size in advance. I did one bar 60x15 px, one 45x15px, one 30x15px and at last 15x15px. Save them as PNG, JPG or GIF.
- Create a new label set within Lime. Call it whatever you like.
- Enter a code number at first, then press the pencil symbol to enter the editor.
- Press the "Insert / edit image" button and upload the bar you want to insert with the FCK upload tool. Then choose the uploaded picture, save and leave the FCK editor.
- The row in the lable editor now shows an <img>-tag which refers to your bar picture.
- Repeat the above described steps as often as needed to build up your bar scale.
Doing a Likert Scale
Tested with:
A Likert Scale is a special type of the Semantic Differential question where several item shall be rated on different scales, each marked at the beginning and at the end with opposite statements. See example:

To do this in LimeSurvey just follow these steps:
- Create a label set with values from 0 to 7 (for the classic Likert Scale - feel free to choose other ranges).
- Create a new question and choose Array (Flexible Labels) as question type.
- Assign the Likert Scale label set to this question.
- Enter your answers as follows:
<DIV style="white-space: nowrap;">ITEM statement1|statement2</div>
The white-space style is to avoid line breaks which would ruin the whole scale. feel free to insert non-breakable spaces between the ITEM and statement1 to define the margin between these to strings.
Alternate background colour of questions
Tested with: 1.85+ (7191)
To alternate the background colour of questions, open the template.css of your template with the Template Editor or a text editor and modify the Question styles section to include the following style.
div#question2 td.questiontext,

div#question4 td.questiontext,

div#question6 td.questiontext {

   background-color: #E0EBF8;

}
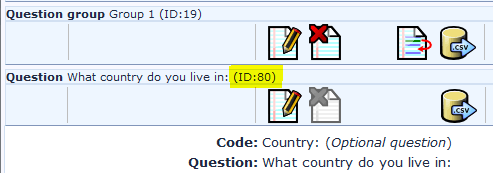
Be sure to apply the style to all of the questions you would like modified using their question IDs (question2, question4, question6 in this case). Question IDs are displayed when creating or editing questions - see below:
Here the question ID is #question80 .
Embedding audio in questions
Tested with: 1.85+ (7191), IE 7, FireFox 3
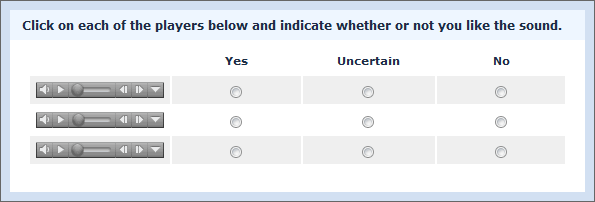
Audio clips can be embedded in most question text or answer text. In this example, using the default template, I've embedded clips into the answers of an Array (Yes/No/Uncertain) question to ask respondents how they feel about some sounds. The resulting question will look like this.
It's accomplished by placing the following code in each of the answers.
<embed height="20" width="128" autostart="false" controls="console"

loop="true" volume="50" src="{TEMPLATEURL}audio_1.mp3"></embed>
Some notes about the code:
- The audio_1.mp3 part will be different for each answer (it's the audio file name).
- In this case the audio files are residing in the template folder being used for this survey (that's where {TEMPLATEURL} points to) but they can be placed anywhere if you use an absolute URL in the src parameter - something like src="http://mysite.com/audio/audio_1.mp3"
- If the audio file doesn't exist where the src parameter indicates, the player will not appear.
- You'll need to insert the code into the answers using the source screen - click on "Edit answers", click the pencil beside the text box, click "Source" in the pop-up, enter the code and save it with the little diskette icon.
- You may need to turn off the XSS filter - see the documentation for Global settings.
Although the above example places the audio in the answer text of the question, the same principles can be used to place it in the question text itself. Something like this perhaps.
Hiding inputs of a "Multiple options with comments" question
Tested with: 1.85+ (7253), IE 6/7, FireFox 3.0, Safari 3.2, Chrome 2.0
There may be times when you want to hide some of the input boxes of a Multiple options with comments question as in the image below.
This can be accomplished with CSS (see Styling questions in LimeSurvey 1.8). For each input that you want to hide, add the following style to your template.css file:
#answer11111X22X33Acomment {
   display: none;
}
Where 11111 is your survey ID, 22 is your group ID, 33 is your question ID and A is the answer code.
Note that you will still see columns for the hidden inputs in your data but they will be empty.
Multiple question types in array
Tested with: 1.90 - 1.92+, IE 7/8/9, Firefox 13, Safari 5, Chrome 10
This workaround allows you to present multiple question types in what appears to be an array - as depicted in the image below and demonstrated here (download the sample survey - limesurvey_survey_62584.lss). This example uses the default template but should be adaptable to any template using divisions for question containers.
Basically what we do is take groups of questions (5 in this case), wrap them in a division and make them line up nicely horizontally and vertically. The width of the survey is also fixed to prevent wrapping issues. We do this with a JavaScript/jQuery function that inserts the necessary wrappers and then modifies styles so everything behaves properly. The top row is 5 boilerplate questions with the "column headers" as question text (the first just has a blank space). The following rows are a boilerplate with the "row headers" followed by 4 assorted questions.
It should be noted that using conditions on these questions may result in unexpected behavior. If a question is hidden by conditions, the question(s) to the right of it will move over to take its place.
Implementation is as follows:
- Create your questions keeping in mind how they will lay out when grouped into rows (in this example - boilerplate, yes/no, short text, numeric, dropdown, and repeat).
- In the source of the first boilerplate question add the function below (see How to use script).
- Modify the number of rows, number of columns and the start placement in the function call (line 6) as required (the example uses 4 rows and 5 columns and the "array" starts with the third question on the page).
The code may look intimidating at first but it's actually fairly simple. I've laid it out as sequentially as possible and purposely used few shortcuts and many comments to make it easier to follow.
Notes:
- If you use question types other than boilerplate, short text, list dropdown, numeric or yes-no, you'll need to add to the last section of code, where it hides the question text and formats the inputs for display this way.
- Any extra questions on the page should follow this grid of questions, not precede them.
- If you use boilerplate as question type you should add after:
// Hide the question text elements in non-boilerplate questions
$('div.questionCell td.questiontext').parent().hide();
the following 2 lines
//repair boilerplate questioncells
$('div.boilerplate td.questiontext').parent().show();
Javascript code:
<script type="text/javascript" charset="utf-8">

	$(document).ready(function() {
		// Call the "sideBySide" function with number of rows, columns and start position
		sideBySide(4, 5, 3);
	});

	function sideBySide(rows, columns, startQuestion) {

		/*********** Display multiple questions side by side ***********/

		if ($('div.qRow1').length == 0) {

			var rowNum = 0;
			var colNum = 1;
			var rowList = new Array();

			//////// Add question classes for later use ////////

			// Loop through all questions and add row and column specific classes
			$('div[id^="question"]').each(function(i) {
				if(i >= (startQuestion-1) && rowNum < rows) { // This IF condition only needed if there are questions before or following the "inline" questions
					$(this).addClass('qRow'+rowNum+'').addClass('qCol'+colNum+'').addClass('inlineQuestion');
					if(rowNum == 0 && colNum > 1) {
						$(this).addClass('columnLabel');
					}
					if(rowNum > 0 && colNum == 1) {
						$(this).addClass('rowLabel');
					}
					else if(rowNum > 0 && colNum > 1) {
						$(this).addClass('questionCell');
					}
					if(colNum == columns) {
						rowList.push('qRow'+rowNum+'');
						rowNum++;
						colNum = 1;
					}
					else {
						colNum++;
					}
				}
				else {
					$(this).addClass('normalQuestion');
				}
			});

			//////// Survey layout manipulation ////////

			// Fix the width of the survey
			$('table.outerframe').css({
				'width': '900px'
			});

			// Wrap each "row" in a wrapper div
			$(rowList).each(function(i) {
				$('.'+this+'').wrapAll('<div id="inlineWrapper'+i+'" class="inlineRow" />');
			});

			// Style the wrapper divs
			$('.inlineRow').css({
				'width': '850px',
				'margin': '0 auto 0 auto',
				'clear': 'both'
			});

			$( '.inlineRow:first' ).css({
				'margin-top': '10px'
			});

			// Get all the questions to sit politely side by side
			$( '.inlineQuestion' ).css({
				'float': 'left',
				'height':'41px',
				'overflow':'hidden',
				'margin-bottom': '-8px'
			});
			$( '.inlineQuestion .questionhelp' ).hide();
			$( '.inlineQuestion .survey-question-help' ).parent().hide();

			// A little space under the last row
			$( '.inlineRow:last .inlineQuestion' ).css({
				'margin-bottom': '10px'
			});

			// Any questions not displayed inline (this is only needed if there are questions following the "inline" questions)
			$( '.normalQuestion' ).css({
				'clear': 'both'
			});

			//////// Column manipulation ////////

			// Set the column widths - can be set individually if necessary
			// Must add up to less than 100%
			$( '.qCol1' ).css({
				'width': '12%'
			});

			$( '.qCol2, .qCol3, .qCol4, .qCol5' ).css({
				'width': '22%'
			});

			//////// Question manipulation ////////

			// Hide the answer element in boilerplate questions
			$( 'div.boilerplate td.answer' ).parent().hide();

			// Hide the question text elements in non-boilerplate questions
			$('div.questionCell td.questiontext').parent().hide();

			// Push the question tables to 100%
			$( 'div.inlineRow table' ).css({
				'width': '100%'
			});

			// Get everything to line up nicely vertically
			$( '.inlineQuestion td.questiontext, .inlineQuestion td.answer p' ).css({
				'text-align': 'center'
			});

			// Adjust cell heights so everything lines up nicely horizontally
			$( '.inlineQuestion td.answer, .inlineQuestion td.questiontext' ).css({
				'height':'35px',
				'overflow':'hidden',
				'padding':'0.5em'
			});
			$( '#inlineWrapper0 .inlineQuestion' ).css({ 'height':'50px' });
			$( '#inlineWrapper0 td.questiontext' ).css({
				'height':'50px'
			});

			// Yes-no question styles
			$( 'div.yes-no ul' ).css({
				'text-align': 'center',
				'font-size': '90%',
				'margin': '0',
				'padding-bottom': '5px'
			});
			$( 'div.yes-no li' ).css({
				'padding-right': '1.5em'
			});
			$( 'div.yes-no td.answer' ).css({
				'padding-bottom': '0'
			});

			// Short-text question styles
			$( 'div.text-short input' ).css({
				'width': '125px',
				'margin-left': '0'
			});

			// Numeric question styles
			$( 'div.numeric input' ).css({
				'width': '125px',
				'margin-left': '0'
			});
			$( 'div.numeric p.tip' ).css({
				'display': 'none'
			});

			// Get rid of the margins around select boxes
			$( 'p.question' ).css({ 'margin':'0' });
		}
	}
</script>
Star Rating System
Tested with: 1.85+ (7557), IE 6/7, FireFox 3.0, Safari 3.2,
This workaround uses the jQuery Star Rating Plugin to display a series of stars that are used to generate a rating value. This value is then passed to either a hidden numeric input question or a hidden list radio question. Both methods are outlined below - use one or both depending on whether you want to use [Assessments|assessments].
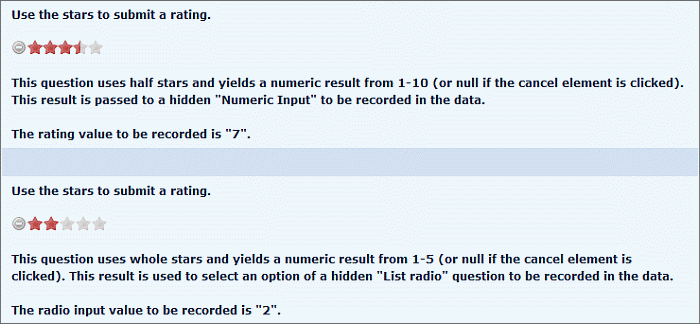
The plugin uses a series of radio inputs to generate the stars (more about these below). It allows the use of whole or partial stars as shown in this demo and the image below.
Star Rating System Using Numeric Input Question
Use this method if you would like your rating data to be collected as a numeric value and don't want to use LimeSurvey assessments - it's a little easier to implement. There is a demo here (first question).
Implementation is as follows:
- Turn off $filterxsshtml to allow insertion of JavaScript in the questions. (See documentation here)
- Download the plugin and place the following included files in your template folder:
- jquery.MetaData.js
- jquery.rating.css
- jquery.rating.js
- delete.gif
- star.gif
- In the <head> section of your startpage.pstpl, add the following code to link to the files.
<script type="text/javascript" src="{TEMPLATEURL}jquery.rating.js" charset="utf-8"></script>


<script type="text/javascript" src="{TEMPLATEURL}jquery.MetaData.js" charset="utf-8"></script>


<link rel="stylesheet" type="text/css" href="{TEMPLATEURL}jquery.rating.css" />
5. Create a numeric input question and then in the source of the question add as many radio inputs as star segments. For example, if you would like 5 stars, each with half-segments (as in the demo Q1), you would need 10 radio inputs and that would give rating values from 1-10.
Don't confuse these inputs with the actual question, they are just for the plugin's use.
At this point your question source code should look something like below. Make sure that all inputs have the same name. Each input must have the same title as value and these must be sequential. Don't worry about how all of this looks in the WSYSWYG editor - the plugin is going to hide these inputs and replace them with stars.
Q1 - Some question text here.<br /><br />

<div id="starContainer">

   <input type="radio" class="star { split:2 }" title="1" value="1" name="q1Rate" />

   <input type="radio" class="star { split:2 }" title="2" value="2" name="q1Rate" />

   <input type="radio" class="star { split:2 }" title="3" value="3" name="q1Rate" />

   <input type="radio" class="star { split:2 }" title="4" value="4" name="q1Rate" />

   <input type="radio" class="star { split:2 }" title="5" value="5" name="q1Rate" />

   <input type="radio" class="star { split:2 }" title="6" value="6" name="q1Rate" />

   <input type="radio" class="star { split:2 }" title="7" value="7" name="q1Rate" />

   <input type="radio" class="star { split:2 }" title="8" value="8" name="q1Rate" />

   <input type="radio" class="star { split:2 }" title="9" value="9" name="q1Rate" />

   <input type="radio" class="star { split:2 }" title="10" value="10" name="q1Rate" />

</div>
6. A note on split stars. The stars in the above example are split in half by the { split:2 } metadata. So if you don't want split stars, your inputs would look like:
<input type="radio" class="star" title="1" value="1" name="q1Rate" />
And stars split into third-segments would look like:
<input type="radio" class="star { split:3 }" title="1" value="1" name="q1Rate" />
7. Finally, in the source of the question add the following function after your inputs. (See How to use script here)
Some notes on the code:
- Replace "SSSSS", "GG", "QQ" in the function call at the end with the survey ID, group ID and question ID respectively.
- The code will hide the numeric input and pass the rating values into it as they are changed. If the rating is canceled the numeric input is nullified. If a respondent navigates away from the page then returns the code "remembers" the previous rating and displays the stars accordingly.
- If you want to apply it to more numeric questions on the same page simply add more calls with the appropriate IDs. (eg. handleRatingNumeric(11111, 22, 1); handleRatingNumeric(11111, 22, 2); ...) .
Code:
<script type="text/javascript" charset="utf-8">

$(document).ready(function() {

function handleRatingNumeric (sID, gID, qID) {

   // Hide the numeric input

   $('#question' + qID + ' td.answer').parent().hide();

   // Get a previous rating (if any) and use it to initialize the star display

   var rating = $('#answer' + sID + 'X' + gID + 'X' + qID + '').val();

   if ( rating != '' ) {

       $('#question' + qID + ' input.star').rating('select', rating);

   }

   // Listener on the star rating cancel element

   $('#question' + qID + ' div.rating-cancel').click(function(event) {

       // Nullify the rating if the Cancel element is clicked

       rating = '';

       $('#answer' + sID + 'X' + gID + 'X' + qID + '').val(rating);

   });

   // Listener on the star rating elements

   $('#question' + qID + ' div.star-rating').click(function(event) {

       // Find the value of the highest clicked star and pass it into the text input

       $('#question' + qID + ' div.star-rating-on').each(function(i) {

           rating = $(this).children('a').html( );

       });

       $('#answer' + sID + 'X' + gID + 'X' + qID + '').val(rating);

   });

}

// Call the function for the numeric question

handleRatingNumeric (SSSSS, GG, QQ);

});

</script>
Star Rating System Using List (Radio) Question
Use this method if you would like to use assessments. There is a demo here (second question).
Implementation is as follows:
1. Turn off $filterxsshtml to allow insertion of JavaScript in the questions. (See documentation here)
2. Set up the template to use custom onload functions. (See the workaround here)
3. Download the plugin and place the following included files in your template folder:
- jquery.MetaData.js
- jquery.rating.css
- jquery.rating.js
- delete.gif
- star.gif
4. In the <head> section of your startpage.pstpl, add the following code to link to the files.
<script type="text/javascript" src="{TEMPLATEURL}jquery.rating.js" charset="utf-8"></script>


<script type="text/javascript" src="{TEMPLATEURL}jquery.MetaData.js" charset="utf-8"></script>


<link rel="stylesheet" type="text/css" href="{TEMPLATEURL}jquery.rating.css" />
5. Create a list (radio) question with the same amount of sequentially numbered answers as star ratings. For example, if you want 5 whole-stars, you would create 5 answers, as in the image below, and this would give you ratings from 1-5. Note that the "Codes" and "Answers" must be sequential numbers.
6. In the list (radio) question, set the hide_tip question attribute to 1
7. In the source of the question add as many radio inputs as star segments. So 5 whole-stars (as in the demo Q2), would need 5 radio inputs.
Don't confuse these inputs with the actual question, they are just for the plugin's use.
At this point your question source code should look something like below. Make sure that all inputs have the same name. Each input must have the same title as value and these must be sequential. Don't worry about how all of this looks in the WSYSWYG editor - the plugin is going to hide these inputs and replace them with stars.
Q2 - Some question text here.<br /><br />

<div id="starContainer">

   <input type="radio" class="star" title="1" value="1" name="q2Rate" />

   <input type="radio" class="star" title="2" value="2" name="q2Rate" />

   <input type="radio" class="star" title="3" value="3" name="q2Rate" />

   <input type="radio" class="star" title="4" value="4" name="q2Rate" />

   <input type="radio" class="star" title="5" value="5" name="q2Rate" />

</div>
8. A note on split stars. The stars in the above example are whole-stars. If you want them split you need to add metadata to the class - something like { split:2 }. So if you want half-stars your inputs would look like:
<input type="radio" class="star { split:2 }" title="1" value="1" name="q1Rate" />
And stars split into third-segments would look like:
<input type="radio" class="star { split:3 }" title="1" value="1" name="q1Rate" />
9. Finally, in the source of the question add the following function after your inputs. (See How to use script here)
Some notes on the code:
- Replace "SSSSS", "GG", "QQ" in the function call at the end with the survey ID, group ID and question ID respectively.
- The code will hide the question radio buttons and toggle them as the rating values are changed. If the rating is canceled all question inputs are unchecked. If a respondent navigates away from the page then returns the code "remembers" the previous rating and displays the stars accordingly.
- If you want to apply it to more numeric questions on the same page simply add more calls with the appropriate IDs. (eg. handleRatingRadio(11111, 22, 1); handleRatingRadio(11111, 22, 2); ...) .
Onload code:
<script type="text/javascript" charset="utf-8">

$(document).ready(function() {

function handleRatingRadio (sID, gID, qID) {

   // Hide the radio input

   $('#question' + qID + ' td.answer').parent().hide();

   // Get a previous rating (if any) and use it to initialize the star display

   var rating = $('#question' + qID + ' input.radio[checked=true]').attr('value');

   //if ( rating != '' ) {

   if ( rating ) {

       $('#question' + qID + ' input.star').rating('select', rating);

   }

   // Listener on the star rating cancel element

   $('#question' + qID + ' div.rating-cancel').click(function(event) {

       // Nullify the rating if the Cancel element is clicked

       rating = '';

       $('#question' + qID + ' input.radio').attr('checked', false);

   });

   // Listener on the star rating elements

   $('#question' + qID + ' div.star-rating').click(function(event) {

       // Find the value of the highest clicked star and pass it into the text input

       $('#question' + qID + ' div.star-rating-on').each(function(i) {

           rating = $(this).children('a').html( );

       });

       $('#question' + qID + ' input.radio[value=' + rating + ']').attr('checked', true);

   });

}

// Call the function for the radio question

handleRatingRadio (SSSSS, GG, QQ);

});

</script>
Variable column widths in array
Tested with: 1.85+ (7557), IE 6/7, Firefox 3.0, Safari 3.2
This workaround allows you to define all column widths of an array question - as shown in the image below and demonstrated here. This example uses the default template shipped with 7557 but should be adaptable to any template.
We use a function to remove all of the widths imposed by the core code and then insert our own.
Implementation is as follows:
- Turn off $filterxsshtml to allow insertion of JavaScript in the questions (see documentation here).
- Create the array question.
- In the source of the array question add the following script (see How to use script here).
- Replace all instances of QQ with the question ID.
- In the third section of code, adjust the widths and add/remove columns as necessary. This example is for an array with a question text column followed by 3 answer columns as shown above.
- In the final section adjust the question text alignment to your liking
Onload code
<script type="text/javascript" charset="utf-8">

$(document).ready(function() {

   // Get rid of all the widths that the API imposes

   $( 'div#questionQQ table.question col' ).attr('width', '');

   $( 'div#questionQQ table.question thead td' ).attr('width', '');

   // Define a width for the question table so we can do so for its children

   // NOTE: Keep this to 95% or less so IE will behave

   $( 'div#questionQQ table.question' ).attr('width', '95%');

   // Define the column widths

   // Add or remove columns and adjust widths as necessary but widths should add up to 100%

   // NOTE: Columns must be sequentially numbered starting at 0 - eg, td:eq(0), td:eq(1), td:eq(2).....

   $( 'div#questionQQ table.question tbody th:eq(0)' ).css({ 'width':'10%' }); // Answer text column

   $( 'div#questionQQ table.question tbody td:eq(0)' ).css({ 'width':'50%' }); // First answer column

   $( 'div#questionQQ table.question tbody td:eq(1)' ).css({ 'width':'20%' }); // Second answer column

   $( 'div#questionQQ table.question tbody td:eq(2)' ).css({ 'width':'20%' }); // Third answer column

   // Push the text input widths to 95% of their parent containers

   $( 'div#questionQQ table.question input[type="text"]' ).css({ 'width':'95%' });

   // Align the answer text - feel free to experiment

   $( 'div#questionQQ table.question tbody th' ).css({'text-align':'center'});

});

</script>
Use images for radio buttons and checkboxes
Tested with: LimeSurvey 1.92/2.0, using IE 9, FireFox 13, Chrome 16, Safari 5
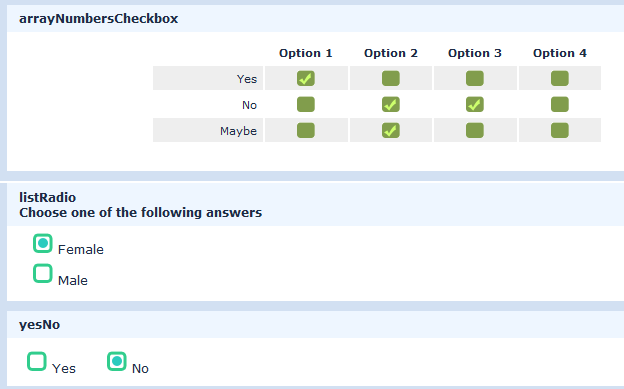
This workaround uses an adaptation of the jQuery imagetick.js plugin to replace the default radio buttons and checkboxes with images as pictured below:
This adaptation will work in the following question types:
- Array
- Array by column
- Array dual scale
- Array (5 point choice)
- Array (10 point choice)
- Array (Increase-Same-Decrease)
- Array (Yes-No-Uncertain)
- Gender
- Yes-No
- Multiple choice
- Multiple choice with comments
- 5 point choice
- List (Radio)
- List with comment
LimeSurvey 1.92 and earlier implementation
- Set up your survey to use JavaScript.
- Download this modified version of the plugin.
- Extract all files and place them in your template directory.
- Add the following line to the <head> element in your startpage.pstpl BEFORE the call for template.js:
<script type="text/javascript" src="{TEMPLATEURL}imagetick_lime.js"></script>
- Add the following to the source of a question or the group description
<script type="text/javascript" charset="utf-8">

	$(document).ready(function(){

		var templatePath = $('head link[href*="template.css"]').attr('href').replace(/template.css/, '');

		// Apply images to radios
		$('input[type="radio"]').imageTick({

			// Image to use as a selected state of the radio
			tick_image_path:  templatePath+"radio.gif",
			// Image to use as a non-selected state
			no_tick_image_path:  templatePath+"no_radio.gif",
			// Class to apply to all radio images that are dynamically created
			image_tick_class: "radios"
		});

		// Apply images to checkboxes
		$('input[type="checkbox"]').imageTick({

			// Image to use as a selected state of the checkbox
			tick_image_path: templatePath+"check.gif",
			// Image to use as a non-selected state
			no_tick_image_path: templatePath+"no_check.gif",
			// Class to apply to all checkbox images that are dynamically created
			image_tick_class: "checkboxes"
		});
	});

</script>
- You can also call the imagetick function from template.js. Skip the last step above and add the following to the end of template.js. Replace "yourTemplateName" with your template directory name.
$(document).ready(function(){

	var templatePath = $('head link[href*="template.css"]').attr('href').replace(/template.css/, '');

	// Apply images to radios
	$('input[type="radio"]').imageTick({

		// Image to use as a selected state of the radio
		tick_image_path: templatePath+"radio.gif",
		// Image to use as a non-selected state
		no_tick_image_path: templatePath+"no_radio.gif",
		// Class to apply to all radio images that are dynamically created
		image_tick_class: "radios"
	});

	// Apply images to checkboxes
	$('input[type="checkbox"]').imageTick({

		// Image to use as a selected state of the checkbox
		tick_image_path: templatePath+"check.gif",
		// Image to use as a non-selected state
		no_tick_image_path: templatePath+"no_check.gif",
		// Class to apply to all checkbox images that are dynamically created
		image_tick_class: "checkboxes"
	});
});
If you want to apply it to only one question on a page use selector (where QQ is the question ID)
$('#questionQQ input[type="radio"]')
If you want to apply it to a single radio button in a question (to maybe have different images for each option) use selector (where SSSSS is the survey ID, GG is the group ID, QQ is the question ID, AA is the answer code)
$("input#answerSSSSSXGGXQQAA")
LimeSurvey 2.0 and later implementation
Follow the instructions above with these changes:
- Download this modified version of the plugin for 2.0 and up instead of the one mentioned above and add all contained files to your template directory.
- Add these lines to the <head> element in your startpage.pstpl instead of the one above:
<script type="text/javascript" src="{TEMPLATEURL}imagetick_lime_2.js"></script>

<link rel="stylesheet" type="text/css" href="{TEMPLATEURL}imagetick_lime_2.css" />
Thanks to Jordan Boesch for the original plugin.
Changing the position and layout of an individual question using "question code"
Tested with: 1.87+ (6536)
To use this very flexible workaround you first have to apply a minor change to the question.pstpl of the used template.
<div class="survey-question">

   <div class="survey-question-text">
needs to be changed to
<div class="survey-question" id="{QUESTION_CODE}">

   <div class="survey-question-text" id="{QUESTION_CODE}" >
this change won't change anything in the layout and can be left in the template even if you don't need this workaround. It's just a means to have a handle to actually change individual questions.
You can then use a code such as the following in the question text to make question specific format changes. "SAMPLE" needs to be replaced with the concerning question code and javascript has to be allowed (older versions of limesurvey, under global settings for newer versions).
<script type="text/javascript" charset="utf-8">

document.getElementById('SAMPLE').style.borderTop= "0px";

document.getElementById('SAMPLE').style.marginTop= "-62px";

document.getElementById('SAMPLE').style.marginLeft= "30px";

</script>
This sample code will hide the border at the top of the question, will move the whole question up by 62px and to the right by 30px. Using this workaround you can change a whole a lot of things concerning format and positions of a specific question without changing all the questions. A (German) list of all the allowed options can be found here.
Create MaxDiff question type
Tested with: 1.87+ (8518), IE 6/7/8, Firefox 3.6, Safari 3.2
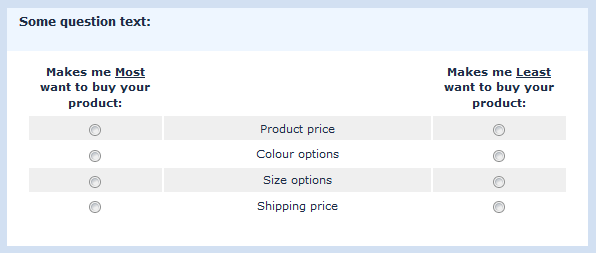
This workaround uses JavaScript to convert an Array (flexible labels) by column question into a MaxDiff question type.
There is a demo here and implementation is as follows.
- Set up your survey to use JavaScript.
- Create an Array (flexible labels) by column question with 2 "answers" - these will be the left and right columns.
- Assign a label set to the question - these will be the labels in the center column.
- Place the following script in the source of the question or in the group description.
- In line 5, replace "QQ" with the ID of the question and modify the message to your needs.
- Adjust the styles in lines 15-18 as required.
The script moves the question columns into the MaxDiff configuration and alerts the user if they select the same option for both max and min columns.
<script type="text/javascript" charset="utf-8">

   $(document).ready(function(){

       maxDiff(QQ, 'You cannot select this answer twice.');

       function maxDiff(qID, msg) {

           // Move the cells around

           $('#question'+qID+' table.question col:eq(1)').prependTo('colgroup.col-responses');

           $('#question'+qID+' table.question thead tr:eq(0) th:eq(0)').prependTo('#question'+qID+' table.question thead tr:eq(0)');

           $('#question'+qID+' table.question tbody tr').each(function(i){

               $('td:eq(0)', this).prependTo(this);

           });

           // Style stuff

           $('#question'+qID+' table.question col.odd').css({ 'background-color':'transparent' });

           $('#question'+qID+' table.question tbody th').css({ 'text-align':'center' });

           $('#question'+qID+' table.question tbody tr:even td, #question'+qID+' table.question tbody tr:even th').css({ 'background-color':'#F1F1F1' });

           $('#question'+qID+' table.question tbody tr:odd td, #question'+qID+' table.question tbody tr:odd th').css({ 'background-color':'#FCFCFC' });

           // Prevent clicking twice in the same row

           $('#question'+qID+' input.radio').mousedown(function () {

               var clickRow = $(this).parents('tr:eq(0)');

               if ($('input.radio:checked', clickRow).length > 0) {

                   alert (msg);

                   return false;

               }

           });

           $('#question'+qID+' table.question tbody td').mousedown(function () {

               var clickRow = $(this).parents('tr:eq(0)');

               if ($('input.radio:checked', clickRow).length > 0) {

                   alert (msg);

                   return false;

               }

           });

       }

   });

</script>
Load SVG Code From Drawing Tool
This workaround uses JavaScript/jQuery to load a drawing tool and store the results in a huge-text question. The details are outlined in the JavaScript section of the workarounds.
Minimum or Maximum Date in Datepicker
Tested with: 1.90, IE 7/8, Firefox 3.6, Safari 3.2
Please note: From version 2.05 beta6, you MUST set the minimum and maximum date for the date picker directly in the advanced question attributes of the date/time question. This workaround will seize to work.
You can set the minimum or maximum selectible date in a datepicker as follows
Set up your survey to use JavaScript and add the following to the source of the date question text or help. Replace "QQ" with the date question ID.
For a minimum date of April 15, 2010:
<script type="text/javascript" charset="utf-8">

   $(document).ready(function() {

       var qID = QQ;

       $('#question'+qID+' .popupdate').datepicker( 'option', 'minDate', new Date(2010, 4-1, 15) );

   });

</script>
For a minimum date of the current date (today):
<script type="text/javascript" charset="utf-8">

   $(document).ready(function() {

       var qID = QQ;

       $('#question'+qID+' .popupdate').datepicker( 'option', 'minDate', new Date() );

   });

</script>
For a maximum date of May 10, 2015:
<script type="text/javascript" charset="utf-8">

   $(document).ready(function() {

       var qID = QQ;

       $('#question'+qID+' .popupdate').datepicker( 'option', 'maxDate', new Date(2015, 5-1, 10) );

   });

</script>
More details here - http://jqueryui.com/demos/datepicker/#option-minDate
Evaluative Space Grid (ESG)
Tested with: 1.91, IE 7/8, Firefox 3.6, Safari 3.2
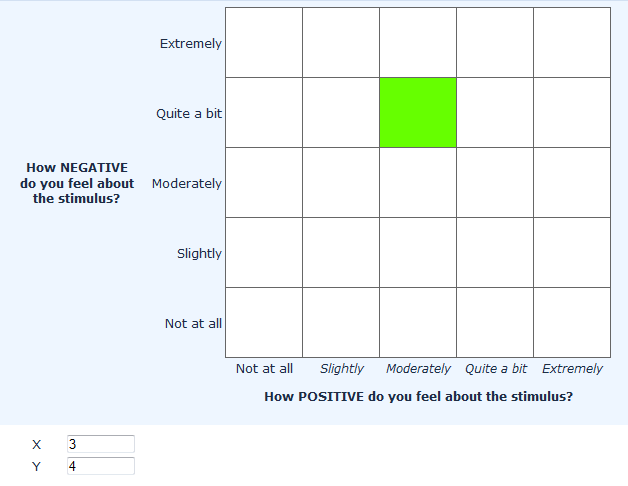
The evaluative space grid (ESG) is a two-dimensional grid that provides a single-item measure of positivity and negativity (Larsen et al, 2009). See page 4 of this PDF.
This can be accomplished using a multiple-numeric question, some simple HTML and a little JavaScript.
A table can be shown in the question. When a respondent clicks a grid cell in the table JavaScript loads the coordinates of the cell into the multiple-numeric question inputs.
- Create a Multiple Numeric question with two sub-questions labelled "X" and "Y".
- Add the following HTML to the source of the question to create the table:
<table class="spaceGrid">
	<tr>
		<td rowspan="5" class="yAxisLabel">How NEGATIVE<br>
			do you feel about<br>
		the stimulus?</td>
		<td class="yLabel">Extremely</td>
		<td class="gridCell"></td>
		<td class="gridCell"></td>
		<td class="gridCell"></td>
		<td class="gridCell"></td>
		<td class="gridCell"></td>
	</tr>
	<tr>
		<td class="yLabel">Quite a bit</td>
		<td class="gridCell"></td>
		<td class="gridCell"></td>
		<td class="gridCell"></td>
		<td class="gridCell"></td>
		<td class="gridCell"></td>
	</tr>
	<tr>
		<td class="yLabel">Moderately</td>
		<td class="gridCell"></td>
		<td class="gridCell"></td>
		<td class="gridCell"></td>
		<td class="gridCell"></td>
		<td class="gridCell"></td>
	</tr>
	<tr>
		<td class="yLabel">Slightly</td>
		<td class="gridCell"></td>
		<td class="gridCell"></td>
		<td class="gridCell"></td>
		<td class="gridCell"></td>
		<td class="gridCell"></td>
	</tr>
	<tr>
		<td class="yLabel">Not at all</td>
		<td class="gridCell"></td>
		<td class="gridCell"></td>
		<td class="gridCell"></td>
		<td class="gridCell"></td>
		<td class="gridCell"></td>
	</tr>
	<tr>
		<td class="blankCell"></td>
		<td class="blankCell"></td>
		<td class="xLabel">Not at all</td>
		<td class="xLabel"><span class="yLabel">Slightly</span></td>
		<td class="xLabel"><span class="yLabel">Moderately</span></td>
		<td class="xLabel"><span class="yLabel">Quite a bit</span></td>
		<td class="xLabel"><span class="yLabel">Extremely</span></td>
	</tr>
	<tr>
		<td class="blankCell"></td>
		<td class="blankCell"></td>
		<td colspan="5" class="xAxisLabel">How POSITIVE do you feel about the stimulus?</td>
	</tr>
</table>
- Add the following styles to the end of your template.css file:
.spaceGrid {
	border: 0 none;
	border-collapse: collapse;
}

.spaceGrid td {
	padding: 0 3px;
	text-align: center !important;
	border: 0 none;
}

td.xAxisLabel {
	padding-top: 10px;
}

td.yAxisLabel {
	padding-right: 10px;
	width: 125px;
}

td.xLabel {
	height: 20px;
	font-weight: normal;
}

td.yLabel {
	text-align: right !important;
	font-weight: normal;
}

td.gridCell {
	width: 70px;
	height: 70px;
	border: 1px solid #666666;
	background-color: #FFFFFF;
	cursor: pointer;
}

td.checkedCell {
	background-color: #66FF00;
}
- Add the following to the end of your template.js file:
$(document).ready(function() {

	// Listener on the grid cells
	$('.gridCell').click(function(){

		// Define some vars
		var parentQ = $(this).parents('div[id</div>="question"]:eq(0)');
		var parentTable = $(this).parents('table.spaceGrid:eq(0)');
		var parentRow = $(this).parent();
		var numGridCell = $('.gridCell').length;
		var numCols = $('.gridCell', parentRow).length;
		var numRows = numGridCell/numCols;

		// Add class to checked cell
		$('.checkedCell', parentQ).removeClass('checkedCell');
		$(this).addClass('checkedCell');

		// Find the cell coordinates
		var reverseRowIndex = (numRows - $('tr', parentTable).index($(parentRow)));
		var colIndex = $('.gridCell', parentRow).index($(this)) + 1;

		// Load coordinates into inputs
		$('input.text:eq(0)', parentQ).val(colIndex);
		$('input.text:eq(1)', parentQ).val(reverseRowIndex);
	});

});
The script should automatically handle different grid sizes.
Slider Highlighting
Tested with: 1.91, IE 7/8, Firefox 3.6, Safari 3.2
You may want to highlight a slider after it has been moved/changed to allow respondents to easily see which slider sub-questions have been answered.
- Add the following to the end of template.js:
$('html').bind('slidecreate', function(event, ui) {
	$('.slider_callout').each(function(i){
		if($(this).text().length > 0) {
			$(this).parents('li:eq(0)').addClass('changedSlider');
		}
	});
});

$(document).ready(function() {
	$('.ui-slider-horizontal').bind('slidechange', function(event, ui) {
	 $(this).parents('li:eq(0)').addClass('changedSlider');
	});
});
- Add something like the following to the end of template.css (these styles are for the default template and would need to be modified for other templates):
.numeric-multi .answer li {
	border-bottom: 5px solid #FFFFFF;
}

.numeric-multi .answer li label {
	background-color: #FFFFFF;
}

.numeric-multi .answer li div.multinum-slider {
	margin: 1.5em 0.5em 0.2em 0;
	padding-left: 0.5em;
}

.ui-slider-1 {
	margin-bottom: 10px;
}

.changedSlider {
	background-color: #99FFFF;
}
Dynamic Slider Call-Out Styles
Tested with: 2.05, IE 9-11, Firefox, Chrome
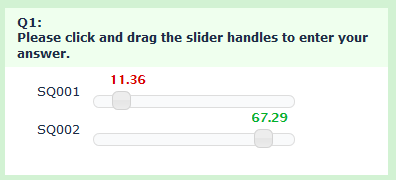
This is an example of how to insert a custom slide() function to control the appearance of the slider call-out as the slider is manipulated. In this example the call-out text colour changes as the slider is moved. Sample survey here - dynamic call-out slider survey.
Requirements:
- LimeSurvey 2.05 or newer
- A multiple-numeric question with slider enabled
- Create your multi-numeric question with the slider enabled
- Add the following to the source of the question
<script type="text/javascript" charset="utf-8">
	$(document).ready(function() {

		// Identify this question
		var thisQuestion = $('#question{QID}');

		// New slide function
		$('.ui-slider', thisQuestion).slider( 'option', 'slide', function(event, ui) {
			// Define a few vars
			var thisRow = $(this).closest('li.answer-item');
			var thisSlider = $(this);
			var thisValue = ui.value.toString().replace(/\./,LSvar.sLEMradix);

			// Load the callout
			$('.slider_callout', thisRow).text(thisValue);

			// Set the data value
			$('input.text', thisRow).val(thisValue);
			$('input.text', thisRow).triggerHandler("keyup");

			handleCallout(thisRow, thisValue);
		});

		// Initial callout states
		$('input.text', thisQuestion).each(function(i) {
			handleCallout($(this).closest('li.answer-item'), $(this).val());
		});

		// Handle the callout style
		function handleCallout(thisRow, sliderVal) {
			if(sliderVal < 20) {
				$('.slider_callout', thisRow).css('color', '#D90000');
			}
			else if(sliderVal < 40) {
				$('.slider_callout', thisRow).css('color', '#D96D00');
			}
			else if(sliderVal < 60) {
				$('.slider_callout', thisRow).css('color', '#D9D900');
			}
			else {
				$('.slider_callout', thisRow).css('color', '#00B22D');
			}
		}

    });
</script>
Sliders in Array-Numbers or Array-Dual-Scale-Numbers
Tested with: 1.91, IE 7/8/9, Firefox 3/7, Safari 5, Chrome 15
This workaround will replace the dropdowns in array-numbers or array-dual-scale-numbers questions with sliders. The sliders will automatically have the same minimum, maximum and steps that you set in the advanced question settings.
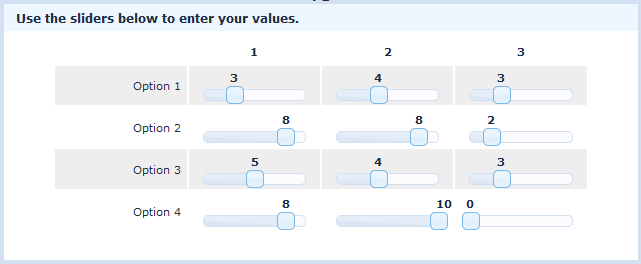
There is a demo here.
- Set up your survey to use JavaScript.
- Create your array-numbers or array-dual-scale-numbers question.
- Add the following to the source of the question. Replace "QQ" with the array question ID. (NOTE: In 1.92 or newer, you can replace "QQ" with "{QID}")
<script type="text/javascript" charset="utf-8">

   $(document).ready(function() {

		insertSlider (QQ);

		function insertSlider (qID) {

			$('#question'+qID+' select').each(function(i, el){

				// Hide the dropdown
				$(el).hide();

				var id = $(el).attr('id').replace(/#/g,'-');

				// Some dropdown values
				var currentVal = Number($('option:selected', el).val());
				var firstVal = Number($('option[value!=""]:first', el).val());
				var secondVal = Number($('option[value!=""]:first', el).next('option').val());
				var lastVal = Number($('option[value!=""]:last', el).val());

				// Insert a container for the slider
				var container = $('<div class="customSliderWrapper"></div>').insertAfter(el);

				// Insert a callout
				var callout = $('<div id="callOut-'+id+'" class="customCallout"></div>').appendTo(container).text($('option:selected', el).val());

				// Initiate the slider
				var slider = $('<div id="slider-'+id+'" class="customSlider"></div>').appendTo(container).slider({
					min: firstVal,
					max: lastVal,
					range: 'min',
					value: currentVal,
					step: secondVal - firstVal,
					slide: function( event, ui ) {
						$('option[value="'+ui.value+'"]', el).attr('selected', 'selected');
						function updateCustomCallout() {
							$('#callOut-'+id).text($('option:selected', el).val()).css({ 'left': $('#slider-'+id+' .ui-slider-handle').css('left') });
						}
						// Delay updating the callout because it was picking up the last postion of the slider
						setTimeout(updateCustomCallout, 10);
					}
				});

				// Change the slider if the dropdown is changed
				// (not required if dropdown is hidden)
				$(el).change(function() {
					slider.slider('value', Number($('option:selected', el).val()));
					$('#callOut-'+id).text($('option:selected', el).val());
				});

				// Set a value as soon as the slider handle is clicked
				$('#slider-'+id+' .ui-slider-handle').mousedown(function() {
					$('option[value="'+slider.slider('value')+'"]', el).attr('selected', 'selected');
					$('#callOut-'+id).text(slider.slider('value'));
				});
			});
		}
	});
</script>
- Add something like the following to the end of template.css (these styles are for the default template and may need to be modified for other templates):
table.innerframe {
	width:850px;
}

.array-multi-flexi table.question {
	width:90%;
}

.customCallout {
	position: absolute;
	top: 0;
	left: 0;
	width: 50px;
	height: 1.75em;
	text-align: left;
	font-weight: bold;
	margin: 0 0 0 -0.3em;
}

.customSliderWrapper {
	position: relative;
	margin: 0 10px;
	padding-top: 1.75em;
}
Vertical Sliders
Tested with: 1.92+, 2.00+, IE 9, Firefox 13, Chrome 19
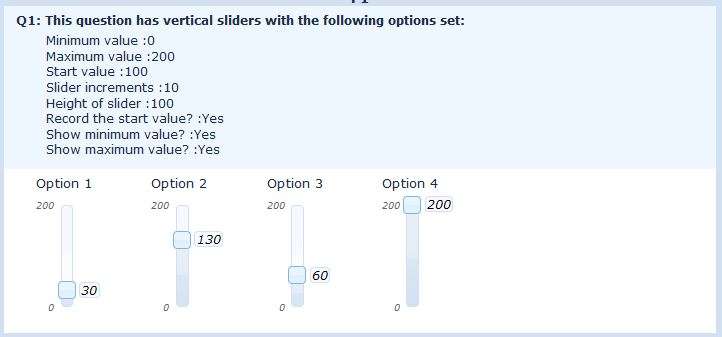
This workaround uses a custom jQuery plugin to apply vertical sliders to multiple-numeric questions. You can download a sample template here (with the plugin in template.js) - vertical slider template - and a sample survey here - vertical slider survey.
- Create your multi-numeric question(s). Do NOT use any of the slider advanced settings.
- Add the following to the end of template.js. Replace "QQ" (line 5) with the question ID and adjust the options in the function call as desired. Repeat the call as many times as you need for more questions
$(document).ready(function(){

	// Call the vertical slider plugin with the question ID
	// Edit options here as desired
	$('#questionQQ').lsVerticalSlider({
		minValue		:0,		// Minimum value (default 0)
		maxValue		:200,	// Maximum value (default 100)
		startValue		:100,	// Start value (default null)
		step			:10,	// Slider increments (default 1)
		height			:100,	// Height of slider in pixels (default 200)
		recordStart		:true,	// Record the start value? (default no)
		showMin			:true,	// Show minimum value? (default no)
		showMax			:true	// Show maximum value? (default no)
	});
});

// NO EDITING REQUIRED BELOW HERE
// A jQuery plugin to convert multiple-numeric questions to vertical sliders
(function( $ ){
	$.fn.lsVerticalSlider = function(options) {

		// The defaults, extended and modified with any passed in the function call
		var opts = $.extend( {
			minValue		:0,
			maxValue		:100,
			startValue		:'',
			step			:1,
			height			:150,
			recordStart		:false,
			showMin			:false,
			showMax			:false
		}, options);

		return this.each(function() {

			var $this = $(this);

			// Some classes for the question and sub-questions
			$this.addClass('vertical-slider-question');
			$('li:[id<div class="simplebox">="javatbd"]', $this).addClass('vertical-slider-sub-question');

			// Loop through the sub-questions
			$('li:[id</div>="javatbd"]', $this).each(function(i){
				var itemID = $(this).attr('id').replace(/javatbd/, '');

				// Check for pre-existing answer
				if($('#answer'+itemID).val() != '') {
					opts.startValue = $('#answer'+itemID).val();
				}

				// Insert the slider elements
				$('#answer'+itemID).after(
					'<div class="vertical-slider-max-min" style="height:'+(opts.height+2)+'px;"> \
						<div class="vertical-slider-max"></div> \
						<div class="vertical-slider-min"></div> \
					</div> \
					<div id="vertical-slider-'+itemID+'" class="vertical-slider" style="height:'+opts.height+'px;"></div> \
					<div class="vertical-slider-callout-wrapper" style="height:'+(opts.height+2)+'px;"> \
						<div class="vertical-slider-callout" id="slider-callout-'+itemID+'"></div> \
					</div>'
				);

				// Show min/max if option is set
				if(opts.showMax) {
					$('.vertical-slider-max', $this).text(opts.maxValue);
				}

				if(opts.showMin) {
					$('.vertical-slider-min', $this).text(opts.minValue);
				}

				// Initiate the slider
				$('#vertical-slider-'+itemID).slider({
					orientation: 'vertical',
					range: 'min',
					min: opts.minValue,
					max: opts.maxValue,
					value: opts.startValue,
					step: opts.step,
					slide: function(event, ui) {
						$('#answer'+itemID).val(ui.value);
						$('#slider-callout-'+itemID).text(ui.value);
						setTimeout(function() {
							$('#slider-callout-'+itemID).css({ 'bottom':$('#vertical-slider-'+itemID+' .ui-slider-handle').css('bottom') }).show();
						}, 10);
					},
					create: function(event, ui) {
						// Initial values and positions
						if($('#answer'+itemID).val() != '') { // Pre-existing answer
							$('#slider-callout-'+itemID).text(opts.startValue);
						}
						else if(opts.recordStart) { // Record the start value (if option is set)
							$('#answer'+itemID).val(opts.startValue);
							$('#slider-callout-'+itemID).text(opts.startValue);
						}
						else {
							$('#slider-callout-'+itemID).hide();
						}
						$('#slider-callout-'+itemID).css({ 'bottom':$('#vertical-slider-'+itemID+' .ui-slider-handle').css('bottom') });
					}
				});
			});
		});
	};
})( jQuery );
- Add the following to the end of template.css (these styles are for the default template):
/* Vertical slider styles and overrides */
.vertical-slider-question p.tip {
	display: none;
}

.vertical-slider-sub-question {
	float: left;
	margin: 0 3em 0 0 !important;
}

.vertical-slider-question label {
	display: block;
	padding: 0 0 0.75em 0 !important;
}

.vertical-slider-question span.input {
	padding: 0.3em 0 0 0;
	display: block;
}

.vertical-slider-question input.text {
	display: none;
}

.vertical-slider {
	float: left;
	border-radius: 4px;
}

.vertical-slider-question .ui-slider-handle {
	top: auto;
	border-radius: 4px;
}

.vertical-slider-max-min,
.vertical-slider-callout-wrapper {
	float: left;
	position: relative;
}

.vertical-slider-callout-wrapper {
	min-width: 3em;
}

.vertical-slider-max-min {
	margin-right: 0.5em;
}

.vertical-slider-max,
.vertical-slider-min {
	font-size: 0.8em;
	color:#666666;
	line-height: 1;
}

.vertical-slider-max {
	margin-top: -0.5em;
}

.vertical-slider-min {
	position: absolute;
	right: 0;
	bottom: 0;
	margin-bottom: -0.5em;
}

.vertical-slider-callout {
	position: absolute;
	top: auto;
	margin: 0 0 -0.6em 0.5em;
	padding: 0.1em;
	font-size: 0.9em;
	color:#000000;
	line-height: 1;
	background: #F8F8FF;
	border: 1px solid #D2E0F2;
	border-radius: 4px;
}
Range Slider
Tested with: 1.92+, 2.00+, IE 9, Firefox 13, Chrome 19
This workaround uses a custom jQuery plugin to insert a jQuery UI range slider into a multi-numeric question and automatically populate that question's inputs with the range min and max values. You can download a sample template here - range slider template - and a sample survey here - range slider survey.
- previous answers
- slider max/min
- range min start
- range max start
- range span min
- slider step
- slider width
- record the start values
- show slider max and min
Requirements:
- LimeSurvey 1.92 or newer
- A multiple-numeric question with two sub-questions
- Create your multi-numeric question. Do NOT use any of the slider advanced settings.
- Add the following to the end of template.js.
// A jQuery plugin to display a range slider in LimeSurvey
(function( $ ){

	$.fn.lsRangeSlider = function(options) {

		// The defaults, extended and modified with any passed in the function call
		var opts = $.extend( {
			range			:true,
			sliderMin		:0,
			sliderMax		:100,
			rangeStartMin		:'',
			rangeStartMax		:'',
			minRangeSpan		:0,
			step			:1,
			width			:250,
			recordStart		:false,
			showMin			:false,
			showMax			:false
		}, options);

		return this.each(function() {

			if($(this).hasClass('numeric-multi') && $('input.text', this).length == 2) {

				// Define some vars
				var $this = $(this);
				var qID = $(this).attr('id').split('question')[1];
				var rangeMinInput = $('input.text:eq(0)', $this);
				var rangeMaxInput = $('input.text:eq(1)', $this);

				// Some classes for the question and sub-questions
				$this.addClass('range-slider-question');

				// Check for pre-existing answer
				if($(rangeMinInput).val() != '' && $(rangeMinInput).val() != '') {
					opts.rangeStartMin = $(rangeMinInput).val();
					opts.rangeStartMax = $(rangeMaxInput).val();
				}

				// Insert the slider elements
				$('.subquestions-list', $this).before(
					'<div class="range-slider-wrapper"> \
						<div class="range-slider-min"></div> \
						<div id="range-slider-'+qID+'" class="range-slider" style="width:'+opts.width+'px;"> \
							<div class="range-slider-callout" id="slider-callout-min-'+qID+'"></div> \
							<div class="range-slider-callout" id="slider-callout-max-'+qID+'"></div> \
						</div> \
						<div class="range-slider-max"></div> \
						<div style="clear:both;"></div> \
					</div>'
				);

				// Show min/max if option is set
				if(opts.showMax) {
					$('.range-slider-max', $this).text(opts.sliderMax);
				}
				if(opts.showMin) {
					$('.range-slider-min', $this).text(opts.sliderMin);
				}

				// Initiate the slider
				var rangeMin;
				var rangeMax;
				if(opts.rangeStartMin == '' || opts.rangeStartMin < opts.sliderMin || opts.rangeStartMin > opts.rangeStartMax) {
					rangeMin = opts.sliderMin+((opts.sliderMax-opts.sliderMin)*0.3333);
				}
				else {
					rangeMin = opts.rangeStartMin;
				}
				if(opts.rangeStartMax == '' || opts.rangeStartMax > opts.sliderMax || opts.rangeStartMax < opts.rangeStartMin) {
					rangeMax = opts.sliderMin+((opts.sliderMax-opts.sliderMin)*0.6667);
				}
				else {
					rangeMax = opts.rangeStartMax;
				}
				$('#range-slider-'+qID).slider({
					range: true,
					min: opts.sliderMin,
					max: opts.sliderMax,
					values: [ rangeMin, rangeMax ],
					step: opts.step,
					slide: function(event, ui) {
						if((ui.values[1] - ui.values[0]) < opts.minRangeSpan) {
							return false; // Nothing happens if less than minRangeSpan
						}
						$(rangeMinInput).val(ui.values[0]);
						$(rangeMaxInput).val(ui.values[1]);
						$('#slider-callout-min-'+qID).text(ui.values[0]);
						$('#slider-callout-max-'+qID).text(ui.values[1]);
						setTimeout(function() {
							$('#slider-callout-min-'+qID).css({ 'left':$('.ui-slider-handle:eq(0)', $this).position().left - $('#slider-callout-min-'+qID).outerWidth() - ($('.ui-slider-handle:eq(1)', $this).outerWidth()/2)+'px' }).show();
							$('#slider-callout-max-'+qID).css({ 'left':($('.ui-slider-handle:eq(1)', $this).position().left)+($('.ui-slider-handle:eq(1)', $this).outerWidth()/2)+'px' }).show();
						}, 10);
					},
					create: function(event, ui) {
						// Initial values and positions
						if($(rangeMinInput).val() != '' && $(rangeMaxInput).val() != '') { // Pre-existing answer
							$('#slider-callout-min-'+qID).text(opts.rangeStartMin);
							$('#slider-callout-max-'+qID).text(opts.rangeStartMax);
						}
						else if(opts.recordStart && opts.rangeStartMin && opts.rangeStartMin && $(rangeMinInput).val() == '' && $(rangeMaxInput).val() == '') { // Record the start value (if option is set)
							$(rangeMinInput).val(opts.rangeStartMin);
							$(rangeMaxInput).val(opts.rangeStartMax);
							$('#slider-callout-min-'+qID).text(opts.rangeStartMin);
							$('#slider-callout-max-'+qID).text(opts.rangeStartMax);
						}
						else {
							$('.range-slider-callout', $this).hide();
						}
						$('#slider-callout-min-'+qID).css({ 'left':$('.ui-slider-handle:eq(0)', $this).position().left - $('#slider-callout-min-'+qID).outerWidth() - ($('.ui-slider-handle:eq(1)', $this).outerWidth()/2)+'px' });
						$('#slider-callout-max-'+qID).css({ 'left':($('.ui-slider-handle:eq(1)', $this).position().left)+($('.ui-slider-handle:eq(1)', $this).outerWidth()/2)+'px' });
					}
				});
			}
		});

	};
})( jQuery );
- Add the following to the end of template.css (these styles are for the default template but easily modified for others):
.range-slider-question p.tip,
.range-slider-question .subquestions-list {
	display: none;
}

.range-slider-wrapper {
	clear: both;
	margin: 10px 0;
	padding-top: 20px;
}

.range-slider,
.range-slider-max,
.range-slider-min {
	float: left;
	position: relative;
}

.range-slider-max,
.range-slider-min {
	font-size: 0.8em;
	color:#666666;
	line-height: 1.20;
}

.range-slider-min {
	margin-right: 5px;
}

.range-slider-max {
	margin-left: 5px;
}

.range-slider-question .ui-slider-handle {
	top: -4px;
	border-radius: 4px;
}

.range-slider-callout {
	position: absolute;
	top: -30px;
	margin: 0;
	min-width: 1.3em;
	padding: 0.1em;
	font-size: 0.9em;
	color:#000000;
	line-height: 1;
	text-align: center;
	background: #F8F8FF;
	border: 1px solid #D2E0F2;
	border-radius: 4px;
}
- Then, add something like this to the source of your question to apply the plugin with some custom option settings (I think the comments explain the options adequately)
<script type="text/javascript" charset="utf-8">
	$(document).ready(function(){

		$('#question{QID}').lsRangeSlider({
			sliderMin	:0,	// Minimum slider value (default 0)
			sliderMax	:100,	// Maximum slider value (default 100)
			rangeStartMin	:20,	// Minimum range handle start value
			rangeStartMax	:80,	// Maximum range handle start value
			minRangeSpan	:5,	// Minimum allowed range span
			step		:1,	// Slider increments (default 1)
			width		:400,	// Width of slider in pixels (default 250)
			recordStart	:true,	// Record the start value? (default no)
			showMin		:true,	// Show slider minimum value? (default no)
			showMax		:true	// Show slider maximum value? (default no)
		});

	});
</script>
- Or, to apply the plugin with the default option settings
<script type="text/javascript" charset="utf-8">
	$(document).ready(function(){

		$('#question{QID}').lsRangeSlider();

	});
</script>
Reverse Slider
Tested with: 2.05, IE 7-10, Firefox, Chrome
This is an example of how to insert a custom slide() function to reverse the slider.
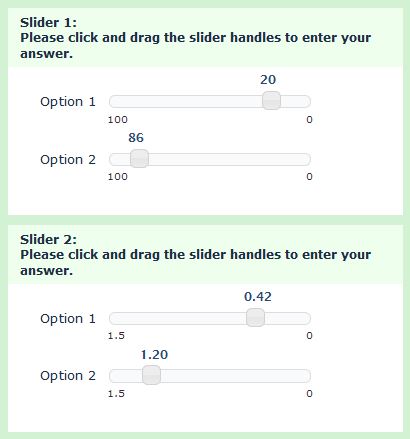
Caveats:
- Developed for LS 2.05
- The "Reset" button will not work
- Create your multi-numeric question with the slider enabled
- Add the following to the end of template.js:
function reverseSlider(qID) {

	// Identify the question
	var thisQuestion = $('#question'+qID);

	//$('span.input', thisQuestion).show() // un-comment this to debug

	// Reverse the min/max displays
	$('.answer-item', thisQuestion).each(function(i) {
		var showMinText = $('.slider-showmin', this).text();
		var showMaxText = $('.slider-showmax', this).text();
		$('.slider-showmin', this).text(showMaxText);
		$('.slider-showmax', this).text(showMinText);
	});

	// Initial slider positions
	$('span.input input[type="text"]', thisQuestion).each(function(i) {

		if($(this).val() != '') {
			var thisRow = $(this).closest('li.answer-item');
			var thisSlider = $('.ui-slider', thisRow);
			var sliderValue = $(thisSlider).slider('option', 'max')+$(thisSlider).slider('option', 'min')-$(this).val();
			$('.ui-slider', thisRow).slider('option', 'value', sliderValue);
			$('.slider-callout', thisRow).text($(this).val());
		}
	});

	// New slide function
	$('.ui-slider', thisQuestion).slider( 'option', 'slide', function(event, ui) {
		// Define a few vars
		var thisRow = $(this).closest('li.answer-item');
		var thisSlider = $(this);
		var step = $(thisSlider).slider('option', 'step').toString();
		var stepDecimals = '';
		if(step.indexOf('.') != -1) {
			stepDecimals = step.length - (step.indexOf('.')+1);
		}
		var reverseValue = '';

		// Calculate the "reverse" value
		if(ui.value > $(thisSlider).slider('option', 'max')) {
			reverseValue = $(thisSlider).slider('option', 'min');
		}
		else if(ui.value < $(thisSlider).slider('option', 'min')) {
			reverseValue = $(thisSlider).slider('option', 'max');
		}
		else if(stepDecimals > 0) { // Handle decimal places
			reverseValue = ($(thisSlider).slider('option', 'max')+$(thisSlider).slider('option', 'min')-ui.value).toFixed(stepDecimals);
		}
		else{
			reverseValue = $(thisSlider).slider('option', 'max')+$(thisSlider).slider('option', 'min')-ui.value;
		}
		reverseValue = reverseValue.toString();
		reverseValue = reverseValue.replace(/\./,LSvar.sLEMradix);

		// Load the callout
		$('.slider_callout', thisRow).text(reverseValue);

		// Set the data value
		$('input.text', thisRow).val(reverseValue);
		$('input.text', thisRow).triggerHandler("keyup");
	});
}
- Add this script to the source of every question you want to "reverse":
<script type="text/javascript" charset="utf-8">
    $(document).ready(function() {
		reverseSlider({QID});
	});
</script>
Sliders With Control Buttons
Tested with: 2.05, IE 7-10, Firefox, Chrome
This workaround uses a custom jQuery plugin to insert "up" and "down" buttons to control sliders. You can download a sample template here - slider with buttons template - and a sample survey here - button slider survey.
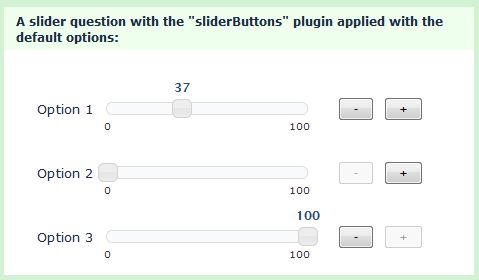
The plugin allows the following options:
- Down Text: Text for the "down" button
- Up Text: Text for the "up" button
- Scrolling: Continuous slider movement if the left mouse button is held down
- Scroll Interval: Interval (in milliseconds) between slider movement when button is held down (do not make this too short or it will be difficult to stop the slider accurately)
- Value Prefix: Prefix for call-out
- Value Suffix: Suffix for call-out
Requirements:
- LimeSurvey 2.05 or newer
- A multiple-numeric question with slider enabled
- Create your multi-numeric question with the slider advanced settings.
- Add the following to the end of template.js.
// A custom plugin to add control buttons to LimeSurvey sliders
// Author - Tony Partner - partnersurveys.com
(function( $ ){

	$.fn.sliderButtons = function(options) {

		// The defaults, extended and modified with any passed in the function call
		var opts = $.extend( {
		downText: '-',		// Text for the "down" button
		upText: '+',		// Text for the "up" button
		scrolling: true,	// Continuous slider movement if left mouse button held down
		scrollInterval: 150,// Interval (in ms) between slider movement when button is held down
		valuePrefix: '',	// Prefix for callout
		valueSuffix: ''	// Suffix for callout
		}, options);

		return this.each(function(i) {

			var thisQuestion = $(this);

			// Add some classes
			$(thisQuestion).addClass('slider-button-question');

			// Insert the buttons
			$('li.question-item', thisQuestion).append('<div class="slider-button-wrapper">\
															<button type="button" class="slider-button down">'+opts.downText+'</button>\
															<button type="button" class="slider-button up">'+opts.upText+'</button>\
														</div>');

			// Initial button states
			function handleButtonState(slider) {
				var thisRow = $(slider).closest('li.question-item');
				var thisSliderVal = $(slider).slider('option', 'value');
				var thisSliderStep = $(slider).slider('option', 'step');
				var thisSliderMin = $(slider).slider('option', 'min');
				var thisSliderMax = $(slider).slider('option', 'max');
				$('button.slider-button', thisRow).prop('disabled', false);
				if ($(slider).slider('option', 'value') == thisSliderMin) {
					$('button.slider-button.down', thisRow).prop('disabled', true);
				}
				if ($(slider).slider('option', 'value') == thisSliderMax) {
					$('button.slider-button.up', thisRow).prop('disabled', true);
				}
			}
			$('.multinum-slider', thisQuestion).each(function(i) {
				handleButtonState(this);
				if($(this).closest('li.question-item').find('input.text').val() != '') {
					$('.slider-callout', this).text(opts.valuePrefix+$(this).closest('li.question-item').find('input.text').val()+opts.valueSuffix);
				}
			});

			// Function to handle button actions
			function handleButtons(thisButton) {
				var thisRow = $(thisButton).closest('li.question-item');
				var thisSlider = $('.multinum-slider', thisRow);
				var thisSliderStep = $(thisSlider).slider('option', 'step');
				var stepDecimals = 0;
				if(thisSliderStep.toString().indexOf('.') >= 0) {
					stepDecimals = thisSliderStep.toString().split('.')[1].length;
				}
				var thisSliderVal = Number($(thisSlider).slider('option', 'value')).toFixed(stepDecimals);
				var thisSliderMin = $(thisSlider).slider('option', 'min');
				var thisSliderMax = $(thisSlider).slider('option', 'max');
				if ($(thisButton).hasClass('down') && thisSliderVal > thisSliderMin) {
					$(thisSlider).slider('option', 'value', Number(thisSliderVal)-Number(thisSliderStep));
				}
				if ($(thisButton).hasClass('up') && thisSliderVal < thisSliderMax) {
					$(thisSlider).slider('option', 'value', Number(thisSliderVal)+Number(thisSliderStep));
				}
				var newValue = $(thisSlider).slider('option', 'value').toFixed(stepDecimals).replace(/\./, LSvar.sLEMradix);
				$('input.text', thisRow).val(newValue).triggerHandler('keyup');
				$('.slider-callout', thisSlider).text(opts.valuePrefix+newValue+opts.valueSuffix);
			}

			// Scrolling
			if(opts.scrolling == true) {

				var sliderTimeout;
				var clicker = $('button.slider-button', thisQuestion);
				var count = 0;

				$('button.slider-button', thisQuestion).mousedown(function(){
					var thisButton = $(this);
					sliderTimeout = setInterval(function(){
						handleButtons(thisButton);
					}, opts.scrollInterval);
					return false;
				});

				$(document).mouseup(function(){
					clearInterval(sliderTimeout);
					return false;
				});
				$('button.slider-button', thisQuestion).mouseout(function(){
					handleButtonState($(this).closest('li.question-item').find('.multinum-slider'));
				});
			}

			// Listener on the buttons
			$('button.slider-button', thisQuestion).click(function(e) {
				handleButtons(this)	;
				handleButtonState($(this).closest('li.question-item').find('.multinum-slider'));
			});

			// Listener on sliders
			$('.multinum-slider', thisQuestion).on('slidestop', function( event, ui ) {
				handleButtonState(this);
			});

			// Listener on reset buttons
			$('.slider-reset', thisQuestion).on( "click", function( event, ui ) {
				var thisReset = $(this);
				setTimeout(function() {
					handleButtonState($(thisReset).closest('li.question-item').find('.multinum-slider'));
				}, 150);
			});
		});
	};
})( jQuery );
- Add the following to the end of template.css (these styles are for the default template but easily modified for others):
.slider-button-question label.slider-label {
    margin-top: 0;
    padding: 40px 1em 0 0;
    *padding: 25px 1em 0 0;
}

.slider-button-question div.multinum-slider {
	margin-top: 45px;
}

.slider-button-question .ui-slider-horizontal .ui-slider-handle {
	width: 18px;
    margin-left: -9px;
    top: -4px;
}

.slider-button-question .slider_callout {
    margin-left: -41px;
    text-align: center;
    width: 100px;
}

.slider-button-question .slider-button-wrapper {
	float: left;
	margin: 40px 0 0 25px;
}

.slider-button-question .slider-button-wrapper button {
	padding: 0 10px;
	margin: 0 0 0 5px;
}

.slider-button-question .slider-button-wrapper button:disabled {
	opacity:0.65;
	filter:alpha(opacity=65);
	cursor: default;
}

.slider-button-question .slider-reset {
	margin-top: 42px;
}
- Then, add something like this to the source of your question to apply the plugin with some custom option settings (I think the comments explain the options adequately)
<script type="text/javascript" charset="utf-8">
	$(document).ready(function(){
		$('#question{QID}').sliderButtons({
			downText: 'Down', // Text for the "down" button
			upText: 'Up', // Text for the "up" button
			scrolling: true, // Continuous slider movement if left mouse button held down
			scrollInterval: 250, // Interval (in ms) between slider movement when button is held down
			valueSuffix: "%"	// Suffix for callout
		});
	});
</script>
- Or, simply to apply the plugin with the default option settings
<script type="text/javascript" charset="utf-8">
	$(document).ready(function(){
		$('#question{QID}').sliderButtons();
	});
</script>
Split your sample into legs (cells) that see slightly different wording and media
Sometimes you may need to test candidate A vs candidate B or brand 1 vs brand 2 … vs brand n. Typically in such cases the phrasing of the questionnaire is identical except for the brand (candidate) and some logo/media. Rather than create several questionnaires it is best to control survey logic by assigning respondents to different groups and showing them different versions of the questionnaire.
The logical engine in the current version (1.91) does not support this but you can still do it using the attribute fields in the token table. The instructions below are not really a workaround, but more of a translation of conditional logic to database questionnaire logic.
This works for closed surveys. If your survey is not closed you may want to consider ways to create automatically tokens for each respondent like: "Create token on the fly and Edit completed survey": http://bugs.limesurvey.org/view.php?id=2982
Case A: you need different text for each version
Step 1: you create a tokens table adding attribute fields for each variation you need: User defined attribute fields. For example you may store in attribute_1 the name of the candidate, in attribute_2 the name of the party etc.
Step 2 You export the structure of your tokens database and populate it with the relevant values for the attribute fields. Then import it back
Example:

Please use the instructions here: importing and exporting tokens, and pay attention because this can be error-prone.
Step 3
When creating a question use the insert replacement field icon  to insert your proper keyword.
This is it. The overall process is quite simple once you get the hang of using tokens, but the database can be space-consuming if you are running on limited resources.
Case B: you need to run different media, from public hosting websites.
The process is just like in case A, just that you will populate the attribute field with unique identifiers for the media.
See below an example on how to embed a youtube video
<iframe allowfullscreen="" frameborder="0" height="349" src="http://www.youtube.com/embed/'''{TOKEN:ATTRIBUTE_5}'''?rel=0&modestbranding=1&loop=0&controls=0&autoplay=1&rel=0&showinfo=0&showsearch=0&iv_load_policy=o" width="560"></iframe>
If you embed images you will want to make sure that the hotlinks for your pictures only differ by the image ID. IF not, you may use a larger portion, or maybe even the entire URL as your unique identifier. As said before, please consider how much space you are allowed for your databases.
Case C: you want to run media from your server, which is organized in relevant folders
For this scenario I will assume your media is organized as follows
Project folder ...leg folder (for each leg) ... media (1 to n). You can use a FTP client to upload this structure to you LS installation.
In this case you only need to store the <leg folder> into the tokens table and then use this info to build your embed tag. This may free a significant amount of space,
For example if you have the data as below...

… then your embed for the party logo will look somewhere along these lines:
<img src="[path to project folder]/'''{TOKEN:ATTRIBUTE_3}'''/logo1.png" alt="'''{TOKEN:ATTRIBUTE_2}'''">
The alt tag is, of course, optional.
You can match and mix all 3 cases as it suites you best. You need to be a little careful when you work with tokens and embed tags, but it will save you from using intricate and error-prone survey logic or from duplicating surveys endlessly.
Limit the language options dropdown on the list surveys page
This solution allows you to define (in config.php) a comma-delimited list of languages you want in the dropdown. It is not optimized (it loads all the languages and then unsets everything you don't want), but is fairly easy to implement.
$supportedLanguagesKeys = 'en,vi';
Filter out everything except the your selected languages (if defined).
   // if $supportedLanguagesKeys is defined in config, filter

   if (!empty($GLOBALS['supportedLanguagesKeys']))

   foreach (array_keys($supportedLanguages) as $lang) {

     if (!in_array($lang, explode(',', $GLOBALS['supportedLanguagesKeys']))) {

       unset($supportedLanguages[$lang]);

     }

   }
Now only my languages, plus the base language, is displayed. To get rid of the redundant base language, do the following
#

   } elseif (!isset($surveyid))

   {

       global $defaultlang, $baselang;

       $htmlcode = "<select name=\"select\" class='languagechanger' onchange=\"javascript:window.location=this.value\">\n";
#    REMOVE THE NEXT LINE OR COMMENT IT OUT)

       $htmlcode .= "<option value=\"$relativeurl/index.php?lang=". $defaultlang ."$tokenparam\">".getLanguageNameFromCode($defaultlang,false)."</option>\n";

   foreach(getlanguagedata() as $key=>$val)

       {

           $htmlcode .= "\t<option value=\"$relativeurl/index.php?lang=".$key."$tokenparam\" ";

           if ($key == $baselang) $htmlcode .= " selected='selected'"; /* ADD THIS TO SET SELECTION */

           $htmlcode .= ">".getLanguageNameFromCode($key,false)."</option>\n";

       }

       $htmlcode .= "</select>\n";
Basically it just pre-selects the base language from the list.
