Menu entries configuration/nl: Difference between revisions
From LimeSurvey Manual
No edit summary |
Updating to match new version of source page |
||
| Line 3: | Line 3: | ||
__TOC__ | __TOC__ | ||
{{Alert|text=Under construction}} | |||
{{Box| | {{Box|The wiki is incomplete. More details have to be provided. If you would like to contribute to this wiki.}} | ||
=Algemeen= | =Algemeen= | ||
Als je iets aan de regels van een menu wilt wijzigen, ga dan via de dialoog '''Configuratie''' naar de '''Menu-regels configuratie'''. | Als je iets aan de regels van een menu wilt wijzigen, ga dan via de dialoog '''Configuratie''' naar de '''Menu-regels configuratie'''. | ||
<center>[[File:Menu Entries Configuration.png|Menu Entries Configuration.png]]</center> | <center>[[File:Menu Entries Configuration.png|Menu Entries Configuration.png]]</center> | ||
Hier kun je de regels in een [[Menu configuration/nl|menu]] aanmaken, wijzigen en verwijderen. | Hier kun je de regels in een [[Menu configuration/nl|menu]] aanmaken, wijzigen en verwijderen. | ||
=Menu-regels configuratie= | =Menu-regels configuratie= | ||
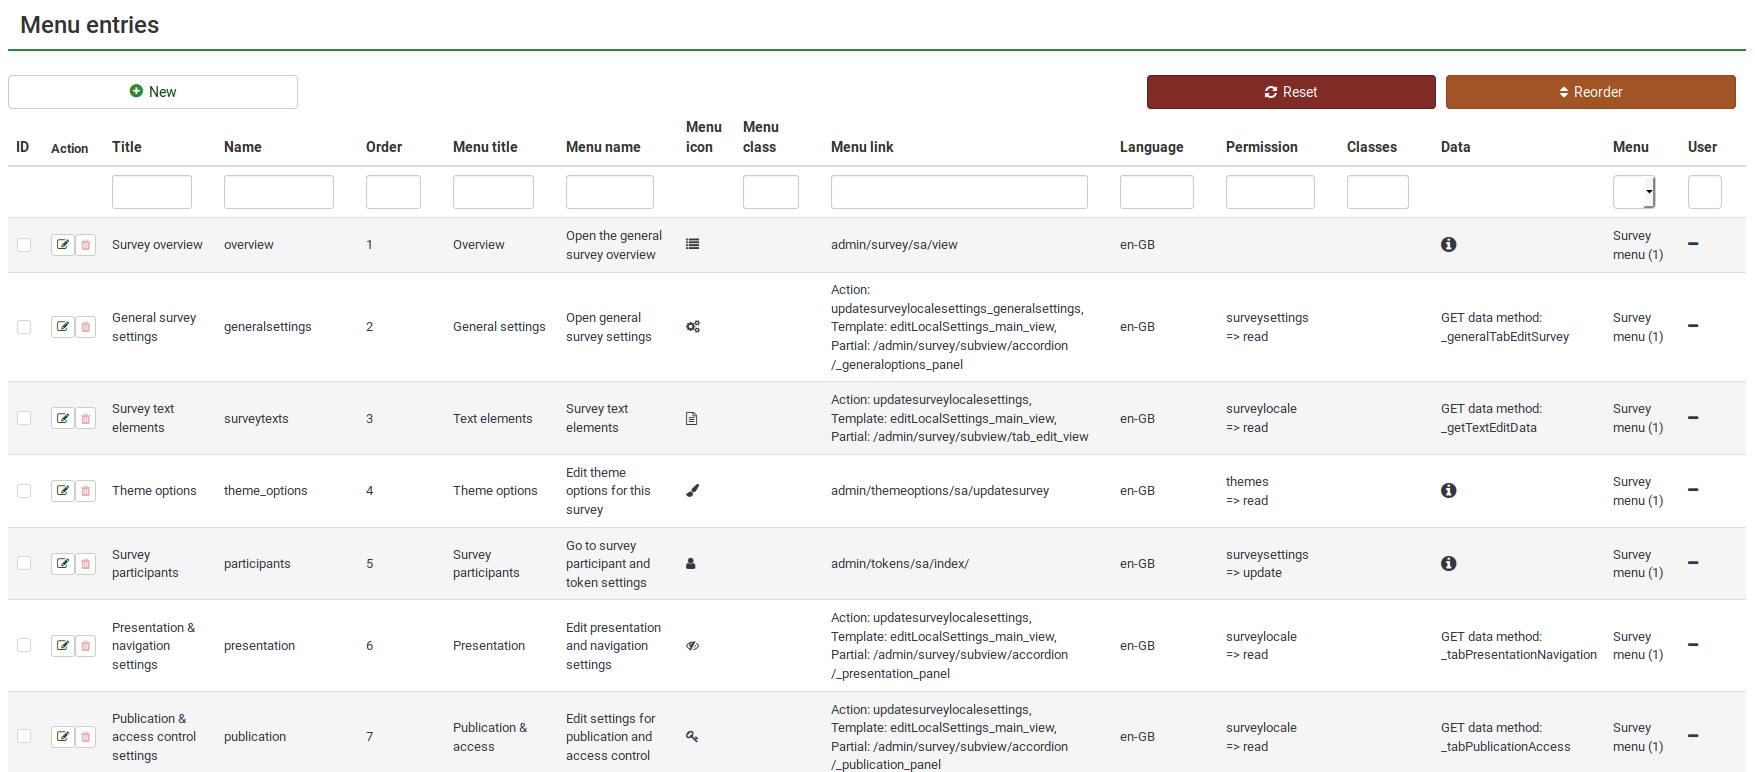
[[File:Menu Entries List.png|center]] | [[File:Menu Entries List.png|center]] | ||
*[[Menu entries configuration | The following actions are available to the users: | ||
*[[Menu entries configuration | *[[Menu entries configuration#Create a menu entry|Create a menu entry]] | ||
*[[Menu entries configuration | *[[Menu entries configuration#Edit menu entry|Edit menu entry]] | ||
*[[Menu entries configuration#Delete menu entry|Delete menu entry]] | |||
*[[Menu entries configuration#Reorder menu entries|Reorder menu entries]] | |||
*[[Menu entries configuration#Reset menu entries to the default values|Reset menu entries to the default values]] | |||
==Menu-regel aanmaken== | ==Menu-regel aanmaken== | ||
To create a new menu entry, click on the '''+ New''' button located on the top-left side of the window. Once clicked, you the following menu options will be displayed: | |||
*'''Menu''': | *'''Menu''': Select the menu where the new entry will be located ([[Menu configuration#Create a menu|read our wiki on how to create menus here]]); | ||
*''' | *'''Name''': Type in the name of the menu entry; | ||
*''' | *'''Title''': The title of the respective entry which will be displayed in the menu or under certain tabs (e.g., under the survey settings tab) | ||
*''' | *'''Ordering''': If more menu entries are added to a menu, use this function to order them. | ||
*'''Menu | *'''Menu title''': Once you accessed a tab or a menu entry, the menu title will be displayed on the first line. For example, if you click on '''Overview''' which is located under the '''Survey settings''' tab, the overview panel will be displayed with the ''(menu) title'': Survey overview | ||
*'''Menu | *'''Menu name''': It is displayed when you hover the mouse over the respective entry. For example, if you hover the mouse over '''Theme options''', the following message will show up: ''Edit theme options for this survey''. | ||
*'''Menu | *'''Menu icon''': All the used icons are fontawesome icons by default. To find other available icons, check the following [https://www.w3schools.com/icons/fontawesome_icons_text.asp link]. Introduce in the box the string located after "fa fa-". E.g., for a floppy disk, we have "fa fa-floppy-o". To use it as an icon for a menu entry, type in this box only "floppy-o". | ||
*'''Menu | *'''Menu icon types''': It depends on the ones used within your current theme. For further details, check the following [[Themes|wiki section]]. | ||
*'''Menu class''' | *'''Menu class''': | ||
*'''Menu link''': Link | *'''Menu link''': Link the menu entry to the URL of that function | ||
*''' | *'''Permission''': | ||
*''' | *'''Permission grade''': | ||
{{Note|[[Menu entries configuration | {{Note|[[Menu entries configuration#Advanced options - menu entries|See the last section of this page]] for information on advanced options.}} | ||
==Menu-regel wijzigen== | ==Menu-regel wijzigen== | ||
Als je een bestaande menu-regel wilt wijzigen, klik dan op de groene knop in de kolom '''Actie''' van die menu-regel. De menu-regel wordt geselecteerd en de tekst op de knop '''+Menu-regel toevoegen''' wordt gewijzigd in '''Wijzig deze menu-regel'''. Klik op de knop en breng je wijzigingen aan. | Als je een bestaande menu-regel wilt wijzigen, klik dan op de groene knop in de kolom '''Actie''' van die menu-regel. De menu-regel wordt geselecteerd en de tekst op de knop '''+Menu-regel toevoegen''' wordt gewijzigd in '''Wijzig deze menu-regel'''. Klik op de knop en breng je wijzigingen aan. | ||
==Menu-regel verwijderen== | ==Menu-regel verwijderen== | ||
Als je een menu-regel wilt verwijderen klik dan op de knop rode afvalbak in de kolom Actie van die menu-regel. | Als je een menu-regel wilt verwijderen klik dan op de knop rode afvalbak in de kolom Actie van die menu-regel. | ||
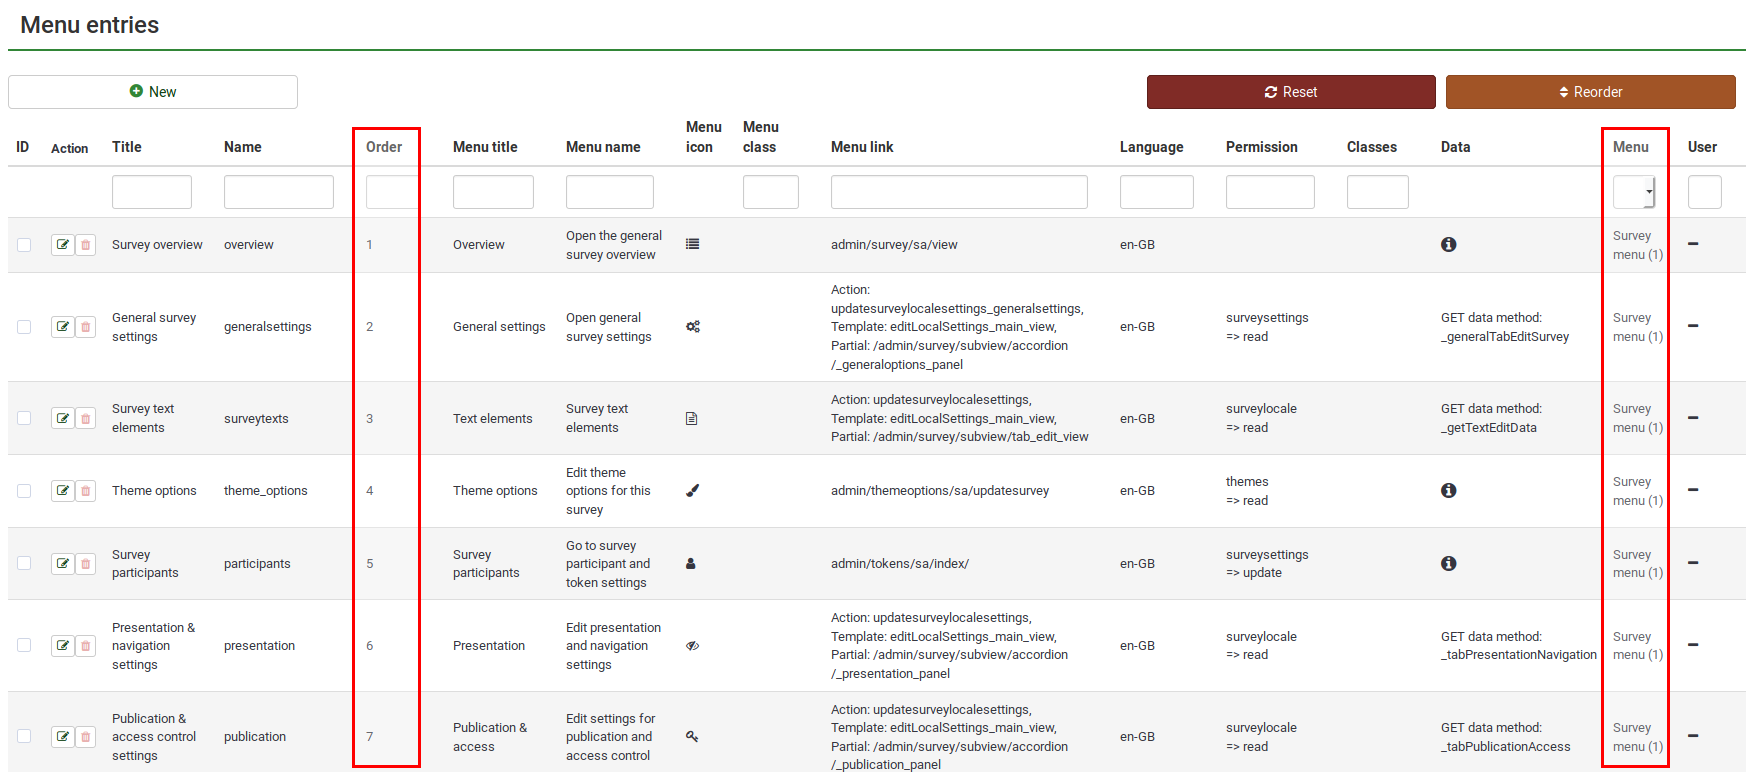
==Reorder menu entries== | |||
The ordering process takes first into account the '''menu''' an entry belongs to, and then it orders the entries according to the value from the '''order field'''. Once you change these values, click on the '''reorder''' button to get the entries rearranged in the table. | |||
<center>[[File:Reorder survey menu entries.png]]</center> | |||
==Reset menu entries to the default values== | |||
If you wish to reset all the values of the survey menu entries to their default values, click on the '''reset''' button located in the upper right part of the screen. A message will pop up asking you to confirm the action. Please note that once you confirm the action, all the custom menu entries will be lost. | |||
{{Alert|title=Attention|text=Please note that in order to backup your survey menu entries configuration, create a [[Backup entire database|LimeSurvey database backup]]. A separate option will be introduced in the near future to facilitate only the backup of the survey menus.}} | |||
=Voorbeelden= | =Voorbeelden= | ||
==I want to add a new menu entry to the default survey menu== | |||
In this example, it will be shown how to add a [[Label sets]] menu entry to the default survey menu. | |||
First, click on the '''+ New''' button located on the top left side of the screen and start completing the fields: | |||
*''Menu'': Select from the dropdown list the menu you wish to add to the menu entry. | |||
*''Name'': labelsets. | |||
*''Order'': 20. | |||
*''Menu title'': Label sets. | |||
*''Menu name'': Click here to edit the available label sets. | |||
*''Menu icon'': Check the following [https://www.w3schools.com/icons/fontawesome_icons_text.asp link] to find the right icon for the new menu entry. In the screenshot from above, I used "fa fa-battery-three-quarters". | |||
*''Menu icon type'': Select from the dropdown box the "Fontawesome icon" option. | |||
*''Menu link'': Find the URL of the option you wish to link the entry to, and copy everything after the website name (admin/labels/sa/view in our case): | |||
<center>[[File:Link menu entry example.png]]</center> | |||
Click on the save button and see if the new survey menu entry was added: | |||
<center>[[File:Example menu entry label Sets.png]]</center> | |||
Once done, check the survey menu and see if the survey menu entry is functional: | |||
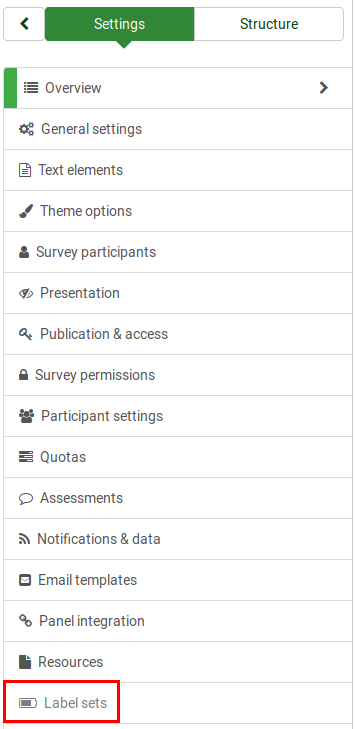
<center>[[File:Example label sets new entry.png]]</center> | |||
{{Alert|title=Attention|text=Do not forget to check the LimeSurvey installation permissions to see which users can access and edit label sets. For more details, check the following wiki section.}} | |||
=Geavanceerde opties= | =Geavanceerde opties= | ||
Revision as of 16:15, 26 May 2018
Algemeen
Als je iets aan de regels van een menu wilt wijzigen, ga dan via de dialoog Configuratie naar de Menu-regels configuratie.

Hier kun je de regels in een menu aanmaken, wijzigen en verwijderen.
Menu-regels configuratie

The following actions are available to the users:
- Create a menu entry
- Edit menu entry
- Delete menu entry
- Reorder menu entries
- Reset menu entries to the default values
Menu-regel aanmaken
To create a new menu entry, click on the + New button located on the top-left side of the window. Once clicked, you the following menu options will be displayed:
- Menu: Select the menu where the new entry will be located (read our wiki on how to create menus here);
- Name: Type in the name of the menu entry;
- Title: The title of the respective entry which will be displayed in the menu or under certain tabs (e.g., under the survey settings tab)
- Ordering: If more menu entries are added to a menu, use this function to order them.
- Menu title: Once you accessed a tab or a menu entry, the menu title will be displayed on the first line. For example, if you click on Overview which is located under the Survey settings tab, the overview panel will be displayed with the (menu) title: Survey overview
- Menu name: It is displayed when you hover the mouse over the respective entry. For example, if you hover the mouse over Theme options, the following message will show up: Edit theme options for this survey.
- Menu icon: All the used icons are fontawesome icons by default. To find other available icons, check the following link. Introduce in the box the string located after "fa fa-". E.g., for a floppy disk, we have "fa fa-floppy-o". To use it as an icon for a menu entry, type in this box only "floppy-o".
- Menu icon types: It depends on the ones used within your current theme. For further details, check the following wiki section.
- Menu class:
- Menu link: Link the menu entry to the URL of that function
- Permission:
- Permission grade:
Menu-regel wijzigen
Als je een bestaande menu-regel wilt wijzigen, klik dan op de groene knop in de kolom Actie van die menu-regel. De menu-regel wordt geselecteerd en de tekst op de knop +Menu-regel toevoegen wordt gewijzigd in Wijzig deze menu-regel. Klik op de knop en breng je wijzigingen aan.
Menu-regel verwijderen
Als je een menu-regel wilt verwijderen klik dan op de knop rode afvalbak in de kolom Actie van die menu-regel.
The ordering process takes first into account the menu an entry belongs to, and then it orders the entries according to the value from the order field. Once you change these values, click on the reorder button to get the entries rearranged in the table.

If you wish to reset all the values of the survey menu entries to their default values, click on the reset button located in the upper right part of the screen. A message will pop up asking you to confirm the action. Please note that once you confirm the action, all the custom menu entries will be lost.
Voorbeelden
In this example, it will be shown how to add a Label sets menu entry to the default survey menu.
First, click on the + New button located on the top left side of the screen and start completing the fields:
- Menu: Select from the dropdown list the menu you wish to add to the menu entry.
- Name: labelsets.
- Order: 20.
- Menu title: Label sets.
- Menu name: Click here to edit the available label sets.
- Menu icon: Check the following link to find the right icon for the new menu entry. In the screenshot from above, I used "fa fa-battery-three-quarters".
- Menu icon type: Select from the dropdown box the "Fontawesome icon" option.
- Menu link: Find the URL of the option you wish to link the entry to, and copy everything after the website name (admin/labels/sa/view in our case):
Click on the save button and see if the new survey menu entry was added:

Once done, check the survey menu and see if the survey menu entry is functional:

Geavanceerde opties
Als je een menu-regel aanmaakt of wijzigt dan staat er onderin een knop Toon geavanceerde opties. Als je daar op klikt verschijnen er extra velden:
- Actie
- Sjabloon
- Gedeeltelijk
- Classes
- Data
- Get data method
- Taal
Als je iets aanpast, vergeet dan niet de wijzigingen op te slaan.