TwoFactorAdminLogin: Difference between revisions
From LimeSurvey Manual
mNo edit summary |
Denischenu (talk | contribs) Force 2FA : enforce |
||
| (15 intermediate revisions by 5 users not shown) | |||
| Line 1: | Line 1: | ||
<languages /> | |||
<translate> | |||
<!--T:1--> | |||
__TOC__ | |||
=Introduction= <!--T:2--> | |||
<!--T:3--> | |||
'''2-Factor-Authentication''' (2FA) is a way to add additional security to your account. It is called "two-factor-authentication" because two verification methods are used to access your account. The first "factor" is your usual password that is standard for any account. The second "factor" is a verification code retrieved from a 2FA application either from your computer or mobile device. For more details about 2FA and its importance, please visit the following [https://en.wikipedia.org/wiki/Multi-factor_authentication article]. | '''2-Factor-Authentication''' (2FA) is a way to add additional security to your account. It is called "two-factor-authentication" because two verification methods are used to access your account. The first "factor" is your usual password that is standard for any account. The second "factor" is a verification code retrieved from a 2FA application either from your computer or mobile device. For more details about 2FA and its importance, please visit the following [https://en.wikipedia.org/wiki/Multi-factor_authentication article]. | ||
If enabled, a 6 digits code (default value) | <!--T:4--> | ||
If enabled, a 6 digits code (default value) has to be introduced when you log in to your LimeSurvey instance: | |||
<!--T:5--> | |||
<center>[[File:2FA_login.png]]</center> | <center>[[File:2FA_login.png]]</center> | ||
<!--T:6--> | |||
To learn more about this functionality, please continue reading below. | To learn more about this functionality, please continue reading below. | ||
=How to install the 2FA plugin= <!--T:7--> | |||
<!--T:59--> | |||
Since version 6.x the plugin is a core plugin. So just visit the [[Plugin manager|Plugin Manager]] page and enable it from there (see below for more details). | |||
=Activate the 2FA plugin= <!--T:16--> | |||
<!--T:17--> | |||
To activate your 2FA plugin, access your LimeSurvey instance, and activate it from your [[Plugin manager|Plugin Manager]]: | To activate your 2FA plugin, access your LimeSurvey instance, and activate it from your [[Plugin manager|Plugin Manager]]: | ||
<!--T:18--> | |||
<center>[[File:2fa_activate.png]]</center> | <center>[[File:2fa_activate.png]]</center> | ||
<!--T:19--> | |||
To check the default settings, please click on "Configure". | To check the default settings, please click on "Configure". | ||
==Plugin settings== | ==Plugin settings== <!--T:20--> | ||
<!--T:21--> | |||
The configuration page contains the following settings: | The configuration page contains the following settings: | ||
<!--T:22--> | |||
<center>[[File:2FA plugin configuration.png]]</center> | <center>[[File:2FA plugin configuration.png]]</center> | ||
<!--T:23--> | |||
*'''Issuer:''' The text typed in this box will be displayed in the app as issuer name. | *'''Issuer:''' The text typed in this box will be displayed in the app as issuer name. | ||
*'''Digits:''' The number of digits the resulting codes will be. Please leave it at 6 for Google Authenticator. | *'''Digits:''' The number of digits the resulting codes will be. Please leave it at 6 for Google Authenticator. | ||
| Line 42: | Line 59: | ||
*'''Discrepancy:''' The amount of discrepancy is allowed for the client after the TimePeriod expires (seconds) | *'''Discrepancy:''' The amount of discrepancy is allowed for the client after the TimePeriod expires (seconds) | ||
<!--T:24--> | |||
*'''Algorithm:''' The algorithm used to generate a hash: | *'''Algorithm:''' The algorithm used to generate a hash: | ||
**''SHA1 (Default)'' | **''SHA1 (Default)'' | ||
| Line 47: | Line 65: | ||
**''MD5'' | **''MD5'' | ||
*'''Force 2FA:''' | <!--T:25--> | ||
*'''Force 2FA:''' | |||
** ''Only prompt, no enforcement'' Users without 2FA token are redirected to 2FA creation after login | |||
** ''Always enforce 2FA activation'' Users without 2FA token are redirected to 2FA creation after login, and no other action are available, except remote control. | |||
<!--T:26--> | |||
Don't forget to click on "Save" after updating your 2FA configuration. | Don't forget to click on "Save" after updating your 2FA configuration. | ||
=2-Factor-Settings= | =2-Factor-Settings= <!--T:27--> | ||
<!--T:28--> | |||
Once you activated the plugin, a new menu item will be displayed on the top bar: | Once you activated the plugin, a new menu item will be displayed on the top bar: | ||
<!--T:29--> | |||
<center>[[File:2fa_location.png]]</center> | <center>[[File:2fa_location.png]]</center> | ||
<!--T:30--> | |||
The dropdown menu includes the following two options: | The dropdown menu includes the following two options: | ||
<!--T:31--> | |||
*[[TwoFactorAdminLogin#2FA-Setting|2FA-Setting]]: Users can enable and manage their 2FA settings. | *[[TwoFactorAdminLogin#2FA-Setting|2FA-Setting]]: Users can enable and manage their 2FA settings. | ||
*[[TwoFactorAdminLogin#2FA-Administration|2FA-Administration]]: With the right permission, you can visualize whether the other instance users use 2FA or not. | *[[TwoFactorAdminLogin#2FA-Administration|2FA-Administration]]: With the right permission, you can visualize whether the other instance users use 2FA or not. | ||
==2FA-Setting== | ==2FA-Setting== <!--T:32--> | ||
<!--T:33--> | |||
If you haven't created any 2FA-token yet, the following page will be displayed: | If you haven't created any 2FA-token yet, the following page will be displayed: | ||
<!--T:34--> | |||
<center>[[File:2fa_register.png]]</center> | <center>[[File:2fa_register.png]]</center> | ||
<!--T:35--> | |||
If you decide to create a 2FA-token, click on "Register 2FA now". You will be prompted by the following message box: | If you decide to create a 2FA-token, click on "Register 2FA now". You will be prompted by the following message box: | ||
<!--T:36--> | |||
<center>[[File:2fa_user_settings.png]]</center> | <center>[[File:2fa_user_settings.png]]</center> | ||
<!--T:37--> | |||
To enable 2FA: | To enable 2FA: | ||
#Select the 2FA authentication method. By default, five different 2FA types are provided: Google Authenticator (default), Authy, YubiKey, Authenticator Plus, Duo, and HDE OTP. | #Select the 2FA authentication method. By default, five different 2FA types are provided: Google Authenticator (default), Authy, YubiKey, Authenticator Plus, Duo, and HDE OTP. | ||
| Line 86: | Line 117: | ||
#Enter the confirmation key displayed in your 2FA application. | #Enter the confirmation key displayed in your 2FA application. | ||
<!--T:38--> | |||
{{Note|From a technical perspective, you can use any 2FA application that supports TOTP (Time-based One-Time Password algorithm). For more information on what TOTP is, please check this [https://en.wikipedia.org/wiki/Time-based_One-time_Password_algorithm article].}} | {{Note|From a technical perspective, you can use any 2FA application that supports TOTP (Time-based One-Time Password algorithm). For more information on what TOTP is, please check this [https://en.wikipedia.org/wiki/Time-based_One-time_Password_algorithm article].}} | ||
<!--T:39--> | |||
To confirm the creation of your 2FA-token, click on "Create 2FA binding". | To confirm the creation of your 2FA-token, click on "Create 2FA binding". | ||
<!--T:40--> | |||
<hr width="50%" style="margin:auto"> | <hr width="50%" style="margin:auto"> | ||
<!--T:41--> | |||
Once done, the following two options will be displayed in your personal 2FA settings: | Once done, the following two options will be displayed in your personal 2FA settings: | ||
<!--T:42--> | |||
<center>[[File:2fa_unset.png]]</center> | <center>[[File:2fa_unset.png]]</center> | ||
<!--T:43--> | |||
* '''Unset 2FA:''' Confirm your action to delete the 2FA-token associated to your account. | * '''Unset 2FA:''' Confirm your action to delete the 2FA-token associated to your account. | ||
<!--T:44--> | |||
{{Note|Please note that you will need to re-authenticate again if "Force 2FA" is enabled from the plugin settings.}} | {{Note|Please note that you will need to re-authenticate again if "Force 2FA" is enabled from the plugin settings.}} | ||
* '''Reset 2FA:''' If this option is selected, you will be asked to scan the new QR-code and introduce the new | <!--T:45--> | ||
* '''Reset 2FA:''' If this option is selected, you will be asked to scan the new QR-code and introduce the new confirmation Key. | |||
==2FA-Administration== | ==2FA-Administration== <!--T:46--> | ||
<!--T:47--> | |||
With the necessary permissions, you can have access to the 2FA user management panel from where you can check how many users activated 2FA. | With the necessary permissions, you can have access to the 2FA user management panel from where you can check how many users activated 2FA. | ||
<!--T:48--> | |||
<center>[[File:2fa_user_management.png]]</center> | <center>[[File:2fa_user_management.png]]</center> | ||
<!--T:49--> | |||
*'''Action:''' A red trash button is displayed in this column next to the users that have enabled 2FA. If someone asks to get the 2FA-token reset because he/she cannot log in anymore into your instance, you can delete the 2FA-token associated with his/her account from here. | *'''Action:''' A red trash button is displayed in this column next to the users that have enabled 2FA. If someone asks to get the 2FA-token reset because he/she cannot log in anymore into your instance, you can delete the 2FA-token associated with his/her account from here. | ||
*'''Username:''' All the instance users are listed under this column. | *'''Username:''' All the instance users are listed under this column. | ||
| Line 125: | Line 167: | ||
*'''2FA enabled:''' If "1", it means that 2FA is enabled for the respective user. | *'''2FA enabled:''' If "1", it means that 2FA is enabled for the respective user. | ||
= | =FAQs= <!--T:50--> | ||
==I am a super administrator and locked myself out. How can I delete my 2FA-token?== <!--T:51--> | |||
<!--T:52--> | |||
You will need access to your database and truncate the 2FA-related column. | |||
==How can I enforce 2FA to all my users?== | ==How can I enforce 2FA to all my users?== <!--T:53--> | ||
<!--T:54--> | |||
Enable "Force 2FA" from the plugin configuration menu. | Enable "Force 2FA" from the plugin configuration menu. | ||
==From where can I download the plugin?== <!--T:55--> | |||
<!--T:56--> | |||
Please access [https://www.limesurvey.org/limestore LimeStore] and [https://www.limesurvey.org/limestore?view=extensiondetails&id=49 download the plugin from download it from here]. To be able to download it, you need to hold a Premium package | |||
==I use LimeSurvey Cloud. Do I have to purchase the plugin?== <!--T:57--> | |||
<!--T:58--> | |||
No. The plugin is already part of the core LimeSurvey plugins - you can enable it by accessing the plugin menu. | |||
</translate> | |||
Latest revision as of 18:49, 19 March 2025
Introduction
2-Factor-Authentication (2FA) is a way to add additional security to your account. It is called "two-factor-authentication" because two verification methods are used to access your account. The first "factor" is your usual password that is standard for any account. The second "factor" is a verification code retrieved from a 2FA application either from your computer or mobile device. For more details about 2FA and its importance, please visit the following article.
If enabled, a 6 digits code (default value) has to be introduced when you log in to your LimeSurvey instance:
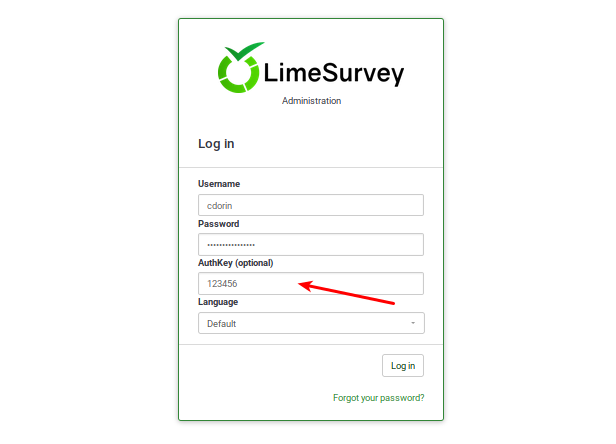
To learn more about this functionality, please continue reading below.
How to install the 2FA plugin
Since version 6.x the plugin is a core plugin. So just visit the Plugin Manager page and enable it from there (see below for more details).
Activate the 2FA plugin
To activate your 2FA plugin, access your LimeSurvey instance, and activate it from your Plugin Manager:

To check the default settings, please click on "Configure".
Plugin settings
The configuration page contains the following settings:
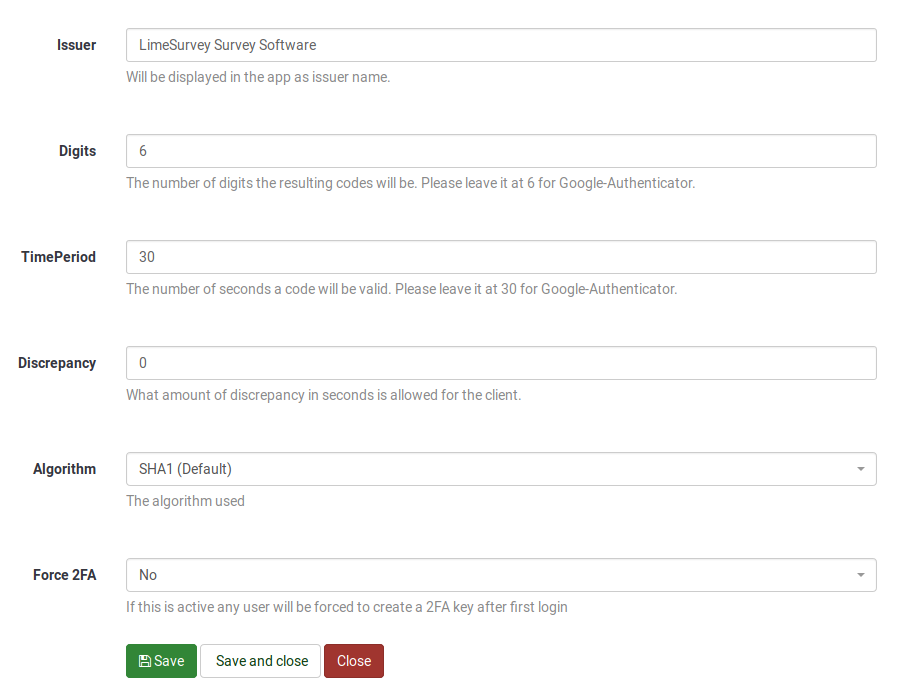
- Issuer: The text typed in this box will be displayed in the app as issuer name.
- Digits: The number of digits the resulting codes will be. Please leave it at 6 for Google Authenticator.
- TimePeriod: The number of seconds a code will be valid. If you use Google Authenticator, please leave it to 30.
- Discrepancy: The amount of discrepancy is allowed for the client after the TimePeriod expires (seconds)
- Algorithm: The algorithm used to generate a hash:
- SHA1 (Default)
- SHA256
- MD5
- Force 2FA:
- Only prompt, no enforcement Users without 2FA token are redirected to 2FA creation after login
- Always enforce 2FA activation Users without 2FA token are redirected to 2FA creation after login, and no other action are available, except remote control.
Don't forget to click on "Save" after updating your 2FA configuration.
2-Factor-Settings
Once you activated the plugin, a new menu item will be displayed on the top bar:
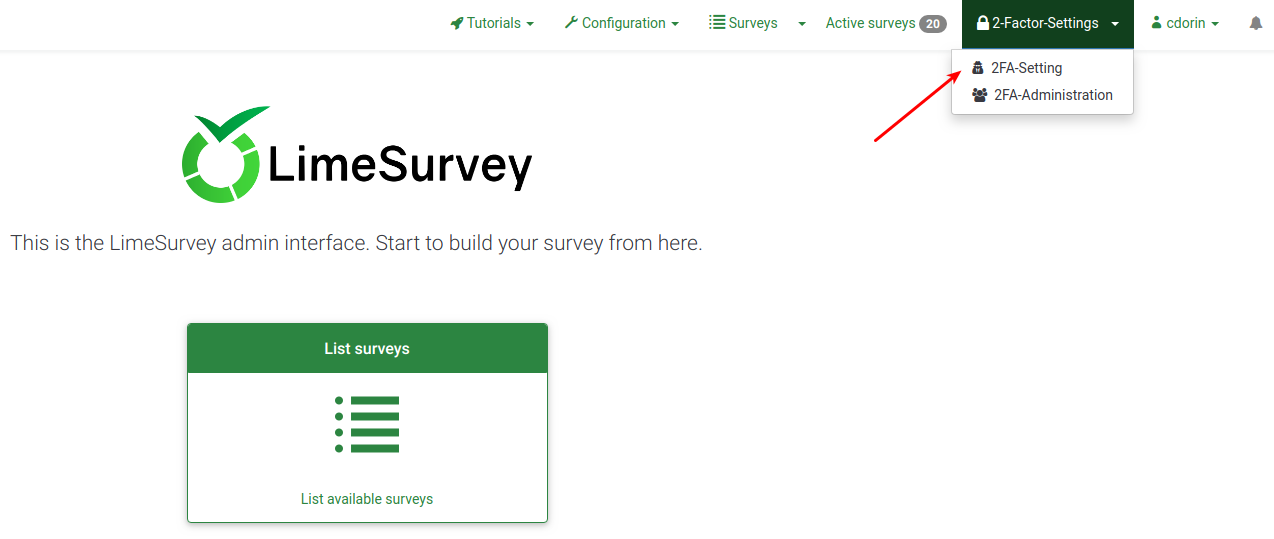
The dropdown menu includes the following two options:
- 2FA-Setting: Users can enable and manage their 2FA settings.
- 2FA-Administration: With the right permission, you can visualize whether the other instance users use 2FA or not.
2FA-Setting
If you haven't created any 2FA-token yet, the following page will be displayed:

If you decide to create a 2FA-token, click on "Register 2FA now". You will be prompted by the following message box:
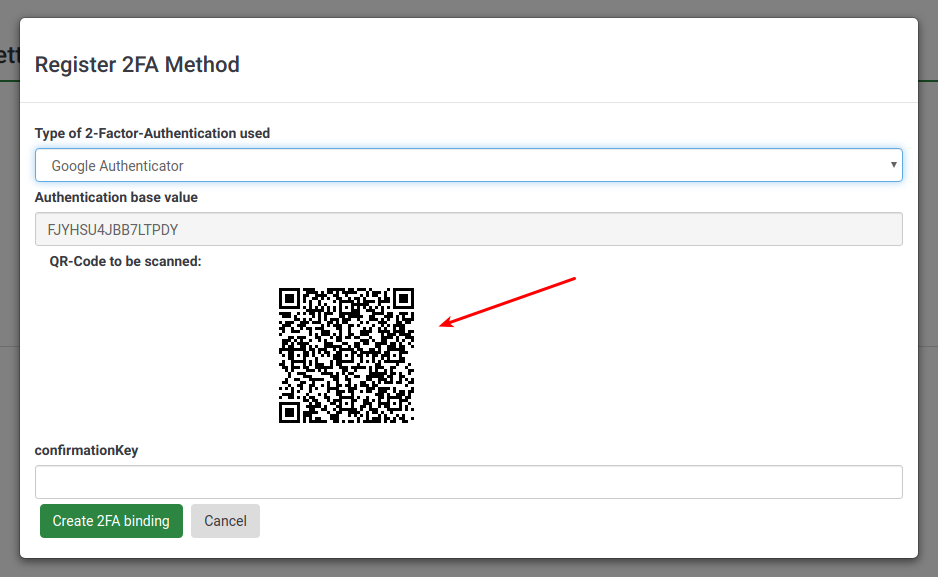
To enable 2FA:
- Select the 2FA authentication method. By default, five different 2FA types are provided: Google Authenticator (default), Authy, YubiKey, Authenticator Plus, Duo, and HDE OTP.
- Scan the QR-code with your mobile phone. For a list of application recommendations, check this article.
- Enter the confirmation key displayed in your 2FA application.
To confirm the creation of your 2FA-token, click on "Create 2FA binding".
Once done, the following two options will be displayed in your personal 2FA settings:
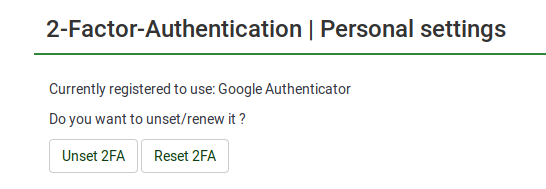
- Unset 2FA: Confirm your action to delete the 2FA-token associated to your account.
- Reset 2FA: If this option is selected, you will be asked to scan the new QR-code and introduce the new confirmation Key.
2FA-Administration
With the necessary permissions, you can have access to the 2FA user management panel from where you can check how many users activated 2FA.

- Action: A red trash button is displayed in this column next to the users that have enabled 2FA. If someone asks to get the 2FA-token reset because he/she cannot log in anymore into your instance, you can delete the 2FA-token associated with his/her account from here.
- Username: All the instance users are listed under this column.
- Full name:The full name typed in here by your users is displayed in this field.
- Email: The email address corresponding to your users.
- 2FA-Method: The 2FA-method chosen by each user.
- 2FA enabled: If "1", it means that 2FA is enabled for the respective user.
FAQs
I am a super administrator and locked myself out. How can I delete my 2FA-token?
You will need access to your database and truncate the 2FA-related column.
How can I enforce 2FA to all my users?
Enable "Force 2FA" from the plugin configuration menu.
From where can I download the plugin?
Please access LimeStore and download the plugin from download it from here. To be able to download it, you need to hold a Premium package
I use LimeSurvey Cloud. Do I have to purchase the plugin?
No. The plugin is already part of the core LimeSurvey plugins - you can enable it by accessing the plugin menu.