Workarounds: Question design, layout and theme-ing - LimeSurvey 3.0+
From LimeSurvey Manual
This section more or less deals with styling your survey, adjusting the layout and setting up special question types. You can find similar information at these pages:
- The theme editor - LimeSurvey 3.0+
- Workarounds: Manipulating a survey at runtime using Javascript - LimeSurvey 3.0+
- Workarounds: Survey behaviour - LimeSurvey 3.0+
- Workarounds: Further solutions provided by LimeSurvey users - LimeSurvey 3.0+
- Question themes
Please keep in mind that these workarounds are not official LimeSurvey extensions - they are solutions that users have created for themselves. Therefore LimeSurvey can't offer guarantees or support for these solutions.
If you have questions, please contact the users that, thankfully, shared their solutions with the community.
Alternate background colour of questions
To alternate the background colour of questions, open the questions one by one and use CSS to edit each question's background. For example, if you wish to change the background colour of a question thas has the ID 6, use the below code:
<style>
.question6 {
background-color: #E0EBF8;
}
</style>
To check the ID of a question, create and save it into a question group, and then access again the question editor. You will see above the question code the ID of the question:

Card sorting question
A custom question theme for Slider Control Buttons for LimeSurvey 3.x can be found here - https://github.com/tpartner/LimeSurvey-Card-Sorting-3.x
Create MaxDiff question type
Tested with: LimeSurvey 3.17.3
This workaround uses JavaScript to convert an Array (flexible labels) by column question into a MaxDiff question type.

Example
IMPLEMENTATION
- Set up your survey to use JavaScript.
- Create an Array (flexible labels) by column question with two subquestions (representing the left and right columns, respectively).
- Add answers to the array - (representing the rows).
- Create a copy the default theme (extend the default theme).
- Add the following to the end of custom.js in your new template:
function maxDiff(qID, randomize) {

	// Identify some elements
	var thisQuestion = $('#question'+qID);
	var thisTable = $('table.subquestion-list:eq(0)', thisQuestion);

	// Assign a new question class
	$(thisQuestion).addClass('max-diff-array');

	// Move the columns
	$('thead tr:eq(0)', thisTable).prepend($('thead tr:eq(0) th:eq(1)', thisTable));
	$('tr.answers-list', thisTable).each(function(i){
		$('td.answer-item:eq(0)', this).prependTo(this);
	});

	// Random rows
	if(randomize) {
		var rowsArr = [];
		$('tr.answers-list', thisTable).each(function(i){
			$(this).attr('data-index', i);
			rowsArr.push(i);
		});
		shuffleArray(rowsArr);
		$(rowsArr).each(function(i){
			$('tbody', thisTable).append($('tr[data-index="'+this+'"]', thisTable));
		});
	}

	// Prevent clicking twice in the same row
	$('input:radio', thisQuestion).on('click', function () {

		$('input:radio', thisQuestion).prop('disabled', false);
		$('input:radio:checked', thisQuestion).each(function(i) {
			var thisRow = $(this).closest('tr.answers-list');
			$('input:radio', thisRow).not(this).prop('disabled', true);
		});
	});

	// Fix up the row classes
	var rowClass = 1;
	$('tr.answers-list', thisTable).each(function(i) {
		$(this).addClass('array'+(2-(i%2)));
	});
}

function shuffleArray(array) {
	for (var i = array.length - 1; i > 0; i--) {
		var j = Math.floor(Math.random() * (i + 1));
		var temp = array[i];
		array[i] = array[j];
		array[j] = temp;
	}
	return array;
}
- Add the following to the end of custom.css in your new template:
.max-diff-array th.answertext {
	text-align: center;
	border-right: 3px solid #FFFFFF;
	border-left: 3px solid #FFFFFF;
}

/* Override the responsive "no-more-tables" stuff */
@media only screen and (max-width: 801px) {

	.max-diff-array .no-more-tables table {
		display: table;
		border-collapse: inherit;
	}

	.max-diff-array .no-more-tables thead,
	.max-diff-array .no-more-tables tbody {
		display: table-row-group;
	}

	.max-diff-array .no-more-tables tr {
		left: auto;
		position: relative;
		top: auto;
		display: table-row;
		border: 0 none;
	}

	.max-diff-array .no-more-tables th,
	.max-diff-array .no-more-tables td {
		display: table-cell;
		text-align: center !important;
		color: #2c3e50;
		font-size: 15px;
	}

	.max-diff-array th.answertext {
		border-right: 3px solid #FFFFFF;
		border-left: 3px solid #FFFFFF;
	}

	.max-diff-array .answer-item label span {
		display: none !important;
	}
}
- Add a script like this to the question source of the Array (flexible labels) question:
<script type="text/javascript" charset="utf-8">
	$(document).ready(function(){
		// Call the maxDiff() function
		// Set the second parameter to true for randomized rows
		maxDiff({QID}, true);
	});
</script>
Likert Scale
To create a likert scale, you have to choose either Array or Array (5 point choice) as question type to part the answer by using a pipe char "|" - which answer should be on the left side and which one on the right side of the array. For example, If you want to have 'Good' on the left side of the row and 'Evil' on the right side of the row, just write 'Good|Evil' into the answer field:
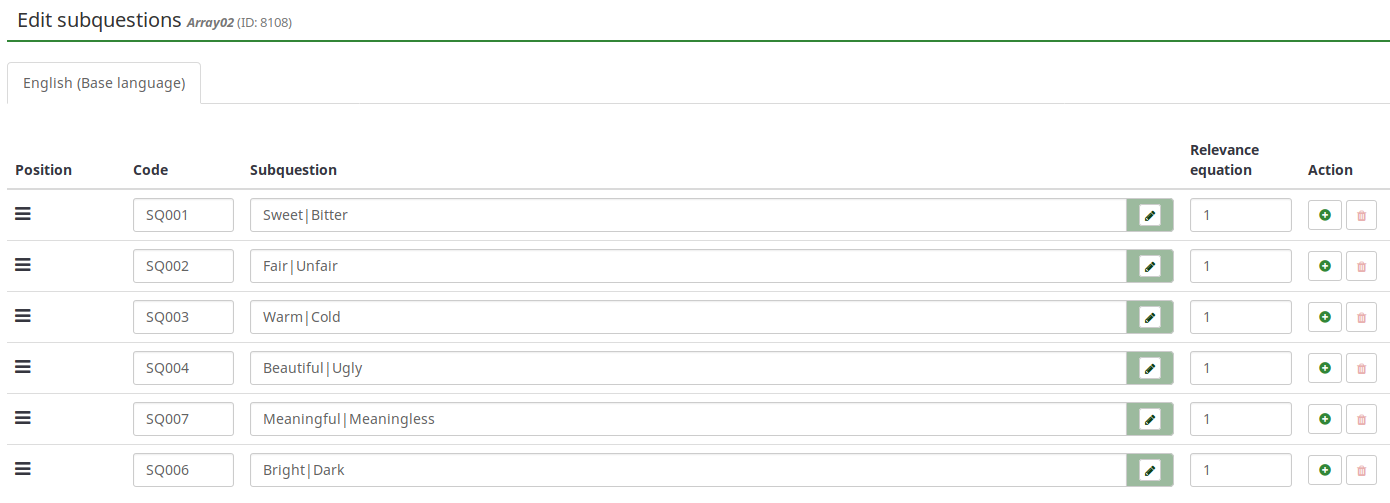
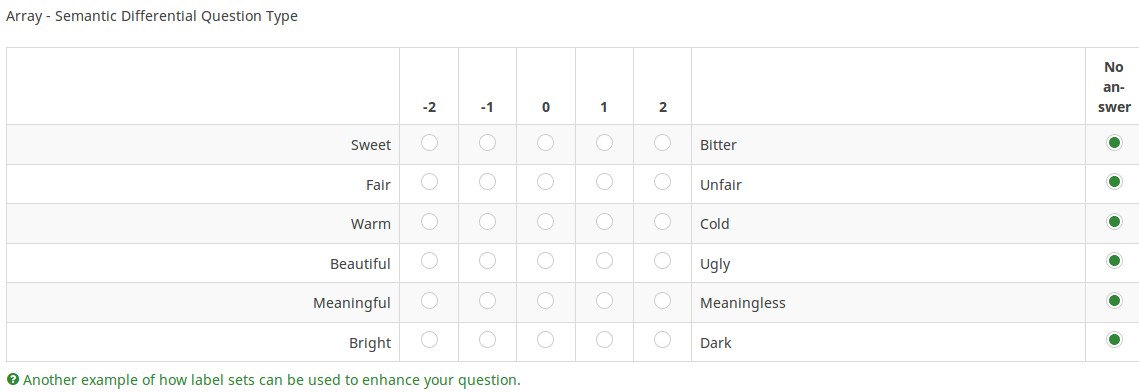
Example: Media:Question type - Array - Semantic Differential Question Type.zip
Dropdown responses for Array
Link tpartner forum
Download example link
Screenshot
Embedding audio in questions
To embed the audio clips, you have to use a code similar to the one listed below:
<audio controls="controls"><source src=" /upload/surveys/336775/images/MP3_file_name.mp3
" type="audio/mp3" /> Your browser does not support this audio</audio>
Once embedded, the question would look like this:

To introduce audio clips as subquestions and/or answers, click on the green pencil to open the HTML editor and attach the corresponding code (while being in the source mode).
Evaluative Space Grid (ESG)
Check the old wiki section -> working
Hiding inputs of a "Multiple options with comments" question
See example + forum post
How to hide the asterisk
The instructions are similar to the ones presented above for LimeSurvey 2.
- Access the desired theme. If it is a default theme, create a copy of it by clicking on the "extend" button.
- Access the list of themes and click on the theme editor that corresponds to the newly created theme.
- On the left side, you can visualise the corresponding CSS files of your theme.
- Click on custom.css and add the following line:
.asterisk {display: none;}
- Save the changes. The red asterisk that is usually displayed at the beginning of the question text is hidden.
How to hide the language switcher from the welcome page
In the case in which you decide to launch a multilingual survey, you will observe on the welcome page a drop-down menu that permits your respondents to select the language in which they wish to fill in your survey:

However, in certain scenarios you wish to hide the respective option. There are many ways in which you can hide the language switcher. The "twig" way is displayed below.
Access Themes from the global Configuration menu:

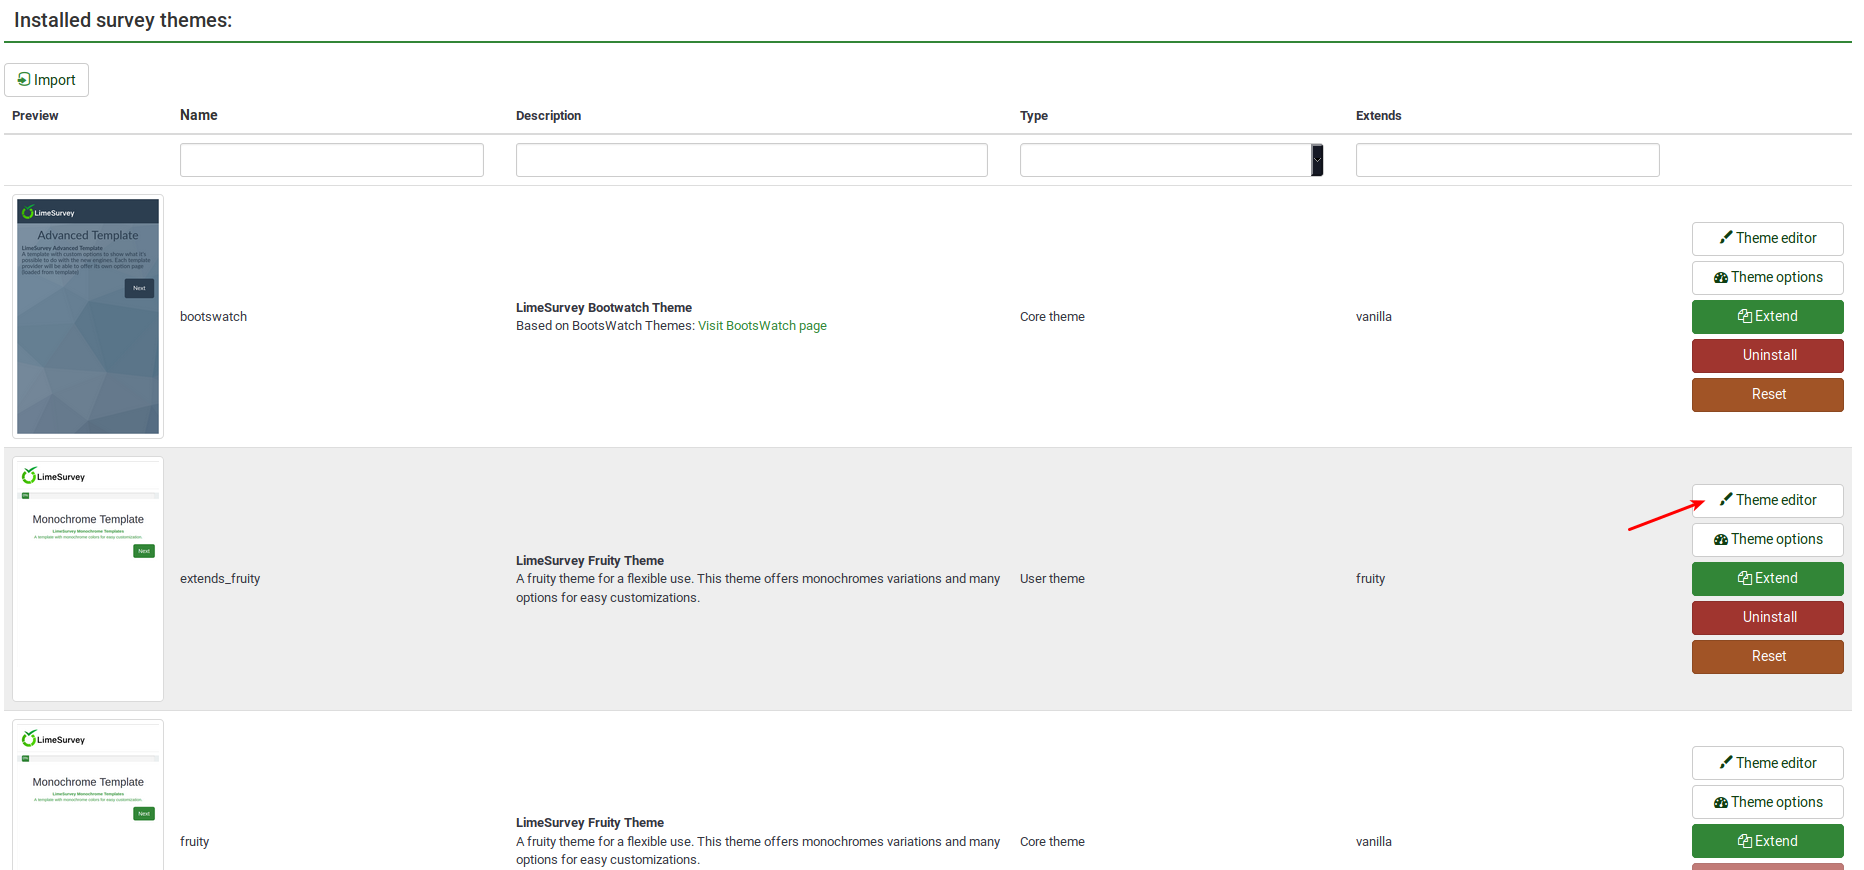
Click on the Theme editor button to edit the desired theme:
Look on the left side of the screen for the language_changer.twig file.
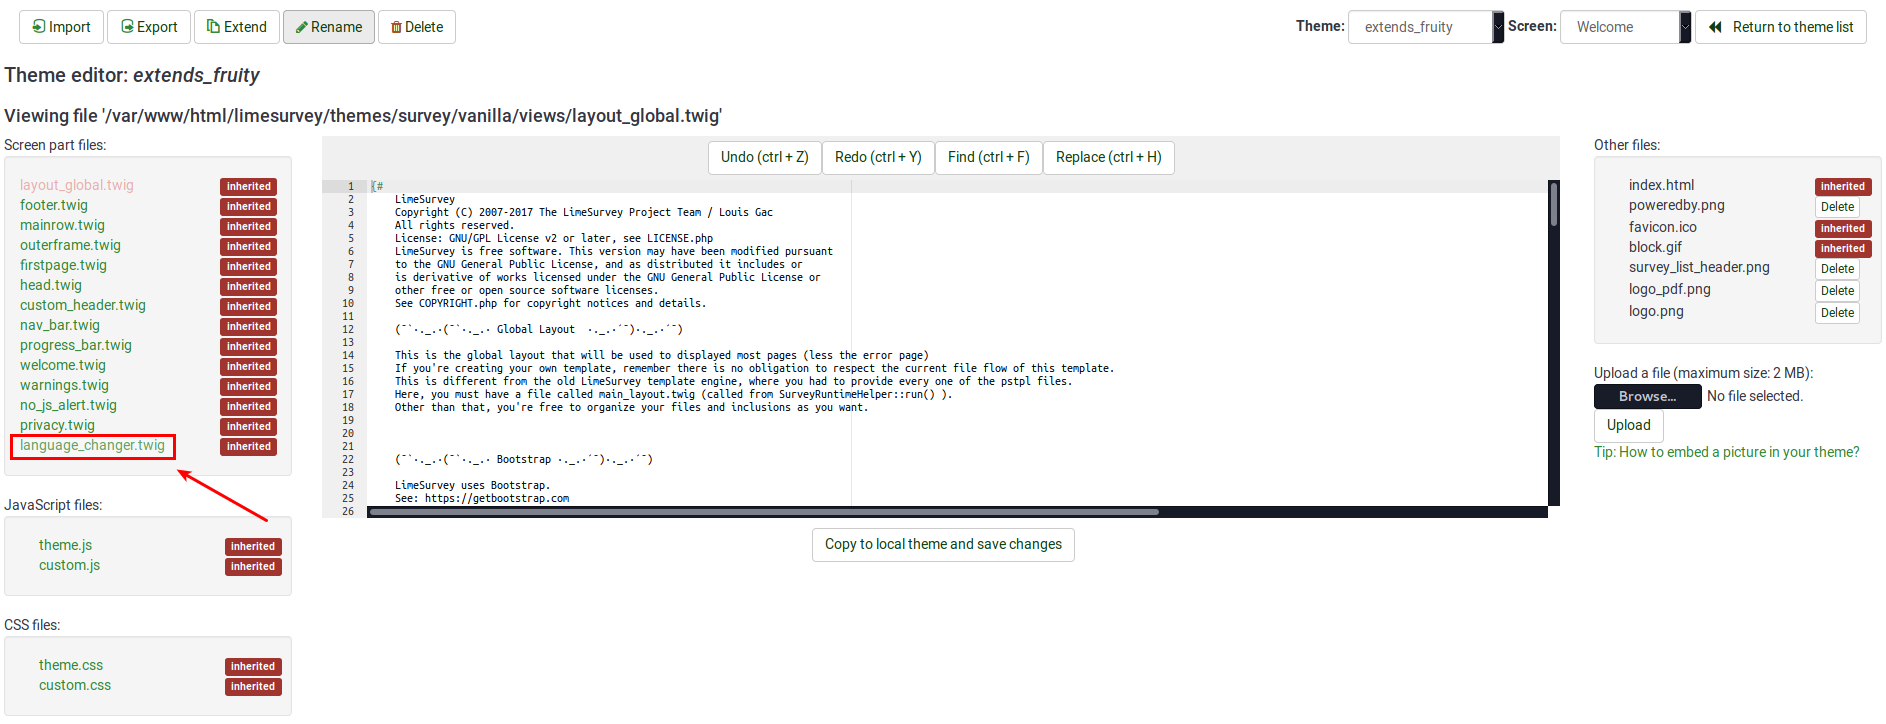
Go to the line that contains the following function:
{% if aSurveyInfo.alanguageChanger.show == true %}
Comment it out (replace "%" with "#") and copy the following line below it:
{% if false == true %}
The line should look like this in the end:

Click on "Copy to local theme and save changes".
Access your survey and select the edited theme from the general settings panel. Now, the welcome page should look like this:

To hide the top language switcher, we will follow pretty much the same steps as described above. We just have to access the right twig file to edit it. Access again the theme you wish to change, and then go to Screen which is located in the upper-right part of the window and select Navigation from the dropdown list. Now, look on the left side of the window for "language_changer_top_menu.twig". Click on it and comment out:
{% if aSurveyInfo.alanguageChanger.show == true %}
Add the following line below it:
{% if false == true %}
No language switcher will be displayed on the right side of the screen:

Image interest points and comments
A custom question theme for Slider Control Buttons for LimeSurvey 3.x can be found here - https://github.com/tpartner/LimeSurvey-Image-Interest-Points-3.x
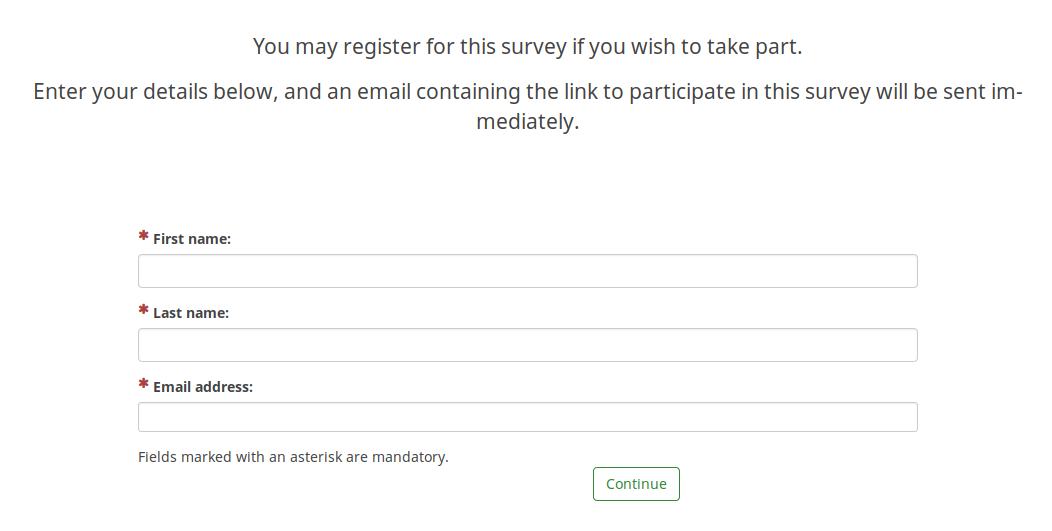
Public registration - mandatory fields
If you use a survey participants table and you also allow public registration, then users will be prompted by the following message:

As it can be observed above, only the email field is mandatory.
To have all three fields marked as being mandatory, please edit your survey theme accordingly. If you use Fruity, you have to go to the registration screen and see how the participants email field looks like:
        {# Participants email #}
        <div class='{{ aSurveyInfo.class.registerformcolrowc }} form-group row' {{ aSurveyInfo.attr.registerformcolrowc }}>
            <label {{ aSurveyInfo.attr.registerformcolrowclabel }} class='{{ aSurveyInfo.class.registerformcolrowclabel }}  control-label'> {{ gT("Email address:") }} {{ include('./subviews/registration/required.twig') }}</label>
            <div {{ aSurveyInfo.attr.registerformcolrowcdiv }}  >
                {{ C.Html.textField('register_email', aSurveyInfo.sEmail, ({'id' : 'register_email','class' : 'form-control input-sm','required' : true})) }}
            </div>
        </div>
After that, make sure to edit the first name and last name fields correspondingly by adding the label:
{{ include('./subviews/registration/required.twig') }}
and this line which makes the field mandatory to be filled out:
'required' : true
The edited file should look like this:
        {# Participants first name #}
        <div class='{{ aSurveyInfo.class.registerformcolrow }} form-group row' {{ aSurveyInfo.attr.registerformcolrow }}>
            <label for='register_firstname' class='{{ aSurveyInfo.class.registerformcolrowlabel }} control-label '>{{ gT("First name:") }} {{ include('./subviews/registration/required.twig') }}</label> {# extra label #}
            <div class="">
                {{ C.Html.textField('register_firstname', aSurveyInfo.sFirstName, ({'id' : 'register_firstname','class' : 'form-control', 'required' : true})) }} {# mandatory field #}
            </div>
        </div>

        <!--T:111-->
{# Participants last name #}
        <div class='{{ aSurveyInfo.class.registerformcolrowb }} form-group row' {{ aSurveyInfo.attr.registerformcolrowb }}>
            <label {{ aSurveyInfo.attr.registerformcolrowblabel }}  class='{{ aSurveyInfo.class.registerformcolrowblabel }} control-label '>{{ gT("Last name:") }} {{ include('./subviews/registration/required.twig') }}</label> {# extra label #}
            <div {{ aSurveyInfo.attr.registerformcolrowbdiv }} >
                {{ C.Html.textField('register_lastname', aSurveyInfo.sLastName, ({'id' : 'register_lastname', 'class' : 'form-control', 'required' : true})) }} {# mandatory field #}
            </div>
        </div>
Now, the public registration page should look like this (all the fields being mandatory):
Reverse slider
Slider with control buttons
A custom question theme for Slider Control Buttons for LimeSurvey 3.x can be found here - https://github.com/tpartner/LimeSurvey-Slider-Controls-3x